Securing Client Connections to MWS
All connections to MWS, except those requesting the documentation or the main page, must be authenticated properly. MWS uses a single-trusted-user authentication model, meaning a single user exists that has access to all aspects of MWS. The username and password for this user are configured with the auth.defaultUser properties in the configuration file. For more information, see Configuration.
When using the MWS user interface in a browser, the user will be prompted for username and password. For information on how to authenticate requests when not using a browser, see Authentication.

The username and password in the Basic Authentication header are encoded but not encrypted. Therefore, it is strongly recommended that MWS be run behind a proxy (like Apache) with SSL enabled. The instructions below provide an example of how to do this.
Encrypting Client Connections Using Apache and SSL
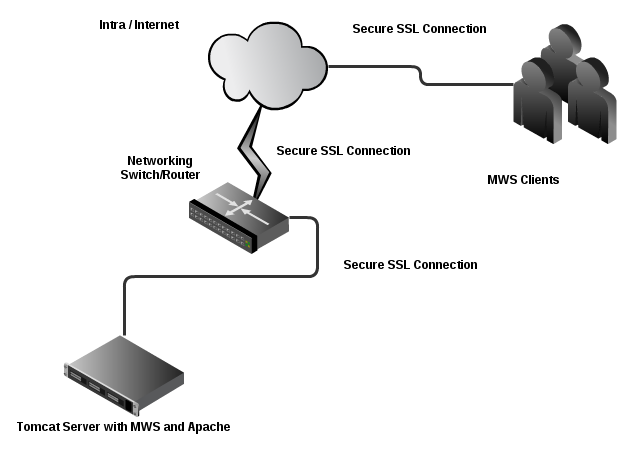
This section shows how to encrypt client connections to MWS using Apache and SSL. These instructions have been tested on CentOS™ 6.2 with the "Web Server" software set installed. The same ideas are applicable to other operating systems, but the details might be different. As shown in the diagram below, these instructions assume that Tomcat and Apache are running on the same server.
To encrypt client connections using Apache and SSL
- Create a self-signed certificate. (If desired, see http://www.openssl.org/docs/HOWTO/certificates.txt for more information.)
- Do the following:
- Run these commands:
- Edit make-dummy-cert and replace the answers() function with code similar to this:
- Run this command:
cd /etc/pki/tls/certs
cp -p make-dummy-cert make-dummy-cert.bak
cp -p localhost.crt localhost.crt.bak
answers() { echo US echo Utah echo Provo echo Adaptive Computing Enterprises, Inc. echo Engineering echo test1.adaptivecomputing.com echo }./make-dummy-cert localhost.crt
- Configure Apache to use the new certificate and to redirect MWS requests to Tomcat. To do so, edit /etc/httpd/conf.d/ssl.conf. Do the following"
- Comment out this line:
- Add these lines near the end, just above </VirtualHost>:
SSLCertificateKeyFile /etc/pki/tls/private/localhost.key
ProxyPass /mws http://127.0.0.1:8080/mws retry=5
ProxyPassReverse /mws http://127.0.0.1:8080/mws
- Configure Apache to use SSL for all MWS requests. Add these lines to the end of /etc/httpd/conf/httpd.conf:
- Give Apache permission to connect to Tomcat.
- Turn on Apache.
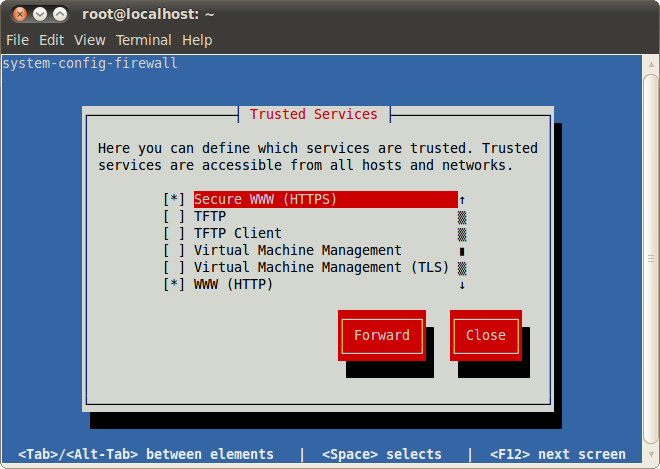
- Using system-config-firewall-tui, enable "Secure WWW (HTTPS)" and "WWW (HTTP)" as trusted services.
Instead of creating a self-signed certificate, you can buy a certificate from a certificate vendor. If you do, then the vendor will provide instructions on how to configure Apache with your certificate.
RewriteEngine On
RewriteCond %{HTTPS} off
RewriteRule (/mws.*) https://%{HTTP_HOST}%{REQUEST_URI}
setsebool -P httpd_can_network_connect 1
chkconfig httpd on
service httpd start
Encrypting Client Connections Using Tomcat and SSL
This section shows how to encrypt client connections to MWS using Tomcat and SSL but without requiring the use of Apache. These instructions have been tested on CentOS™ 6.2 with Tomcat 6.0.
To encrypt client connections using Tomcat and SSL
- First, you must generate a certificate. Do the following:
- Use the keytool utility that is shipped with the Oracle Java Runtime Environment. As the Tomcat user, run the following:
Specify a password value of "changeit". This will create a .keystore file that contains the new certificate in the user's home directory.
keytool -genkey -alias tomcat -keyalg RSA
- Enable the Tomcat SSL connector. Do the following:
- Open the server.xml file, usually located in $CATALINA_HOME/conf/ ($CATALINA_HOME represents the directory where Tomcat is installed).
- Verify the SSL HTTP/1.1 Connector entry is enabled. To do so locate the SSL HTTP/1.1 Connector entry and uncomment it.
- Save the server.xml file.
- Verify that server.xml is owned by the Tomcat user.
- Next modify the MWSweb.xml file. Add a security-constraint section to the $CATALINA_HOME/webapps/mws/WEB-INF/web.xml file found in your Tomcat directory.
- Now restart tomcat.
<Connector port="8443" protocol="HTTP/1.1" SSLEnabled="true" maxThreads="150" scheme="https" secure="true" clientAuth="false" sslProtocol="TLS" />
The code above enables SSL access on port 8443. The default for HTTPS is 443, but just as Tomcat uses 8080 instead of 80 to avoid conflicts, 8443 is used instead of 443.
chown -R tomcat:tomcat server.xml
<web-app>
   …
      <security-constraint>
         <web-resource-collection>
            <web-resource-name>MWS Secure URLs</web-resource-name>
            <url-pattern>/*</url-pattern>
         </web-resource-collection>
         <user-data-constraint>
            <transport-guarantee>CONFIDENTIAL</transport-guarantee>
         </user-data-constraint>
      </security-constraint>
</web-app>
Related Topics