6.37
This topic contains instructions on how to install Remote Visualization, including licensing and configuration information.

Remote Visualization uses the FastX product. The Remote Visualization installation includes installing the Remote Visualization Server (gateway server) and Remote Visualization on the Torque MOM Hosts (session servers).

Remote Visualization Server (gateway server) and the Remote Visualization Session Servers, must be configured in order for Remote Visualization to work.
In this topic:
- 6.37.1 Open Necessary Ports
- 6.37.2 Obtain and Install the Remote Visualization License
- 6.37.3 Configure the RLM Plugin
- 6.37.4 Configure Moab to use Moab Web Services as a Resource Manager
- 6.37.5 Install Remote Visualization
- 6.37.6 Configure the Gateway Server
- 6.37.7 Configure a Session Server
- 6.37.8 Copy the Session Server Configuration to the Remaining Session Servers
- 6.37.9 (Optional) Install Graphical Packages on Each Torque MOM Host
- 6.37.10 Configure Moab for Remote Visualization
- 6.37.11 Configure Viewpoint for Remote Visualization
If your site is running firewall software on its hosts, you will need to configure the firewall to allow connections to Remote Visualization.
Do the following:
- On the Remote Visualization Server (also known as the gateway server), do the following:
[root]# iptables-save > /tmp/iptables.mod
[root]# vi /tmp/iptables.mod

# Add the following lines immediately *before* the line matching
# "-A INPUT -j REJECT --reject-with icmp-host-prohibited"

-A INPUT -p tcp --dport 3000 -j ACCEPT
-A INPUT -p tcp --dport 3443 -j ACCEPT

[root]# iptables-restore < /tmp/iptables.mod
[root]# service iptables save
firewall-cmd --add-port=3000/tcp --permanent
firewall-cmd --add-port=3443/tcp --permanent
firewall-cmd --reload
[root]# vi /etc/sysconfig/SuSEfirewall2

# Add the following ports to the FW_SERVICES_EXT_TCP parameter as required

# Needed on the Moab server for off-host client communication
FW_SERVICES_EXT_TCP="3000 3443"

[root]# service SuSEfirewall2 restart
- On each Remote Visualization Session Server (Torque MOM Host), do the following:
[root]# iptables-save > /tmp/iptables.mod
[root]# vi /tmp/iptables.mod

# Add the following lines immediately *before* the line matching
# "-A INPUT -j REJECT --reject-with icmp-host-prohibited"

-A INPUT -p tcp --dport 3000 -j
-A INPUT -p tcp --dport 3443 -j ACCEPT
-A INPUT -p tcp --dport 6000:6005 -j ACCEPT
-A INPUT -p tcp --dport 16001 -j ACCEPT # if using gnome
-A INPUT -p tcp --dport 35091 -j ACCEPT # if using gnome
-A INPUT -p udp -m udp --dport 117 -j ACCEPT

[root]# iptables-restore < /tmp/iptables.mod
[root]# service iptables save
firewall-cmd --add-port=3000/tcp --permanent
firewall-cmd --add-port=3443/tcp --permanent
firewall-cmd --add-port=6000-6005/tcp --permanent
firewall-cmd --add-port=16001/tcp --permanent # if using gnome
firewall-cmd --add-port=35091/tcp --permanent # if using gnome
firewall-cmd --add-port=117/udp --permanent
firewall-cmd --reload
[root]# vi /etc/sysconfig/SuSEfirewall2

# Add the following ports to the FW_SERVICES_EXT_TCP parameter as required

# Needed on the Moab server for off-host client communication
FW_SERVICES_EXT_TCP="3000 3443 6000:6005 16001 35091" # ports 16001 and 35091 are only needed if using gnome

FW_SERVICES_EXT_UDP="117"

[root]# service SuSEfirewall2 restart
6.37.2 Obtain and Install the Remote Visualization License
Remote Visualization uses the RLM to validate the amount of open and available sessions.
These instructions assume you already have access to an RLM Server. See 6.38 Installing RLM Server for instructions on how to set up a new RLM Server.
Do the following:
- Email [email protected] and request an activation key. Adaptive Computing will send you the activation key in a return email.
- Once you have your activation key, do the following on the RLM Server:
- Install the license activation script and dependencies.
[root]# yum -y install perl-Crypt-SSLeay StarNetFastX2
[root]# zypper install perl-Crypt-SSLeay StarNetFastX2
- Run the license activation script.
/usr/lib/fastx2/install/activate
- When prompted:
- Enter the activation key.
- Enter how many seats (sessions) you want for this license.
When the license has generated you will see something similar to the following on the last line:
License activated and saved in /usr/lib/fastx2/rlm/FastX2-<date>.lic - Move the license file to the /opt/rlm directory.
mv /usr/lib/fastx2/rlm/FastX2-<date>.lic /opt/rlmThis license file references the default RLM Server port (5053). If the RLM Server in your configuration uses a different port, you will need to modify the license file to reflect the actual port.
- If you did not install an RLM Server using the file available from Adaptive Computing (for example, because your system configuration already uses one), do the following:
- Download the 'starnet.set' file from the Adaptive Computing Moab HPC Suite Download Center.
- Copy the 'starnet.set' file into the same directory where the Remote Visualization license resides (/opt/rlm).
- Remove the license activation script (StarNetFastX2 package).
[root]# yum -y remove StarNetFastX2
[root]# zypper remove StarNetFastX2
- Restart RLM.
[root]# service rlm restart
[root]# systemctl restart rlm.service
[root]# systemctl restart rlm.service
- Install the license activation script and dependencies.
6.37.3 Configure the RLM Plugin
Moab can schedule available remote visualization sessions by querying the RLM server for the number of active and total available sessions.
In order for Moab to schedule remote visualization sessions, Moab also needs to be configured to use Moab Web Services as a resource manager. See Configuring Moab Workload Manager in the Moab Web Services Reference Guide for more information.
Do the following:
- Using a web browser, navigate to your MWS instance (http://<server>:8080/mws/) and then log in as the MWS administrative user (moab-admin, by default).
- Select Plugins and then from the drop-down select Plugins to display the list of MWS plugins (displays Plugin List page).
- Click Add Plugin (displays Create Plugin page).
- Select RLM from the Plugin Type drop-down.
- Click Continue (displays the already built information for this plugin on the Create Plugin page).
- In the Configuration field, select Resource from the drop-down and then click Add Entry (adds the Resource key to the table). The following is an example of what your Create Plugin page should look like.
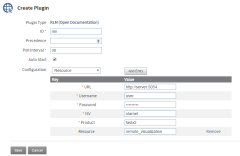
Click to enlarge
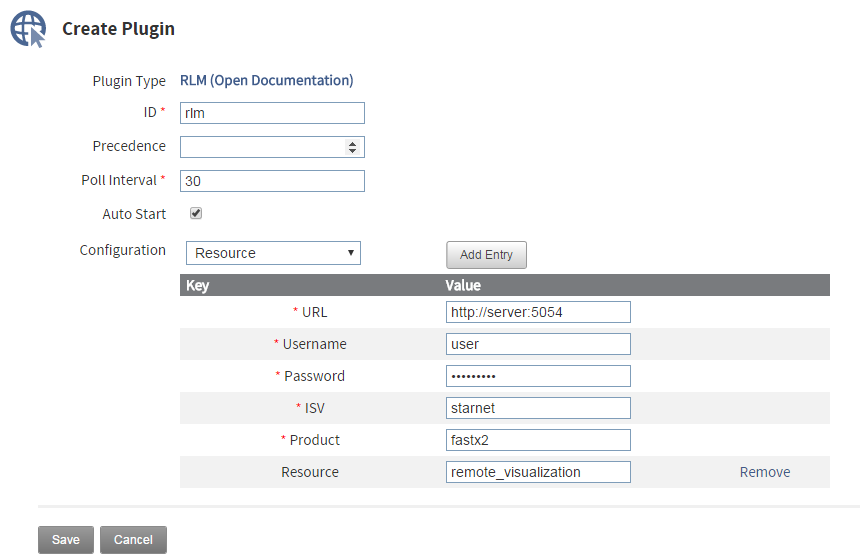
- Enter the key values. The following table describes the required information.
Key Value Description URL URL for the RLM Server web interface in the form: <protocol>://<rlm_server_host>:<rlm_web_interface_port>.
For example: http://server:5054
Username The username in the RLM Web interface; typically user. Password Password used by the user listed in the Username key. This is the password you set when you install the RLM. See Change the Default Passwords. ISV
Independent software vender for Remote Visualization. This value must be starnet. Product Name of the licensed product for Remote Visualization. This value must be fastx2. Resource Name of the resource to report to Moab Workload Manager. This value must be remote_visualization. - When finished, click Save to save your changes and close this page; otherwise click Cancel to reset all the changes.
The state should be "Started". If the state says "Errored", click Edit, modify the values as needed, click Update. Then from the Plugin Monitoring page, locate the RLM plugin and click the play icon.
- Log out of your MWS instance and close the web browser.
6.37.4 Configure Moab to use Moab Web Services as a Resource Manager
In order for Moab to schedule remote visualization sessions, Moab also needs to be configured to use Moab Web Services as a resource manager.
On the Moab Server Host, do the following:
- Add the following lines to /opt/moab/etc/moab.cfg:
RMCFG[mws]                      TYPE=MWS
RMCFG[mws]                      BASEURL=http://localhost:8080/mws
The BASEURL must match the configured URL of MWS
-
Add the following line to /opt/moab/etc/moab-private.cfg:
CLIENTCFG[RM:mws] USERNAME=moab-admin PASSWORD=changeme!
USERNAME and PASSWORD must match the values of auth.defaultUser.username and auth.defaultUser.password, respectively, found in the MWS configuration file. The MWS RM contacts MWS directly using the base URL, username, and password configured.
- Restart Moab Workload Manager.
[root]# service moab restart
[root]# systemctl restart moab.service
[root]# systemctl restart moab.service
6.37.5 Install Remote Visualization
Remote Visualization needs to be installed on the gateway server and on all the session servers (Torque MOM Hosts).
You must complete all the tasks earlier in this topic before installing Remote Visualization.
Do the following:
- Make sure that your DNS server is configured for reverse lookups. Without reverse DNS, Session Servers will fail to register with your Gateway Server. As a result, authentication requests to the Gateway Server will fail because the Gateway Server will not be able to connect to any Session Servers.
- Prepare the hosts for RPM installation. If you will be installing Remote Visualization on a host that does not have another RPM installation, complete the steps to prepare the host. See 6.31 Preparing the Host – Typical Method or 6.30 Preparing the Host – Offline Method.
- On the Remote Visualization Gateway Server Host and each Session Server Host, do the following:
- Install FastX and all its dependencies.
[root]# yum -y install ImageMagick-perl perl-Crypt-SSLeay perl-Net-SSLeay perl-X11-Protocol StarNetFastX2
If installing on RHEL, some packages may not be found in the standard RHEL distribution repositories. You will need to install the missing dependencies from EPEL or other reputable repositories.
[root]# zypper --non-interactive install perl-PerlMagick perl-Crypt-SSLeay perl-X11-Protocol StarNetFastX2 lsb-release
- Create or use an unprivileged account to login into fastx with admin privileges.
This is the <fastxadminuser>.
The following example uses the ace user and password. You can use an existing user, as long as that user can ssh into this host with a username/password pair.
[root]# useradd ace
[root]# passwd ace
- Add the node.js repository and refresh zypper.
[root]# zypper addrepo http://download.opensuse.org/repositories/devel:languages:nodejs/SLE_12/devel:languages:nodejs.repo
[root]# zypper refresh
Run the install.sh script on the Remote Visualization Gateway Server and on all of the Session Servers (Torque MOM Hosts).
Answer the questions raised by the install.sh script. For example:
[root]# /usr/lib/fastx2/install.sh
Do you have a license server on your network? [y/N] y
Enter the name (or IP address) of your license server: localhost
License file /usr/lib/fastx2/rlm/localhost.lic has been created.
Install/update the FastX web server? [Y/n] y
Creating a self-signed certificate... done.
A self-signed certificate has been created for this web server.
It will allow secure connections, but is vulnerable to a
man-in-the-middle attack. Because of this, connections will generate
warnings from the browser. These warnings (and the vulnerability) can be
eliminated later by installing a certificate from a certificate authority.
Setup initial admin user? [Y/n] y
The admin must be an existing Linux user, but not root.
The admin will be able to see and terminate any user's session,
add additional admins, and configure the server.
Enter admin account: ace
Starting FastX web service...
Starting fastx (via systemctl): [ OK ]
FastX Server listening on port 3000
FastX HTTPS Server listening on port 3443
done.
- Install FastX and all its dependencies.
- Viewpoint supports password-based authentication or key-based authentication for Remote Visualization. Enable each Session Server for your configuration's authentication type.
- For password-based authentication, do the following:
- Set the following parameters in /etc/ssh/sshd_config:
PasswordAuthentication yes
ChallengeResponseAuthentication no
- Restart the sshd service.
[root]# service sshd restart
[root]# systemctl restart sshd.service
[root]# systemctl restart sshd.service
- Set the following parameters in /etc/ssh/sshd_config:
For key-based authentication, do the following:
Log in as the FastX admin user and generate a ssh key.
- Accept the defaults.
A passphrase is not supported by Viewpoint. Leave this field empty.
[<fastxadminuser>@<hostname> ~]$ ssh-keygen -t rsa
Generating public/private rsa key pair.
Enter file in which to save the key (/home/<fastxadminuser>/.ssh/id_rsa):
Created directory '/home/<fastxadminuser>/.ssh'.
Enter passphrase (empty for no passphrase):
Enter same passphrase again:
Your identification has been saved in /home/<fastxadminuser>/.ssh/id_rsa.
Your public key has been saved in /home/<fastxadminuser>/.ssh/id_rsa.pub.
The key fingerprint is:
...
- Copy the generated id_rsa private key to a location where Viewpoint has access.
Set the generated id_rsa public key as an authorized key for the Gateway Server.
[root]# cat ~<fastxadminuser>/.ssh/id_rsa.pub >> ~<fastxadminuser>.ssh/authorized_keys ; chown <fastxadminuser>. ~<fastxadminuser>/.ssh/ -R
Copy the id_rsa public key to all the Session Servers and set it as an authorized key.
For documentation clarity, these instructions use node00 through node09 as the names of the Session Servers; with node00 designated as the initial Session Server.
[root]# for i in {00..09} ; do scp ~<fastxadminuser>/.ssh/id_rsa.pub node$i:<fastxadminuser home>:id_rsa.pub ; done
[root]# for i in {00..09} ; do ssh node$i "cat id_rsa.pub >> <fastxadminuser home>/.ssh/authorized_keys ; rm -f id_rsa.pub ; chownfastxadminuser>. <fastxadminuser home>/.ssh/ -R" ; done
- For password-based authentication, do the following:
6.37.6 Configure the Gateway Server
Do the following:
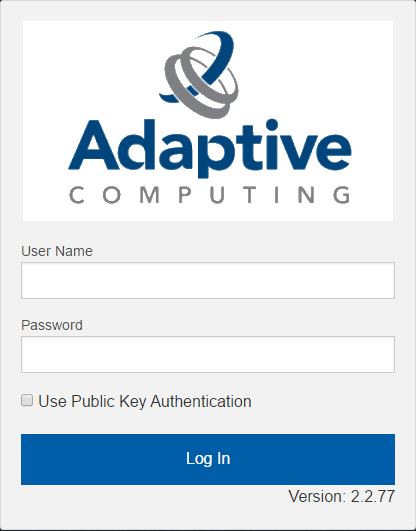
- Using a web browser, navigate to your secure Remote Visualization Gateway Server instance. (https://<gateway_host>:3443; where <gateway_host> is the IP address or name of the Gateway Server Host).
The Log In page displays. For example:
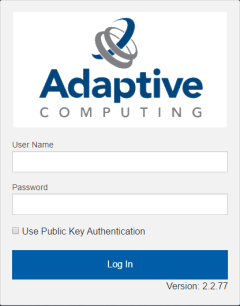
Click to enlarge
-
Log in as the FastX admin user. Do one of the following:
- If your authentication method is password-based, do the following:
- Enter the user name (default is "ace").
- Enter the password (default is "ace").
- Make sure the "Use Public Key Authentication" checkbox is cleared.
- Click Log In.
- If your authentication method is key-based, do the following:
- Enter the user name (default is "ace").
- Select the "Use Public Key Authentication" checkbox.
- A prompt will display asking for you to load your private key file.
- Click Upload Private Key File and navigate to your stored key file.
When your key file has uploaded it will be displayed in the prompt. For example:
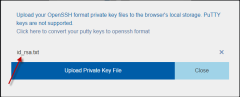
Click to enlarge
- Click Close. The prompt closes.
- Click Upload Private Key File and navigate to your stored key file.
- Click Log In.
-
Click the icon for Admin\System Configuration. The icon is circled in the example to assist in finding its location.
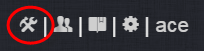
Click to enlarge
-
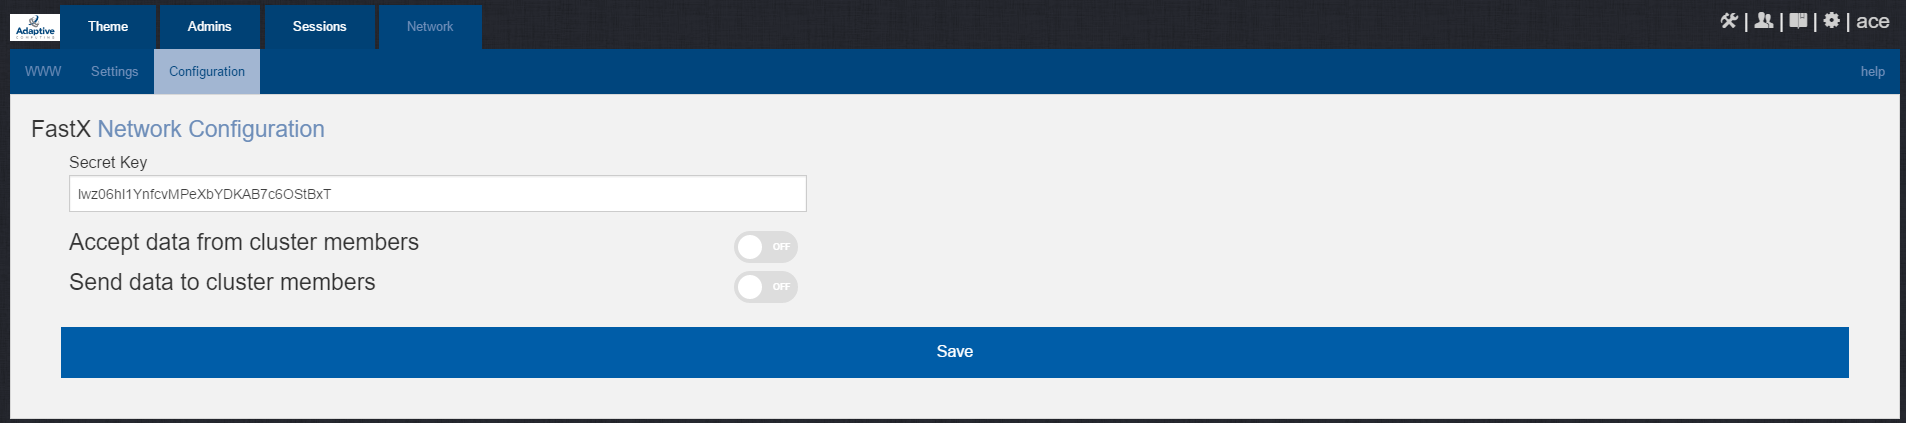
Select the Network tab. If it is not already selected, select the Configuration sub-tab to display the FastX Network Configuration page.

Click to enlarge
- Do the following:
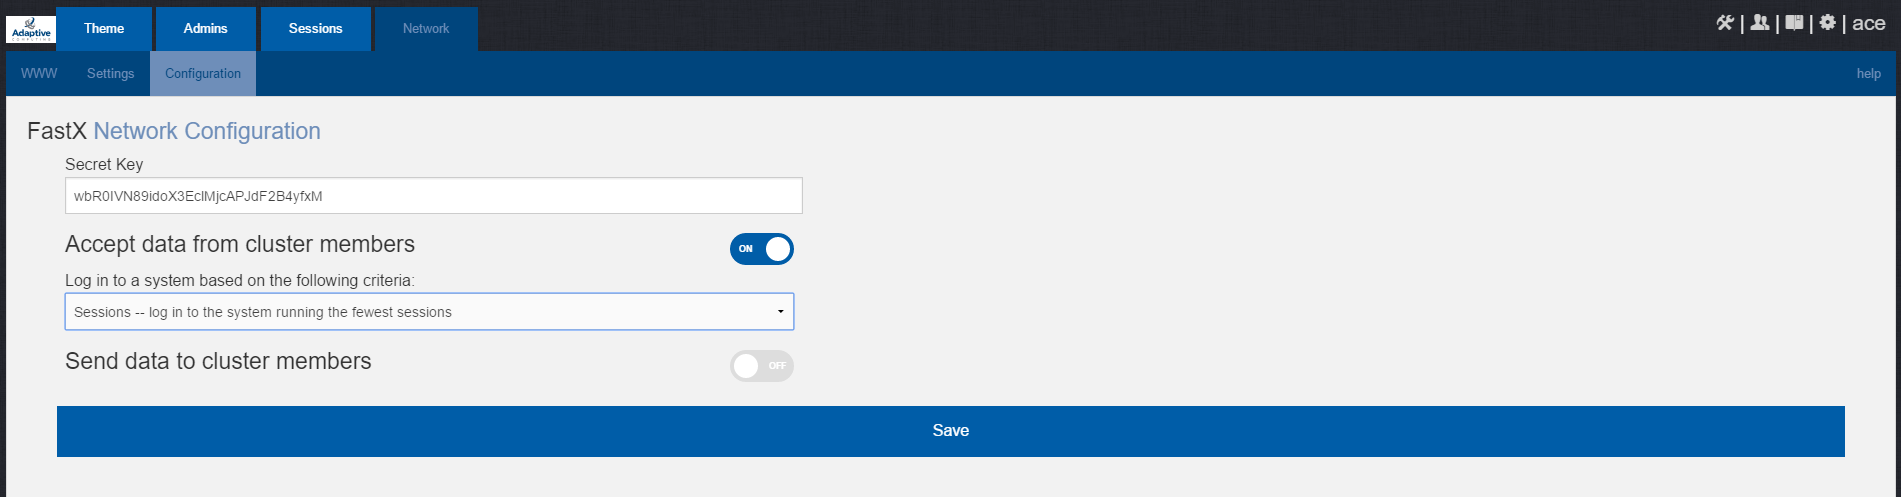
- In the Secret Key field is a FastX-generated key. Record this secret key (e.g. copy to your clipboard) because you will need it when configuring the Session Servers later in this topic. This key is different from the key file used to log in as the administrative user. You can also change the generated Secret Key if needed.
- Enable the connection to accept data from cluster member.
- In the box to specify the log in method, select "Sessions - log in to the system running the fewest sessions".
- Disable the Gateway Server from sending data to cluster members.
The following image is an example of the completed FastX Network Configuration page for the Gateway Server.
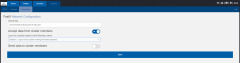
Click to enlarge
- Click Save to submit your changes.


6.37.7 Configure a Session Server
This section provides instructions on how to configure one Session Server (referred to as the initial Session Server). The configuration will then be copied to the additional Session Servers in your environment in a later procedure.
Do the following:
- Using a web browser, navigate to your secure Remote Visualization Session Server instance. (https://<session-host>:3443; where <session_host> is the IP address or name of the initial Remote Visualization Session Server Host).
The Log In page displays. For example:
Click to enlarge
-
Log in as the FastX admin user. Do one of the following:
- If your authentication method is password-based, do the following:
- Enter the user name (default is "ace").
- Enter the password (default is "ace").
- Make sure the "Use Public Key Authentication" checkbox is cleared.
- Click Log In.
- If your authentication method is key-based, do the following:
- Enter the user name (default is "ace").
- Select the "Use Public Key Authentication" checkbox. Upload the public key used when you configured the Gateway Server earlier in this topic.
- Click Log In.
When you first log in, you will get a message that you have no session running. That is expected.
-
Select the icon for Admin\System Configuration. The icon is circled in the example to assist in finding its location.
Click to enlarge
-
Select the Network tab. If it is not already selected, select the Configuration sub-tab to display the FastX Network Configuration page.
Click to enlarge
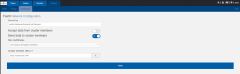
- Do the following:
- In the Secret Key field, remove the auto-generated key and enter the secret key provided when configuring the Gateway Server earlier in this topic.
You will not be able to login to the portal on the Gateway Server until you have completed the configuration of at least one Session Server. If you did not save it earlier, the secret key can be found in the /usr/lib/fastx2/config/network.json on the Gateway Server.
- Disable the connection to accept data from cluster members.
- Enable the Gateway Server to send data to cluster members.
- In the box to specify whether to SSL certificates, select "I am using a self-signed certificate".
- In the Cluster member URLs box, to the following:
- Click the + icon.
- In the box that displays, enter the IP address or name and the port number of the Gateway Server you just configured (for example: "https://mgmtnode:3443").
The following image is an example of the completed FastX Network Configuration page.
Click to enlarge
- In the Secret Key field, remove the auto-generated key and enter the secret key provided when configuring the Gateway Server earlier in this topic.
- Click Save to submit your changes.

6.37.8 Copy the Session Server Configuration to the Remaining Session Servers
After you configured the initial Session Server, the settings are saved in the network.json file.
For documentation clarity, these instructions use node00 through node09 as the names of the Session Servers; with node00 designated as the initial Session Server.
If the upgrade required you to configure a session server in the prior step, on the initial Session Server Host, copy the network.json file to the remaining Session Server Hosts in your environment, and restart the FastX service.
[root]# for i in {01..09} ; do scp /usr/lib/fastx2/config/network.json root@node$i:/usr/lib/fastx2/config/network.json ; donee
[root]# for i in {01..09} ; do ssh node$i "chown fastx. /usr/lib/fastx2/config/. -R" ; done
[root]# for i in {01..09} ; do ssh node$i "service fastx restart" ; done
6.37.9 (Optional) Install Graphical Packages on Each Torque MOM Host
A few graphical packages are available to let you easily submit remote visualization jobs from Viewpoint (install a desktop environment).
One each Torque MOM Host, do the following:
[root]# yum -y groupinstall "Desktop" "Desktop Platform" "X Window System" "Fonts"
[root]# yum -y install xterm
-
Non-RHEL systems (e.g. CentOS and Scientific Linux)
[root]# yum -y groupinstall "GNOME Desktop" "X Window System" "Fonts"
[root]# yum -y install xterm
-
RHEL systems
[root]# yum -y groupinstall "GNOME" "X Window System" "Fonts"
[root]# yum -y install xterm
[root]# zypper install gnome-desktop
[root]# zypper install -t pattern gnome-basic x11
6.37.10 Configure Moab for Remote Visualization
On the Moab Server Host, verify the /opt/moab/etc/moab.cfg file contains the following uncommented parameter:
JOBCFG[remote_visualization] FLAGS=usemoabjobid SELECT=TRUE
This parameter configuration specifies that Moab will reference remote visualization jobs by their internal Moab job id. However, the job's output and error files will still be generated by your resource manager (for exampe, Torque). This means that, even though your job will get assigned a Moab job id, your job's output and error file names will reference the resource manager's job id (for example, job.oX).
If you need the job's output files to match the same job id as your Moab job, append the following parameters to your moab.cfg:
RMCFG[pbs] SYNCJOBID=TRUE FLAGS=ProxyJobSubmission
RMCFG[internal] JOBIDFORMAT=integer
Be advised that these appended parameters are not recommended for all systems; especially if your configuration includes customizations. If your system is not working as expected, contact Adaptive Computing support for assistance.
If you have made changes to the moab.cfg file, make sure you restart Moab.
[root]# service moab restart
[root]# systemctl restart moab.service
[root]# systemctl restart moab.service
6.37.11 Configure Viewpoint for Remote Visualization
Do the following:
- Using a web browser, navigate to your Viewpoint instance (http://<server>:8081) and then log in as the MWS administrative user (moab-admin, by default).
-
Click Configuration from the menu and then click Remote Visualization Services from the left pane.
The following is an example of the Remote Visualization Configuration page.

Click to enlarge
- Enter the hostname (or IP address) and port number for the FastX gateway server in the Gateway Server field (do not use localhost if you intend to submit remote viz jobs from other hosts). For example, https://<server>:3443.
- If your Remote Visualization configuration was set up using self-signed certificates, confirm the Trust Self Signed check box is selected.
- Enter the FastX admin user you specified when you installed the Remote Visualization Server in the Username field. For example, ace.
- If your configuration will authenticate using the password-based method, do the following:
- Select Password Based Authentication from the Authentication Method box.
- Enter the FastX admin user's password in the Password field.
The /etc/ssh/sshd_config file on each Session server must be configured to enable password authentication. See 6.37.5 Install Remote Visualization earlier in this topic for more information.
- If your configuration will authenticate using the key-based method, do the following:
- Select Key Based Authentication from the Authentication Method box.
- Click UPLOAD KEY and navigate to the copy of the generated .ssh/id_rsa file.
- Click TEST to confirm your settings are correct.
- Click SAVE to submit your settings.

6.37.12 Grant Users Remote Visualization Permissions in Viewpoint
For users to be able to predefine requirements for Remote Visualization jobs and/or submit Remote Visualization jobs, the user must have the appropriate role must be added to the principal to which the user belongs.
These are the Viewpoint Roles for Remote Visualization:
- RemoteVizAdmin – Administrative user, with permission to create remote visualization application templates and manage other user's remote visualization jobs.
- RemoteVizUser – Basic user, with permission to create and manage their own remote visualization jobs.
See Creating or Editing Principals in the Moab Viewpoint Reference Guide for more information.