6.40
This topic contains instructions on how to install Moab Viewpoint (Viewpoint).
In this topic:
- 6.40.1 Prerequisites
- 6.40.2 Install Viewpoint Server
- 6.40.3 Enable Access to the Viewpoint File Manager
- 6.40.4 License Viewpoint
- 6.40.5 Configure Viewpoint
- 6.40.6 Configure File Manager
- 6.40.7 Verify Base Roles are Present
- 6.40.8 Grant Users Access to Viewpoint

Viewpoint requires a connection to Moab Server and MWS installed on the shared host. Viewpoint may also be installed on that shared host or on a different host. For documentation clarity, the instructions refer to the shared Moab Server and MWS Server host as the Moab Server Host and the host on which you install Viewpoint Server as the Viewpoint Server Host.
In this section:
- 6.40.1.A Security Enhanced Linux
- 6.40.1.B Open Necessary Ports
- 6.40.1.C Configure the ViewpointQueryHelper Plugin
6.40.1.A Security Enhanced Linux
For Red Hat-based systems where Security Enhanced Linux (SELinux) is enforced, you need to adjust SELinux to allow the web server to make network connections and create and write to the log file.
On the Viewpoint Server Host, do the following:
- To determine the current mode of SELinux, run getenforce.
[root]# getenforce
- If the command returns a mode of Disabled or Permissive, or if the getenforce command is not found, you can skip the rest of this procedure.
- If the command returns a mode of Enforcing, you can choose between options of customizing SELinux to allow the web GUI to perform its required functions or disabling SELinux on your system.
- If you choose to customize SELinux:
SELinux can vary by version and architecture and these instructions may not work in all possible environments.
[root]# yum install policycoreutils-python
[root]# semanage permissive -a httpd_t
- If you choose to disable SELinux:
[root]# vi /etc/sysconfig/selinux

SELINUX=disabled

[root]# setenforce 0
- If you choose to customize SELinux:
If your site is running firewall software on its hosts, you will need to configure the firewall to allow connections to the necessary ports.
In this section:
- Open the Viewpoint PostgreSQL Database Port (5432)
- Open the Apache Web Server Port (8081)
- Open the Viewpoint File Manager Port (8443)
Open the Viewpoint PostgreSQL Database Port (5432)
Viewpoint requires access to the Viewpoint PostgreSQL database. Depending on your system configuration, your PostgreSQL databases may not be installed on the same host as their corresponding component servers. For example, you may choose to install the Viewpoint PostgreSQL database on the same host where you have installed the Insight PostgreSQL database instead of on the Viewpoint Server Host.
If you choose to install the Viewpoint PostgreSQL database on a different host from where you will install Viewpoint Server, do the following on the Viewpoint Database Host:
[root]# iptables-save > /tmp/iptables.mod
[root]# vi /tmp/iptables.mod

# Add the following lines immediately *before* the line matching
# "-A INPUT -j REJECT --reject-with icmp-host-prohibited"

-A INPUT -p tcp --dport 5432 -j ACCEPT

[root]# iptables-restore < /tmp/iptables.mod
[root]# service iptables save
[root]# firewall-cmd --add-port=5432/tcp --permanent
[root]# firewall-cmd --reload
[root]# vi /etc/sysconfig/SuSEfirewall2

FW_SERVICES_EXT_TCP="5432"

[root]# service SuSEfirewall2 restart
Open the Apache Web Server Port (8081)
On the Viewpoint Server Host, do the following:
[root]# iptables-save > /tmp/iptables.mod
[root]# vi /tmp/iptables.mod

# Add the following lines immediately *before* the line matching
# "-A INPUT -j REJECT --reject-with icmp-host-prohibited"

-A INPUT -p tcp --dport 8081 -j ACCEPT

[root]# iptables-restore < /tmp/iptables.mod
[root]# service iptables save
[root]# firewall-cmd --add-port=8081/tcp --permanent
[root]# firewall-cmd --reload
[root]# vi /etc/sysconfig/SuSEfirewall2

FW_SERVICES_EXT_TCP="8081"

[root]# service SuSEfirewall2 restart
Open the Viewpoint File Manager Port (8443)
On the Moab Server Host, do the following:
[root]# iptables-save > /tmp/iptables.mod
[root]# vi /tmp/iptables.mod

# Add the following lines immediately *before* the line matching
# "-A INPUT -j REJECT --reject-with icmp-host-prohibited"

-A INPUT -p tcp --dport 8443 -j ACCEPT

[root]# iptables-restore < /tmp/iptables.mod
[root]# service iptables save
[root]# firewall-cmd --add-port=8443/tcp --permanent
[root]# firewall-cmd --reload
[root]# vi /etc/sysconfig/SuSEfirewall2

FW_SERVICES_EXT_TCP="8443"

[root]# service SuSEfirewall2 restart
6.40.1.C Configure the ViewpointQueryHelper Plugin
You will need to configure the MWS ViewpointQueryHelper plugin to allow Viewpoint to query the Insight MongoDB (MongoDB host, database, port, and user information).
Do the following:
- Using a web browser, navigate to your MWS instance (http://<server>:8080/mws/) and then log in as the MWS administrative user (moab-admin, by default).
- Select Plugins and then from the drop-down select Plugins to display the list of MWS plugins (displays Plugin List page).
- Click the viewpoint-query-helper plugin to view this plugin's information (displays Show Plugin page).
- Click Edit to modify the Configuration table fields (displays Edit Plugin page). The following is an example of the Edit Plugin page.

Click to enlarge
- Modify the values as needed. The following table describes the required information.
Key Value Description host Name or IP address of the host on which Insight MongoDB resides. database Name of the MongoDB database to which Insight writes. port Port number for Insight MongoDB (typically 27017). user User name with which MWS connects to Insight MongoDB. password Password used by the user listed in the value for the "user" key. This is the user name and password you specified when installing Insight. See the step "Add the required MongoDB users to Insight MongoDB and Moab MongoDB; regardless of whether they share a host." for the user and password information.
- When finished, click Update to save your changes and close this page (return to the Show Plugin page); otherwise click Cancel to reset all the changes.
- When satisfied with the values, on the Show Plugin page, confirm that the State is "Started". If it is not, go to Plugins, select Plugin Monitoring, and start the plugin using the green start button.
- Log out of your MWS instance and close the web browser.

See also About Moab Web Services Plugins in the Moab Web Services Reference Guide for more information.
6.40.2 Install Viewpoint Server
You must complete the prerequisite tasks earlier in this topic before installing the Viewpoint Server. See 6.40.1 Prerequisites.
Do the following:
- If you are installing Viewpoint on its own host or on a host that does not have another RPM installation, complete the steps to prepare the host. See 6.31 Preparing the Host – Typical Method or 6.30 Preparing the Host – Offline Method.
- Set up PostgreSQL for Viewpoint.
These instructions assume you will install the Viewpoint PostgreSQL database on the same host as the Insight PostgreSQL database (strongly recommended). Depending on your system configuration, this may be the on the Insight Server Host or on the PostgreSQL Database Host.
If you choose to install the Viewpoint PostgreSQL database on a host that does not already have a PostgreSQL database, you will need to install the Viewpoint PostgreSQL database. See 6.36.2.C Install PostgreSQL for more information.
On the host containing the Insight PostgreSQL, do the following:
[root]# su - postgres
[postgres]$ psql
CREATE USER moab_viewpoint WITH PASSWORD 'changeme!';
CREATE DATABASE moab_viewpoint WITH OWNER=moab_viewpoint;
\q
[postgres]$ exit
- On the Moab Server Host, install the moab-viewpoint-filemanager package.
- Update zypper.
[root]# zypper update zypper
- Install the package.
[root]# yum install moab-viewpoint-filemanager
[root]# yum install python-setuptools
[root]# zypper install moab-viewpoint-filemanager
- Using the instructions in /opt/acfileman/utils/certs-handling/Readme.txt, follow these steps:
Step 1. Create CA (Certificate Authority).
Step 2. Create server (WebDav server) certificate and key.
Step 3. Create client certificate and key.
Step 4. Configure WebDav server.
For example:
[root]# cd /opt/acfileman/utils/certs-handling
[root]# ./ac-cert-tool.sh create-ca
[root]# ./ac-cert-tool.sh create-server-cert --altnames 127.0.0.1,localhost <moab_host>
[root]# ./ac-cert-tool.sh create-client-cert
[root]# bash certs/servers/<moab_host>/install-server-certs.sh -u root:root -p 600 /opt/acfileman/etc/
[root]# vi /opt/acfileman/etc/uwsgi.ini
Provided you followed the above steps, your key files will have been installed in /opt/acfileman/etc/server-cert.pem and /opt/acfileman/etc/server-key.pem. To change the location where your certificates are stored, edit the /opt/acfileman/etc/uwsgi.ini file accordingly.
- Configure the file manager port to be used.
[root]# vi /opt/acfileman/etc/wsgi.conf

# In the SERVER OPTIONS section, edit the line that says "port = 8001"
port = 8443
- Configure the moab-viewpoint-filemanager package to start up at system boot and start the moab-viewpoint-filemanager.
[root]# chkconfig acfileman on
[root]# service acfileman restart
[root]# systemctl enable acfileman.service
[root]# systemctl restart acfileman.service
[root]# systemctl enable acfileman.service
[root]# systemctl restart acfileman.service
- Update zypper.
- On the Moab Server Host, enable negative job priority and remote visualization features.
- Set the ENABLENEGJOBPRIORITY parameter in /opt/moab/etc/moab.cfg.
[root]# vi /opt/moab/etc/moab.cfg
ENABLENEGJOBPRIORITY TRUE
You must set this Moab parameter to support Viewpoint features that enable users to specify user priorities for their jobs. See Advanced Settings in the Viewpoint Reference Guide for more information on enabling user priorities for jobs.
- If using the Remote Visualization features, set the USEMOABJOBID parameter in /opt/moab/etc/moab.cfg.
[root]# vi /opt/moab/etc/moab.cfg
USEMOABJOBID TRUE
- Restart Moab.
[root]# service moab restart
[root]# systemctl restart moab.service
[root]# systemctl restart moab.service
- Set the ENABLENEGJOBPRIORITY parameter in /opt/moab/etc/moab.cfg.
-
On the Moab Server Host, register Viewpoint as a client in MWS.
- Edit the grails.plugin.springsecurity.oauthProvider.clients array in /opt/mws/etc/mws-config.groovy and specify a client id and a client secret. Leave the authorizedGrantTypes field unchanged.
The following is a suggested script for generating the client secret:
dd if=/dev/urandom count=24 bs=1 2>/dev/null | base64
[root]# vi /opt/mws/etc/mws-config.groovy grails.plugin.springsecurity.oauthProvider.clients = [ [ clientId: "viewpoint", clientSecret: "<ENTER-CLIENTSECRET-HERE>", authorizedGrantTypes: ["password"] ] ] - Restart Tomcat.
[root]# service tomcat restart
[root]# systemctl restart tomcat.service
[root]# systemctl restart tomcat.service
- Edit the grails.plugin.springsecurity.oauthProvider.clients array in /opt/mws/etc/mws-config.groovy and specify a client id and a client secret. Leave the authorizedGrantTypes field unchanged.
- On the Viewpoint Server Host, do the following:
- Install the moab-viewpoint package.
[root]# yum install moab-viewpoint
[root]# zypper install moab-viewpoint
- (Optional) Configure virtual hosts. The moab-viewpoint package installs a file for Apache.
/etc/httpd/conf.d/viewpoint.conf
/etc/apache2/conf.d/viewpoint.conf
Virtual host configurations should be made within this file. See http://httpd.apache.org/docs/2.2/vhosts/ for more information.
- Edit the /opt/viewpoint/etc/viewpoint.cfg values as needed. The following is an example of the viewpoint.cfg file with the default values.
[admin]
username = viewpoint-admin
password = pbkdf2_sha256$20000$ZHeToCJgrSUH$+xmzYdhpqZCJokxO9eGzyr2B6jrfCgLlBT+pBgMis4w=

[environment]
VIEWPOINT_DATABASE_NAME = moab_viewpoint
VIEWPOINT_DATABASE_PASSWORD = changeme!
VIEWPOINT_DATABASE_USER = moab_viewpoint
VIEWPOINT_DATABASE_HOST = localhost
VIEWPOINT_DATABASE_PORT = 5432

[settings]
past_hours = 24
future_hours = 4
Be aware of the following:
- [admin] username: The admin username must not be the same as the auth.defaultUser.username in mws-config.groovy.
- [admin] password: For security purposes, the admin password is encrypted. In the example, the default is the encrypted equivalent to "changeme!", which is the default for the Viewpoint instance. Change this default password to a different encrypted password.
To encrypt the password, do the following (substituting "changeme!" with your password):
[root]# echo -n 'changeme!' | /opt/viewpoint/bin/viewpoint makehash
Using default hasher
pbkdf2_sha256$20000$ZHeToCJgrSUH$+xmzYdhpqZCJokxO9eGzyr2B6jrfCgLlBT+pBgMis4w=
The default hashing algorithm is pbkdf2_sha256. To show the other available algorithms, run /opt/viewpoint/bin/viewpoint makehash --help
bcrypt_sha256 and bcrypt are not supported on Red Hat 7-based systems.
[environment]: "changeme!", although unencrypted, is the default for the Viewpoint database password. If you do not change this password, your Viewpoint database will not be secure. For tips on choosing a good password, see https://www.us-cert.gov/ncas/tips/ST04-002.
- [settings]: These values are used to limit the threshold for the Resource Job Timeline. See Resource Job Timeline Page in the Moab Viewpoint Reference Guide.
Viewpoint has a number of environment variables used to configure a Viewpoint installation and troubleshoot operating issues. See 6.60.1 General configuration issues for more information about Viewpoint environment variables.
- Initialize Viewpoint's PostgreSQL database.
[root]# /opt/viewpoint/bin/viewpoint migrate
- Start (or restart) the Apache service.
[root]# chkconfig httpd on
[root]# service httpd restart
[root]# systemctl enable httpd.service
[root]# systemctl restart httpd.service
[root]# systemctl enable apache2.service
[root]# systemctl restart apache2.service
- Install the moab-viewpoint package.
6.40.3 Enable Access to the Viewpoint File Manager
This section finishes the SSL authentication steps you began when you installed moab-viewpoint-filemanager -- that is, Step 5 of /opt/acfileman/utils/certs-handling/Readme.txt that you skipped earlier.
Do the following:
- On the Moab Server Host, do the following:
[root]# cd /opt/acfileman/utils/certs-handling/certs [root]# scp ca/ca-cert.pem client/client-cert.pem client/client-key.pem root@<viewpoint_host>:/opt/viewpoint/lib/viewpoint/webdav_client - On the Viewpoint Server Host, set the mode, owner, and group of the files you copied over.
[root]# cd /opt/viewpoint/lib/viewpoint/webdav_client
[root]# chmod 600 ca-cert.pem client-key.pem client-cert.pem
[root]# chown apache:apache ca-cert.pem client-key.pem client-cert.pem
[root]# service httpd restart
[root]# cd /opt/viewpoint/lib/viewpoint/webdav_client
[root]# chmod 600 ca-cert.pem client-key.pem client-cert.pem
[root]# chown apache:apache ca-cert.pem client-key.pem client-cert.pem
[root]# systemctl restart httpd.service
[root]# cd /opt/viewpoint/lib/viewpoint/webdav_client
[root]# chmod 600 ca-cert.pem client-key.pem client-cert.pem
[root]# chown wwwrun:www ca-cert.pem client-key.pem client-cert.pem
[root]# systemctl restart apache2.service
Do the following:
- Using a web browser, navigate to your Viewpoint instance. (http://<viewpoint_host>:8081; where <viewpoint_host> is the IP address or name of the Viewpoint Server Host).
- Log in as the Viewpoint administrative user (viewpoint-admin, by default) using the password you set in the Viewpoint installation instructions.
The Viewpoint administrative user has very limited rights.
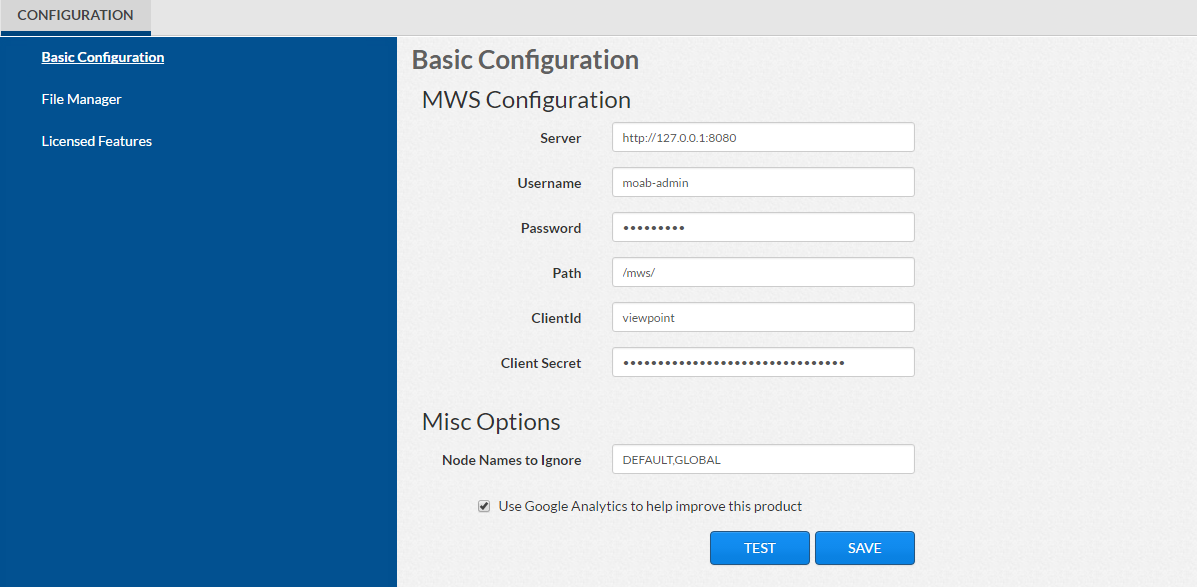
The Configuration page displays with only the authorized features. The following is an example of what you will see once you first log in.

Click to enlarge
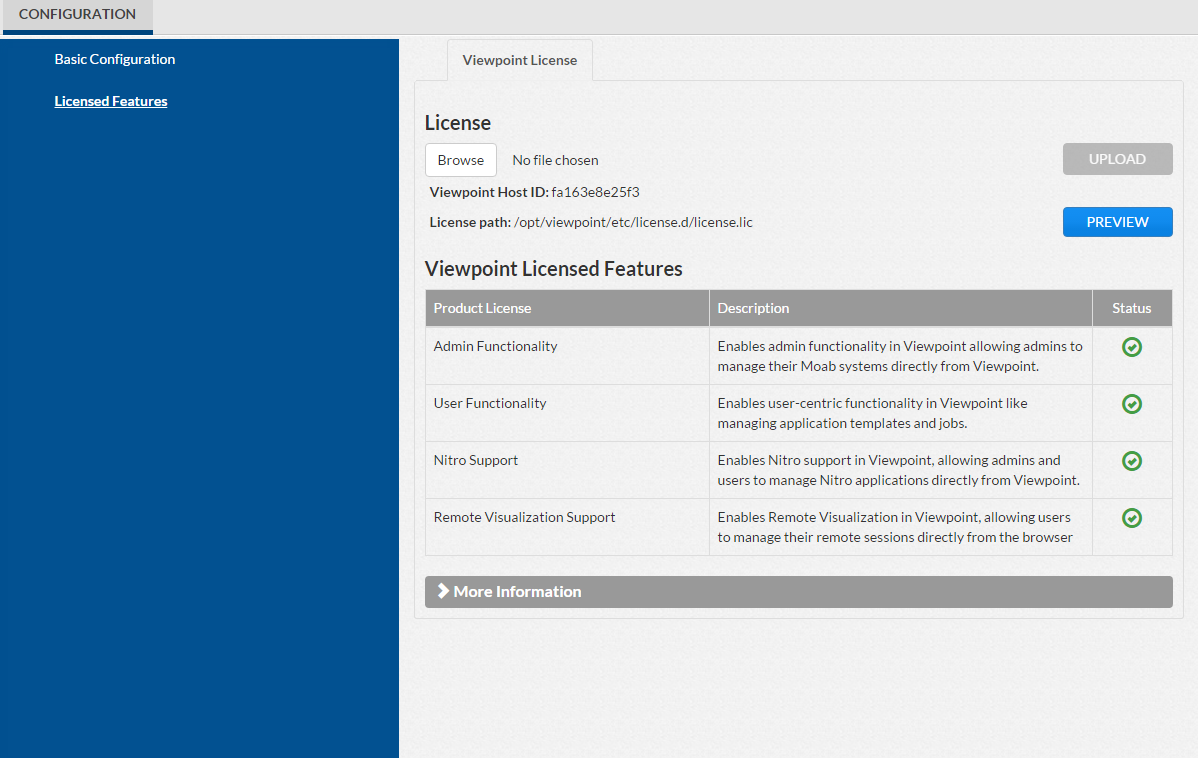
- Select Licensed Features from the left page. The Licensed Features page appears with only the Viewpoint tab available.
- In the License section, locate the Viewpoint Host ID.
- Email [email protected] with that hostid.
- Adaptive Computing will generate the license and send you the Viewpoint license (.lic) file in a return email.
- Save the Viewpoint license in a safe location.
- Go back to your Viewpoint instance and log in again as the Viewpoint administrative user and navigate to the Licensed Features page.
- Click Browse, navigate to where you saved the Viewpoint License file, and then click Open.
- Click Upload.
- Once the license file has uploaded, the Viewpoint License information shows green check boxes for your licensed features and displays the path to your uploaded license file under the Viewpoint Host ID information. The following is an example of what you will see once the license file is uploaded.

Click to enlarge
- Click Preview to view the contents of the license file you uploaded
- You can also expand the More Information section to see expiration information.
Do the following:
- If you have not already done so, log into your Viewpoint instance as the Viewpoint administrative user.
The Configuration page displays.
- In the MWS Configuration area, do the following:
- In the Server field, enter the URL for MWS on the Moab Server Host (for example: "http://server:8080").
If your configuration uses a secure connection between Viewpoint and MWS, the URL must contain "https" and the secure port.
- In the Username and Password fields, enter the MWS administrator credentials. You can find these credentials in /opt/mws/etc/mws-config.groovy on the Moab Server Host. Look for auth.defaultUser.username and auth.defaultUser.password.
- In the Path field, the default value (/mws/) is already filled in. Leave it as is unless you have installed MWS with a non-default path.
- In the Client Id and Client Secret fields, enter the values that you set during the Viewpoint installation. Refer back to the step (On the Moab Server Host, register Viewpoint as a client in MWS.) earlier in this topic.
- In the Server field, enter the URL for MWS on the Moab Server Host (for example: "http://server:8080").
- In the Misc Options area, do the following:
In the Node Names to Ignore field, enter the nodes that you want Viewpoint to ignore. Separate node names with a comma (,).
Choose whether you wish to use Google Analytics to help improve this product.
- Click TEST to confirm the settings are correct.
- Click SAVE to submit your settings.
Do the following:
- If you have not already done so, log into your Viewpoint instance as the Viewpoint administrative user.
- Select File Manager from the left pane. The File Manager Configuration page appears.
The following image is an example of the File Manager Configuration page.

Click to enlarge
- Modify the values as needed. The following table describes the required information.
- The client SSL certificate will be verified.
- Viewpoint will use the given certificate when connecting to File Manager Service.
- Click TEST to confirm the settings are correct.
- Click SAVE to submit your settings.

| Field | Description |
|---|---|
| Server URL | The name of the Moab Server host on which you installed the File Manager Service and the port number for the File Manager Service (for example, "https://server:8443"). |
| Server Verify SSL |
When enabled: |
| SSL Certificate File | The location of the SSL certificate file on the Viewpoint Server. Usually, /opt/viewpoint/lib/viewpoint/webdav_client/client-cert.pem. |
| SSL Certificate Key | The location of the SSL certificate key on the Viewpoint Server. Usually, /opt/viewpoint/lib/viewpoint/webdav_client/client-key.pem. |
| CA Bundle File | The location of the CA bundle file on the Viewpoint Server. Usually, /opt/viewpoint/lib/viewpoint/webdav_client/ca-cert.pem. |
| Server Root Path | The root URL path where File Manager Service publishes its API (usually it is simply "/"). |
| Accessible Roots |
The root folders that users can access from the File Manager page. This can be used to limit users' access to certain directories, without giving them access to the "/" folder on the remote file system (RFS). Separate root folders with a colon (for example, /home:/usr/share/groups).
For example, if you define /home and /usr/share/groups as accessible roots, although users will be able to see a tree similar to the following, the users will not be able to see (access) anything inside /usr other than "share" and anything inside "share" other than "groups".
|
- /home/
     |
      - user1/
      - user2/
      - youruser/
- /usr/
     |
      - share/
          |
           - groups/
|
| Maximum Upload Size (bytes) | Total amount of data that can be uploaded in a single file. A value of '-1' means unlimited. |
6.40.7 Verify Base Roles are Present
Viewpoint comes configured with several default (base) roles. See Differences in version 9.0 of the Moab HPC Suite Release Notes for more information.
As part of the Viewpoint installation, you will need to verify that the base roles are present.
Do the following:
- Assuming that you are still logged in as the Viewpoint administrator, do the following:
- Sign out.
- Log in as the MWS administrative user (moab-admin, by default).
- Click Configuration from the menu. The Basic Configuration page displays with additional options in the left pane. For example:

Click to enlarge
- Click Roles from the left pane. The Role Management page displays.

Click to enlarge
- If all the roles shown above are present, continue with the procedure in 6.40.8 Grant Users Access to Viewpoint.
However, if any of the roles displayed on the Role Management page shown above are not present, you will need to recreate (restore) the base roles.
- If you need to recreate the base roles, the Recreate Base Roles button displays on the Role Management page. For example:

Click to enlarge
- Click Recreate Base Roles. Viewpoint will restore the roles.


6.40.8 Grant Users Access to Viewpoint
For a user to be able to access Viewpoint, he or she must be a member of a principal.
Do the following:
- Using a web browser, navigate to your Viewpoint instance. (http://<viewpoint_host>:8081; where <viewpoint_host> is the IP address or name of the Viewpoint Server Host)
- Log in as the MWS administrative user (moab-admin, by default).
- Click Configuration from the menu. The Basic Configuration page displays.
- Click Principals from the left pane.
- Create one or more principals. See Creating or Editing Principals in the Moab Viewpoint Reference Guide for instructions on setting up principals.
Viewpoint comes configured with an admin and a user role that you can assign to the principals. You can also modify the default roles and create new roles as needed. See About Roles in the Moab Viewpoint Reference Guide for more information.
Related Topics