4.4
This topic identifies how the application template information is organized and the fields and functions available when creating or editing an application template.
See 4.2 Create Application Template Page for more information about creating application templates.
See 4.3 Edit Application Template Page for more information about editing application templates.
In this topic:
- 4.4.1 Application Template Name – Identifies the name for the application template.
- 4.4.2 Application Template Type - Identifies the type for the application template.
- 4.4.3 Available Fields – Provides information on the available fields and how the fields are organized.
- 4.4.4 Field Information and Actions – Provides a general explanation of the field functions; including how to show or hide fields.
- 4.4.5 Application Template Permissions – Provides information on how to restrict the users who have access to this application template.
- 4.4.6 Published/Unpublished Application Template – Provides information regarding the difference between published and unpublished application templates.
- 4.4.7 Job Submission Script – Explains how to access and use the Script Builder window to manage the job submission script for the application template.
- 4.4.8 Application Template History - Identifies the version for the application template. Provides information on saving a template as a new view version, viewing a template's history, and reverting to previous template versions.
4.4.1 Application Template Name
The name of the application template appears towards the top of this page. Using the example in this topic, the application template title is "Untitled Application Template". The application template name is displayed in the application template list shown in the Application Templates page.
To edit the template name, click on the name label and enter the desired name.
4.4.2 Application Template Type
Directly under the application template name, you can specify the application template type. To choose, select one of the options from the drop-down menu. The available application template types are:
- HPC Application
- Job Array
- Remote Visualization
- Nitro Application
When editing an existing application template, you can modify the application template to create job arrays by changing the application template type to Job Array.
The available fields used for creating/editing application templates are grouped into five areas. Specifically:
- 4.4.3.A Application Description
- 4.4.3.B Basic Settings
- 4.4.3.C Advanced Settings
- 4.4.3.D Node Policy Settings
- 4.4.3.E Custom Settings
Expand an area to view its fields. This section provides information on these different areas and their associated fields. See 4.4.4 Field Information and Actions for information on using the fields.
4.4.3.A Application Description
This area lets you provide a description for your application template. Use this area to tell users any necessary information to use or access this application template. This field provides multiple options for styling and formatting, among other ways to make your description more detailed.
The following image shows the Application Description area.

|
|
Click to enlarge |
This area, as well as the Advanced Settings area, contains Moab-specific input for the job. If the template will be used for creating job arrays, the Basic Settings area also specifies starting and ending job indexes.
This area breaks the basic setting information into functional groups. The information will also be grouped similarly on the Job Details page.
The following images are examples of the functional groups.
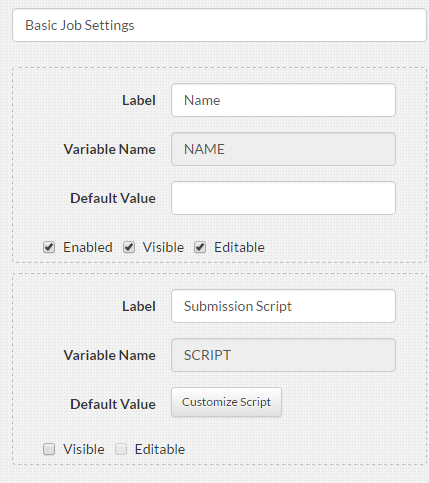
- Basic Job – contains settings for basic information like the name assigned to jobs created with this template and the submission script used to submit jobs. See 4.4.7 Job Submission Script for more information about creating a job submission script.
- Time Management – contains delay start and job duration settings.
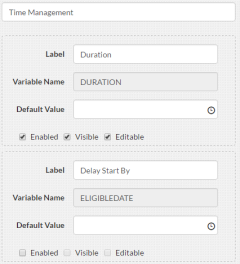
Click to enlarge
- Credentials – settings for specifying job ownership, resource usage, policy enforcement, etc. See 1.1 Credential Overview for more information.
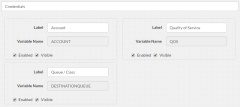
Click to enlarge
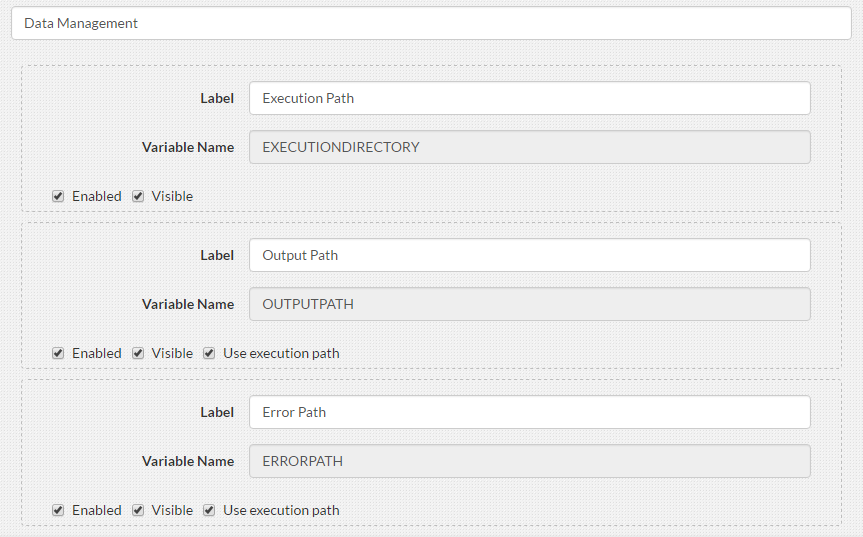
- Resources – contains architecture, memory, and core settings.
- Data Management – settings for job execution directory, output, and error reporting. Check the Use execution path box to use the execution path for the output path or error path.
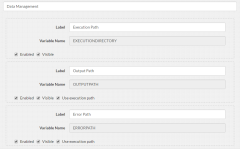
Click to enlarge
|
|
Click to enlarge |
If the Template Type for the application template is set to Job Array, the Basic Settings area also contains settings for job indexes.

|
|
Click to enlarge |


|
|
Click to enlarge |
Use the up and down arrows to increment or decrement the resource values. Click the settings icon  to set minimum, maximum, and step values to be used when incrementing and decrementing the resource setting.

|
|
Click to enlarge |
This area contains advanced inputs that can be requested to Moab for the job such as whether to include Moab environment variables at job submission time. You can also define job environment variables that can be used when creating submission scripts.
The following image is an example of the Advanced Settings area.

|
|
Click to enlarge |

When enabled, the User Priority field requires the Moab ENABLENEGJOBPRIORITY server parameter set to "TRUE". This Moab parameter should have been set when Viewpoint was installed. See Moab Parameters in the Moab Workload Manager Reference Guide for more information on this parameter.
This area contains policies that can be requested to Moab for the job such as whether to include Moab environment variables at job submission time.
The following image is an example of the Node Policies Settings area.

|
|
Click to enlarge |
This area lets you add any custom settings to a template. You can add new custom settings widgets by clicking Left, Fill, or Right to specify whether the widget is to appear in the left column, right column, or fill both columns.

|
|
Click to enlarge |
When you add a custom setting, you can then specify the control that will be displayed to set the custom setting's value, a label to be displayed on the control, a variable name, and default value for the variable. Depending on the type of control you select, other settings may be required.

|
|
Click to enlarge |
4.4.4 Field Information and Actions
This section describes the different information and actions available for the fields in the Basic Settings, Advanced Settings, and Custom Settings areas of the application template.
- Label – User-friendly name shown for the field on the Create/Edit Job page. This is typically similar to the variable name.
- Variable Name – Actual name of the variable widget that will contain the user’s input. For Basic and Advanced Settings areas, this is the Moab variable for that field and cannot be changed. For the Custom Settings area, this variable can be any name that does not conflict with a Moab input variable. See 4.4.7 Job Submission Script for a list of Moab variable widgets.
- Default Value – Lets you specify a default value that will be used when creating/editing a job. Depending on the type of variable for this field, this can be a selection list, a drop-down to select a date/time, or a space to write in the value. If it is a date/time or write-in value, leave this empty if you do not want to assign a default value to the widget's variable and input fields.
- Enabled, Visible, Editable check boxes – These three check boxes control if and how fields are used in the application template.
- Enabled – When checked, this field is activated; meaning that this information is reported. At this time only two fields (Job Arrays and User Priority) require activation. If Job Arrays is enabled, then only job arrays can be created using this application template. If User Priority is enabled, users are able to make changes to the user priority information for the job (this option requires additional configuration, see 4.4.3.C Advanced Settings).
- Visible – When checked, this field will be displayed on the Create/Edit Job page. This check box requires the Enabled check box, if present, to be checked.
- Editable – When checked, users can provide information for this field when creating/editing a job. This check box requires the Visible check box to be checked.
4.4.5 Application Template Permissions
In addition to being able to restrict which fields the user may see or edit, you can also restrict who has access to the application template itself. This is done using the Permissions area at the top right of the page.
The following image is an example of the Permissions area.

|
|
Click to enlarge |
Using this area you can restrict access by:
- Users. In the Users field, type the IDs of the users. Viewpoint will check if the users you added are valid; that is, has a valid operating system account. If the user is valid, the user name turns green; otherwise it turns red. Use "ALL" to remove restrictions.
- Group associations. In the Groups field, type the IDs of the groups. Viewpoint will check if the groups you added are valid; that is, has a valid operating system account. If the group is valid, the group ID turns green; otherwise it turns red. Use "ALL" to remove restrictions.
- Account associations. In the Accounts field, select from the available accounts listed in the drop-down. Leave blank to remove restrictions.
4.4.6 Published/Unpublished Application Template
Viewpoint also lets you configure whether this application template is available (published) for use.
When an application template is marked "Unpublished" only the creator of the application template or template admins can view/edit the application template; regardless of the Permissions settings. In addition, the application template does not appear in the application templates list when a user creates a job.
On the Create/Application Template page, under the "Permissions" area, select the appropriate radio button for the publish status.
You can also change the publish status directly from the drop-down menu in the Application Templates page. See 4.1.3 Additional Functions.
Viewpoint provides a Submission Script widget on the Application Template Details page (in the Basic Job Settings area). This widget provides a Script Builder window where you can create/edit, upload, or export the script information.
In order for users to submit jobs using the application template, the application template must have a defined job submission script. As with any field in the application template, you can choose whether to make the script visible and editable by the user when creating a job.
Click Customize Script (located in the Default Value area in the Submission Script field) to access the Script Builder window.
The following image is an example of the Script Builder window.

|
|
Click to enlarge |
Using this window you can:
- Create/edit a script.
- Add/edit the lines for the script in the left pane.
- You can drag and drop the available variables from the right pane into the left pane. Hover the mouse over the variable to view its description. The right pane includes variables defined in the Advanced Settings area. When used in the script, the variables shown in the right pane are highlighted and the number of times the variable is used in this script is displayed.
- From inside the left pane, click Ctrl+Space to access to a list of variables. You can select the variables directly in this list instead of having to drag them from the right pane.
- Click DONE EDITING to save the script and close the window.
- Add/edit the lines for the script in the left pane.
- Import an existing script. You can import a script from your local computer or from your RFS.
- Export the script. Exporting a script lets you export a copy of your script to your RFS. Then you can import the script for application templates to use.
See 3.8 Creating or Editing a Job Submission Script for more information about creating and editing job submission scripts.
4.4.8 Application Template History
Viewpoint creates a new version of the application template every time you edit an application template. The Template History Manager window displays a history of the versions and lets you manage the versions. Once an application template has been edited and saved, the next time you go to edit the template, a History button is provided. Click this button to view the Template History Manager window.
The following image is an example of the Template History Manager window.

|
|
Click to enlarge |
The Template History Manager window displays a list of the different versions for the application template in a column format and provides operations for managing the versions of an application template. The following table describes the different columns and their contents.
Column titles that are underlined indicate that you can sort (ascending or descending) the column contents.
| Column Heading | Description |
|---|---|
| Name | Name used to identify the application template. |
| Version | The version number for the version of the application template. |
| Changed By | Name of the user who last edited the application template. |
| Description | A description of the application template version. |
| Operations |
Icons representing operations that can be performed on the application template version.
|
 – Makes this version of the application template the current version.
  – Deletes this version of the application template.
  – Exports this version of the application template.
Related Topics