HPC Pack 2008 R2 SP 1 is required for MSMHPC and Moab 6.1. Follow instructions in the Windows HPC Server 2008 Reviewers Guide to install and configure Microsoft Windows HPC Server 2008 R2.
- Deploy the Windows head node (Microsoft Windows HPC 2008 R2), configure static IP addresses, disable IPV6, and add AD Server role if no Enterprise AD is present.
 | Turn off IPv6 support, both on the head node and compute
nodes, if you are not going to use it as it might conflict with your setup. |
If you deploy nodes automatically, consider modifying the Windows diskpart.txt script to leave free space at the end of the drive. This script is located at C:\Program Files\Microsoft HPC Pack 2008\Data\InstallShare\Config\diskpart.txt. Note that the partition size is in MB.
| Verify the NTFS partition does not fill the entire drive when you install HPC 2008 R2 on the compute nodes. |
select disk 0
clean
create partition primary size=150000
select partition 1
assign letter=c
format FS=NTFS LABEL="Node" QUICK OVERRIDE
active
exit
Because the DHCP server requests are answered by an external DHCP server by default, disable the DHCP Server Role in Windows.
- Install HPC Pack 2008 R2 on the Windows head node.
- Configure HPC Pack. Create the Default ComputeNode Template including the OS installation steps.
- Remove the DHCP Server Role from the Windows head node, otherwise the WDS DHCP server will interfere with the DHCP server running on Linux.
- Install MSMHPC Service on the Windows head node.
| When installing MSMHPC, MSMHPC Manager prompts to create a default configuration file if one does not exist on startup. It then prompts to restart the service. |
| The MSMHPC installer makes necessary registry
changes to the WDS during installation so that they do not interfere
with the DHCP server running on Linux. If the HPC Pack is
reinstalled, the administrator must ensure that the DHCP Server Role
is removed and that the HPC settings are reset using the MSMHPC
Manager. |
1.1.1 Automating the Home Directory and SSH Key Creation
- Share /home through NFS
#cat /etc/exports
/home *(rw,sync)
/data/network-install *(ro,sync)
- Add NFS share to etc/fstab:
# for i in node01 node02 node03 node04 ; do ssh ${i} "echo x36-lhn:/home /home nfs defaults 0 0 >> /etc/fstab"; done
- Mount NFS share:
# for i in node01 node02 node03 node04 ; do ssh ${i} mount /home ; done
- Create home directories for all the AD users:
# for i in `wbinfo -u` ; do su ${i} -l -c echo ; done
- Generate new keys.
# for i in `wbinfo -u` ; do su ${i} -l -c "ssh-keygen -t rsa -q -f ~${i}/.ssh/id_rsa -N \"\"" ; done
# for i in `wbinfo -u` ; do su ${i} -l -c "cp .ssh/id_rsa.pub .ssh/authorized_keys" ; done
1.1.2 Installing the MSMHPC Services
To set up Windows to enable Moab and HPC 2008 R2 integration, do the following:
- Obtain the latest MSMHPC Server package (MSMHPC Installer-6.1.0)
| MSMHPC requires .NET 3.5 SP1. |
- Install the MSMHPC Server package.
- Run the setup package to launch the MSMHPC Setup Wizard.
- Read the License Agreement. If you accept the terms in the license, click Next.
- On the Select Installation Folder page, verify the installation path is correct, specify whether you want to make the installation available across all users or just for your user, and click Next.
| Typically, you will want to select the default option ("Just me") as regular users will not be able to read/write to the MSMHPC installation directory. |
- When the Installation Complete page opens, click Close to exit the wizard.
- Launch MSMHPC Manager. (Depending on selected preferences, you might be able to double-click the MSMHPC Manager shortcut on your desktop to launch MSMHPC Manager.)
- Click Configure and make adjustments in the MSMHPC Manager Configuration forms according to your requirements. The following offers explanations for some of the fields:
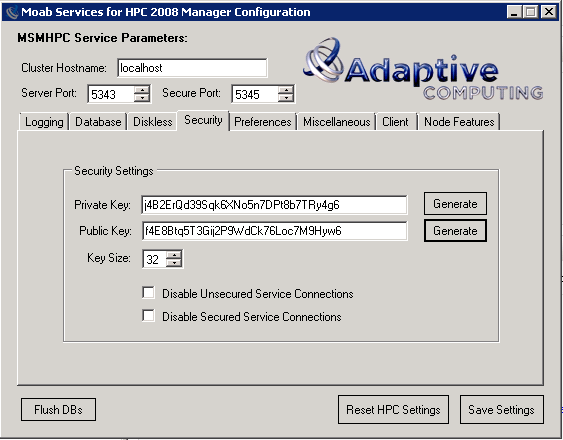
- Security tab
- Server Port: Used to configure an unsecured service port.
- Secure Port: Used to configure a secure service port.
- Private Key: This is used to authenticate privileged actions required by the MSMHPC Tools to the MSMHPC Service.
You can specify a unique key or click the Generate button. Clicking Generate creates a random key using the number of bytes specified in the Key Size option box.
- Public Key: This is used to authenticate unprivileged actions required by the MSMHPC Tools to the MSMHPC Service.
You can specify a unique key or click the Generate button. Clicking Generate creates a random key using the number of bytes specified in the Key Size option box.
|
|
The Disable Unsecured Service Connections and Disable Secured Service Connections options disable the non-SSL port and the SSL secured port configured at the top of the window. You cannot disable both secured and unsecured ports for the web service at once. |
- Database tab:
- Type: This is used to change the database type from the default SQL Compact Edition.
| Moab Adaptive HPC currently supports Microsoft SQL Compact Edition, SQL Server, and SQL Server Express. SQL Compact Edition is the recommended database for small installations of fewer than 64 nodes. For large scale clusters above 64 nodes, SQL Server and SQL Server Express are recommended. |
- Connection String: This is used to modify the connection string. If you switch the database type, you must change to a valid connection string.
- Generate Default String: This is used to overwrite the current connection string with a valid one if you do not know which to use with the selected database.
| As long as the correct permissions are in place, the schemas and databases generate automatically. SQL Compact Edition and SQL Server/Express and their schema are automatically added to the database if the correct credentials are present. To create a new SQL Compact Edition database, verify that the connection string points to a .sdf file that does not yet exist. MSMHPC creates the file and the schema at startup. |
- Preferences tab
- Cron Timeout: If you want MSMHPC to be more responsive, you can lower the Cron Timeout setting to 10000 milliseconds (10 seconds), but doing so consumes more CPU.
- Exclude Nodes: Exclude certain nodes from being reported to Moab by entering a comma-delimited list or regular expression.
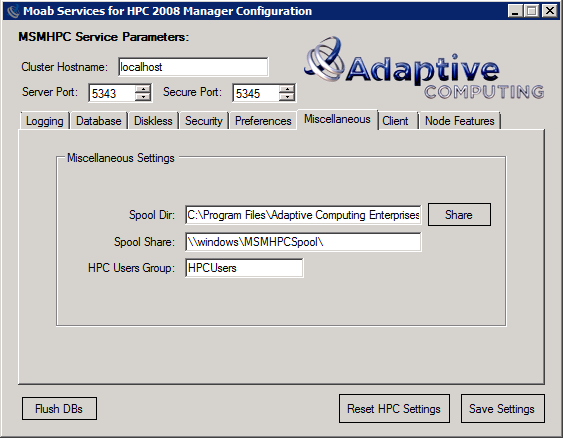
- Miscellaneous tab
- Spool Dir: Change to a local directory that is shared by the network path specified by the Spool Share parameter.
- Spool Share: Change this to a network share reachable by all the compute nodes. This share should point to the local directory specified in Spool Dir.
| The default MSMHPC share is created by the DNS host name of the head node. For instance, the default location of the spool share for head node windows.domain.com is \\windows\MSMHPCSpool\ |
| The default values for both Spool Dir and Spool Share should be acceptable because the setup application automatically creates a share. |
- HPC Users Group: The default group in which users are placed when the create.ad.account.pl script is used.
- Client tab: Click Generate Client Config to create Moab configuration files. This will save two files to your desktop: moab.cfg and moab-private.cfg. You will use these two files later to configure Moab (see Moab Configuration).
- Click Save Settings. Then, when prompted, click Yes to restart the MSMHPC Service.
|
|
Most of the settings should be automatically set up during the installation process. After installing MSMHPC, the administrator should click Save Settings (even if no changes were made) to create a pair of shared keys. |
- Exit the Manager Configuration and return to the MSMHPC Manager. Click Start or stop to identify whether the MSMHPC Service is running. If it is not running, click Start.
- On MSMHPC Manager, click Check.
- Click Check Service to again confirm that the MSMHPC Service is running.
- Specify the location of the Web Service in the Web Service URL field. The suggested URL should be correct.
- Click Check Web to confirm that the Public Web Service is running.
- On MSMHPC Manager, click Test to open the MSMHPC Manager Test Form.
- Click Get Nodes.
If nodes are reported, then MSMHPC is communicating correctly with the Windows HPC job scheduler.
- For Linux users to submit jobs to the HPC cluster, they must exist as users on the Windows domain. To add users to the domain, do the following:
- Open the User Administration GUI. (Start→Administrative Tools→Active Directory Users and Computers)
- Click Users in the left navigation window.
- On the toolbar, click Create Users.
- Fill in the user's information.
- Click Next.
- Create a password for the user. You may allow the user to create a password, but the password must be the same for both the Windows and Linux environments for write access to the home directory on both systems. Ensure that the user is not required to change the password at the next login. Click Finish.
- Right-click the newly created user name and make any additional changes needed, such as adding the user to additional groups, for example.
To submit jobs from Moab, all Linux users must have the same user credentials as the credentials on the Windows system. If the head node is a compute node as well as the domain controller, a policy disables users from logging in to that node. Consider only using the head node as a compute node if that machine is not the domain controller for the cluster.
1.1.3 Reinstalling the HPC Pack
If you encounter a situation in which you need to reinstall the HPC Pack, take the following into consideration:
- If you want to deploy HPC nodes automatically using Microsoft Windows Deployment Services but rely on an external DHCP server to reply to PXE requests, then you need to remove the DHCP Server Role.
- You need to reset the HPC Scheduler settings so that MSMHPC can have control over it. To do so, run the MSMHPC Manager from your desktop, go to Configure and click Reset HPC Settings.
- You need to cache all the user's credentials. You can do this by running the user.cache.pl script from your Linux head node, using the MSMHPC Manager (Test → Service Operations) or by using the provided MSMHPCCacheCredentialsCLI or MSMHPCCacheCredentialsGUI applications inside the directory where you installed the MSMHPC Services. For more information, see Cache User Credentials.