Configuring Moab Cloud Suite for xCAT
The information in this section instructs you on how to configure Moab Cloud Suite for xCAT and how to get your system ready to submit services. It contains these topics:
- Installing and configuring the xCAT connector
- Installing and configuring Nagios
- Creating images in the Image Catalog
- Creating service templates
- Submitting a service
Installing and configuring the xCAT connector
This section includes instructions for configuring the xCAT connector. These instructions assume that the xCAT server and VMware vCenter have already been installed. The following steps will help verify that xCAT has been configured properly for Moab Cloud Suite.

Because many system-level files and directories are accessed during the installation, the following instructions should be executed with root privileges.
You will see that the instructions below execute commands as the root user. Please note that the same commands will work for a non-root user with the sudo command.
To install and configure the xCAT connector
These instructions assume that the xCAT server's FQDN is xcat.mcs.cloud and that the Moab server's FQDN is moab.mcs.cloud. Make sure to substitute the appropriate server names when using the examples below.
- Stop the Moab service.
- Stop the MWS and Viewpoint services.
- Configure the MCS node to be a client of the xCAT node. Do the following:
- Run this command to get the xCAT client .pem files:
- Run these commands to point the Moab server node to the xCAT server:
- On the xCAT server, make sure that the xCAT policy table allows access to the root user of the MCS node. In the following example, the rule number may differ depending on whether a 1.1 rule already exists or not.
[root]# scp -r [email protected]:/root/.xcat /root/
[root]# cat << EOF > /etc/profile.d/xcat-host.sh
export XCATHOST=xcat.mcs.cloud:3001
EOF
[root]# . /etc/profile.d/xcat-host.sh
[root]# tabedit policy
...
"1.1","root","moab.mcs.cloud",,,,,"allow",,
...
- Install the perl-xCAT and xCAT-client packages.
- Install the moab-cloud-optimizer-xcat-connector package.
- (CentOS and RHEL 5 only) Make sure the Storable and File::Path Perl modules are up to date.
- Start Tomcat.
- Configure MSM (Moab Services Manager) with the parameters needed to communicate with xCAT.
- If the xCAT server (i.e., xcatd) is running on a separate server, set the _XCATHOST configuration parameter in /opt/moab/tools/msm/xcat/msm.cfg. For example:
- Set the _NODERANGE parameter to the group of nodes Moab is managing. For example:
- Set the _VMINTERFACES parameter to the nic device VMs should be provisioned with. This value will be used to populate vm.nics in xCAT during VM creation. For example:
- Set the _HVXCATPASSWDKEY parameter. For example:
- Set the _VCENTERXCATPASSWDKEY parameter. For example:
- If MWS is running on a separate server, set the _MWSURL parameter to the base URL of the MWS server (defaults to http://localhost:8080/mws). For example:
- Set the _MWSUSERNAME parameter to an MWS user that has read/write access to the MWS rest/images resource. For example:
- Set the _MWSPASSWORD parameter to an MWS user that has read/write access to the MWS rest/images resource. For example:
- Check the VLAN configuration file and verify that the network addresses and ranges are correct. For example:
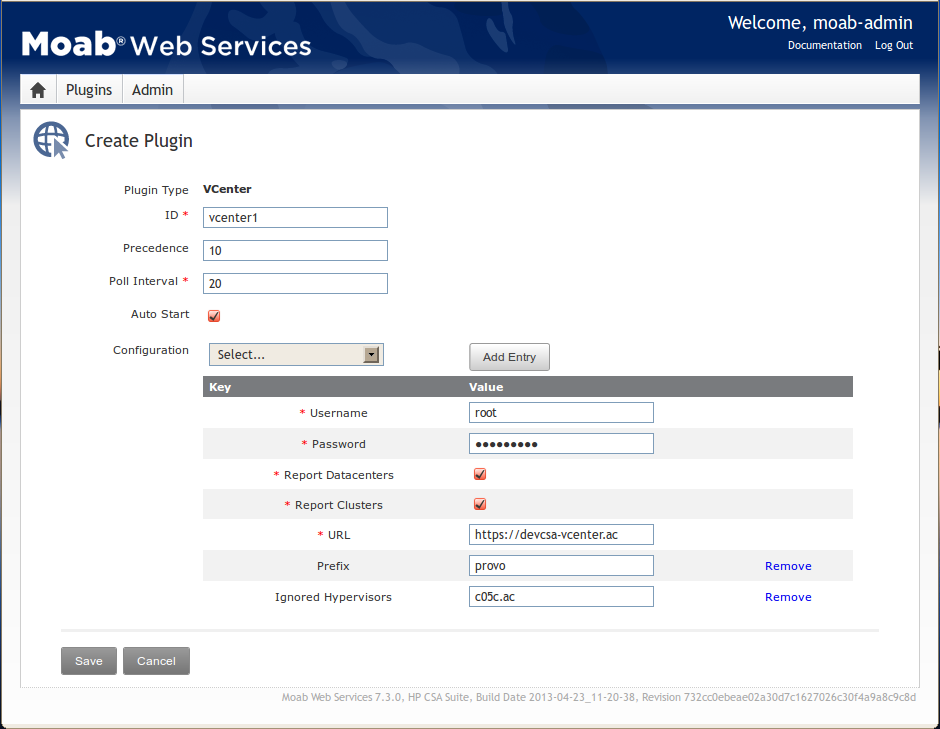
- Log in to MWS (for example, http://localhost:8080/mws/), and install the vCenter plugin. Do the following:
- Click Plugins > Plugin Types in the navigation menu.
- Click VCenter then Add Plugin.
- Fill out the form using the image below as a guide. You may need to add other optional parameters from the drop-down as shown in the image. For example, you may want to ignore some virtual machines. For more information, see the vCenter Plugin documentation in Moab Web Services.
- Choose Save.
- To verify that the vCenter plugin is working, navigate to http://<hostname>:8080/mws/rest/plugins/all/rm/clusterQuery. You should see information about the hypervisors and virtual machines that your vCenter server manages.
- Start Moab.
- Log in to Viewpoint (for example: http://[hostname or ip address]:8080/moab) with the default super user username and password (moab-admin/changeme!).
- On the "Set Viewpoint Defaults" page (Administration > Configuration > Set Viewpoint Defaults), set the Viewpoint default permissions. (For more information, see "Setting the Viewpoint default permissions" in the Viewpoint Management and User Guide.
[root]# service moab stop
[root]# service tomcat6 stop
[root]# yum install perl-xCAT xCAT-client
[root]# yum install moab-cloud-optimizer-xcat-connector
[root]# cpan -i Storable File::Path
[root]# service tomcat6 start
MWS must be running when Moab starts. Otherwise, MSM may encounter issues reading the Image catalog from MWS.
The MSM configuration file is located in /opt/moab/tools/msm/xcat/msm.cfg. Most of the default configurations should work without any changes. However, you may need to modify the following parameters, based on how your xCAT server is configured.
# Set this if xcatd is running on a different host (defaults to localhost:3001 if not specified)
# The xCAT::Client package is still needed locally
APPCFG[xcat]       _XCATHOST=xcat.mcs.cloud:3001
# This defines the group that is used to describe resources that Moab will be managingAPPCFG[xcat] _NODERANGE=moab
This value reflects one of the "groups" entries in the xCAT "nodelist" table, and it is used during nodes and rpower stat commands while reporting node information to Moab via cluster queries.
In the example below, if _NODERANGE is set to moab, then "hv1," "hv2," and "hv3" will be reported, but "hv4" will not because it does not have the moab group assigned. This group will also be added automatically to nodes and VMs provisioned via Moab.
[root@xcat]# tabdump nodelist
#node,groups,status,statustime,appstatus,appstatustime,primarysn,hidden,updatestatus,updatestatustime,comments,disable
"hv1","moab,ipmi,vlan1,servers,all","powering-off","10-14-2013 16:21:46",,,,,,,,
"hv2","moab,ipmi,vlan1,servers,all","netbooting","10-14-2013 17:37:30",,,,,,,,
"hv3","moab,ipmi,vlan1,servers,all","netbooting","10-14-2013 17:42:09",,,,,,,,
"hv4","ipmi,vlan1,servers,all","netbooting","10-15-2013 10:36:22",,,,,,,,
...
# Interface names (typically a bridge device) configured in xCAT's vm.nics for VM creation
APPCFG[xcat]       _VMINTERFACES=br0
# If using ESX, specify the key for the row in xCAT's passwd table that contains the user/password for ESX hypervisors
APPCFG[xcat]       _HVXCATPASSWDKEY=vmware
This value reflects the "key" entry in the xCAT "passwd" table that sets the ESX hypervisor credentials for xCAT-provisioned hypervisors.
[root@xcat]# tabdump passwd
#key,username,password,cryptmethod,comments,disable
"system","root","<my_password>",,,
"vmware","root","<my_password>",,,
"vcenter","Administrator","<my_password>",,,
# If using a vCenter Server, specify the key for the row in xCAT's passwd table that contains the user/password for vCenter servers
APPCFG[xcat]       _VCENTERCATPASSWDKEY=vcenter
This value reflects the "key" entry in the xCAT "passwd" table that contains the credentials for the vCenter instance you installed previously.
[root@xcat]# tabdump passwd
#key,username,password,cryptmethod,comments,disable
"system","root","<my_password>",,,
"vmware","root","<my_password>",,,
"vcenter","Administrator","<my_password>",,,
APPCFG[xcat] _MWSURL=http://moab.mcs.cloud:8080/mws
APPCFG[xcat] _MWSUSERNAME=moab-admin
APPCFG[xcat] _MWSPASSWORD=changeme!
[root]# nano /opt/moab/etc/vlan.cfg
################################################################################
#
# Vlan Configuration File for Core Cloud Stack
#
################################################################################

CONFIG[vlan1] NETWORK_RANGE=<10.1.3.0/24>
CONFIG[vlan1] BROADCAST=<10.1.3.250>
CONFIG[vlan1] GATEWAY=<10.1.3.254>
CONFIG[vlan1] STARTUP_ADDRESS=<10.1.3.200>

#log configuratiaon
...
| NETWORK_RANGE | CIDR network address for all nodes managed by xCAT. |
| BROADCAST | Broadcast network address for the network managed by xCAT. |
| GATEWAY | Default gateway address for the network managed by xCAT. If nodes inside the VLAN need to access nodes outside of the VLAN, then this will be the VLAN’s gateway router; otherwise, it will usually be the xCAT node. |
| STARTUP_ADDRESS | Address that the IPManager script will start at when assigning addresses. |
|
|
Click to enlarge |
The new vCenter plugin will query your vCenter server and prepare to report information to Moab Workload Manager.
[root] # service moab start
Make sure that you set the MWS default permissions first, and then the Viewpoint default permissions.
For more information about configuring storage, contact Adaptive Computing Professional Services.
Installing and configuring Nagios
To install and configure Nagios
- Install Nagios.
- Update the Nagios configuration file.
- For RedHat and CentOS 6:
- For RedHat and CentOS 5:
[root]# nano /etc/nagios/nagios.cfg

## Comment out this line:
#cfg_file=/etc/nagios/objects/localhost.cfg

## Un-comment this line:
cfg_dir=/etc/nagios/servers
[root]# nano /etc/nagios/nagios.cfg

## Comment out this line:
#cfg_file=/etc/nagios/localhost.cfg

## Un-comment this line:
cfg_dir=/etc/nagios/servers
- Update the Nagios node template configuration file.
- Update the Moab Nagios configuration file.
- Create the directory that holds the configuration files for monitored machines.
- Run the registerNode.pl script for each node and VM currently being reported by the vCenter and xCAT resource managers without the suffix configured above. For example, to register hypervisor1.mcs.cloud, do the following:
- Start the Nagios and Apache services.
[root]# yum install -y nagios nagios-plugins-{ssh,ping}
The node names provided by the Nagios resource manager must match the names provided by vCenter and xCAT. If vCenter and xCAT are providing FQDNs, then Nagios should as well. In the example below, nodes will be reported by the Nagios resource manager with the .mcs.cloud suffix. If no FQDN suffix is required, then %NODENAME% is sufficient.
[root]# nano /opt/moab/tools/nagios/nodeTemplate.cfg

## Change this line
address %NODENAME%.core.cloud

## to
address %NODENAME%<.mcs.cloud>
[root]# nano /opt/moab/etc/nagios.cfg

## Change this line
CONFIG[cluster-query] StatusFile=/var/nagios/status.dat

## to
CONFIG[cluster-query] StatusFile=/var/log/nagios/status.dat
[root]# mkdir -p /etc/nagios/servers/
[root]# /opt/moab/tools/nagios/registerNode.pl hypervisor1
This step is only required during initial installation and setup. VMs will be registered with Nagios automatically during provisioning.
[root]# service nagios start
[root]# chkconfig httpd on
[root]# service httpd start
For more information about the Nagios component, see the Nagios documentation.
Creating images in the Image Catalog
These instructions explain how to create a hypervisor image and an associated virtual machine image in the Image Catalog. The Image Catalog is used by MSM to associate node information gleaned from xCAT with node information that Moab needs in order to properly schedule and provision.
To create images in the Image Catalog
- Log in to Viewpoint as the super user.
- Navigate to the Image Management page (Services > Image Management).
- Create a new VM image. Do the following:
- Click New.
- Complete the fields on this page as follows:
- If the genimage and packimage commands were used, then it is likely Stateless.
- If the genimage and liteimage commands were used, then it is likely Statelite.
- Choose Save to save the new VM image.
The Create New Image page displays.
Field Action Type The type depends on how the xCAT image was created.
For more information, see xCAT documentation.
The information in this field does not affect how provisioning is carried out. It's purpose is to offer a reference to the Administrator in knowing what the image type is.
For more information about image types, see "Fields: Create New/Edit Image" in the Viewpoint Management and User Guide.
Image name Specify the name you want to use for the image.
This name will be referenced in the xCAT "nodetype" table to associate a given node with a given MWS image. To simplify correlation between MWS and xCAT, it is recommended that you use the xCAT osimage.imagename field value (for example, "centos6.4-x86_64-install-compute").
[root@xcat]# tabdump osimage
#imagename,groups,profile,imagetype,description,provmethod,rootfstype,osdistroname,osupdatename,cfmdir,osname,osvers,osarch,synclists,postscripts,postbootscripts,serverrole,isdeletable,kitcomponents,comments,disable
"esxi5.1-x86_64-install-hypervisor",,"hypervisor","linux",,"install",,,,,"Linux","esxi5.1","x86_64",,,,,,,,
"centos6.4-x86_64-install-compute",,"compute","linux",,"install",,"centos6.4-x86_64",,,"Linux","centos6.4","x86_64",,,,,,,,
...
OS type Specify the OS type for the image.
The xCAT osimage.osname field value is recommended.
Status Select Active. Machine type Select Virtual machine. Provisioning manager Select xCAT. Operating system For this field, you must specify the xCAT osimage.osvers field value.
All VMs using this image will use this attribute when reporting OS to Moab.
Architecture Specify the architecture for the image.
The xCAT osimage.osarch field value is recommended.
Profile Specify the value of the xCAT osimage.profile field. Hypervisor group name Specify the name of the hypervisor group.
This value is used to reference the xCAT "noderes" table while provisioning hypervisors. In the following example, "servers" will be used.
[root@xcat]# tabdump noderes
#node, servicenode, netboot, tftpserver, nfsserver, monserver, nfsdir, installnic, primarynic, discoverynics, cmdinterface, xcatmaster, current_osimage, next_osimage, nimserver, routenames, comments, disable
"esxvm",,"xnba","<10.1.3.252>","<10.1.3.252>",,,"<eth0>","<eth0>",,,,,,,,,
"servers",,"xnba","<10.1.3.252>","<10.1.3.252>",,,"<eth0>","<eth0>",,,,,,,,,
VM group name Specify the name of the VM group.
This value is used to reference the xCAT "noderes" table while provisioning VMs associated with hypervisors that are using this image. In the following example, "esxvm" will be used.
[root@xcat]# tabdump noderes #node, servicenode, netboot, tftpserver, nfsserver, monserver, nfsdir, installnic, primarynic, discoverynics, cmdinterface, xcatmaster, current_osimage, next_osimage, nimserver, routenames, comments, disable "esxvm",,"xnba","<10.1.3.252>","<10.1.3.252>",,,"<eth0>","<eth0>",,,,,,,,, "servers",,"xnba","<10.1.3.252>","<10.1.3.252>",,,"<eth0>","<eth0>",,,,,,,,, - Create a new hypervisor image. Do the following:
- Click New.
- Complete the fields on this page as follows:
- If the genimage and packimage commands were used, then it is likely Stateless.
- If the genimage and liteimage commands were used, then it is likely Statelite.
- Choose Save to save the new hypervisor image.
The Create New Image page displays.
Field Action Type The type depends on how the xCAT image was created.
For more information, see xCAT documentation. You can glean some information from existing hypervisors by running lsdef <hypervisor>.
The information in this field does not affect how provisioning is carried out. It's purpose is to offer a reference to the Administrator in knowing what the image type is.
Image name Specify the name you want to use for the image.
This name will be referenced in the xCAT "nodetype" table to associate a given node with a given MWS image. To simplify correlation between MWS and xCAT, it is recommended that you use the xCAT osimage.imagename field value (for example, "esxi5.1-x86_64-install-hypervisor").
[root@xcat]# tabdump osimage
#imagename,groups,profile,imagetype,description,provmethod,rootfstype,osdistroname,osupdatename,cfmdir,osname,osvers,osarch,synclists,postscripts,postbootscripts,serverrole,isdeletable,kitcomponents,comments,disable
"esxi5.1-x86_64-install-hypervisor",,"hypervisor","linux",,"install",,,,,"Linux","esxi5.1","x86_64",,,,,,,,
"centos6.4-x86_64-install-compute",,"compute","linux",,"install",,"centos6.4-x86_64",,,"Linux","centos6.4","x86_64",,,,,,,,
...
OS type Specify the OS type for the image.
The xCAT osimage.osname field value is recommended.
Status Select Active. Machine type Select Hypervisor.
This causes the Hypervisor type field to display above.
Hypervisor type Select ESX.
All hypervisors using this image will have the VARATTR attribute "HVTYPE" set to ESX.
Virtualized images Click Add, and select from the drop-down the VM image you previously created. Provisioning manager Select xCAT. Operating system For this field, you must specify the xCAT osimage.osvers field value.
All hypervisors using this image will use this attribute when reporting OS to Moab.
Architecture Specify the architecture for the image.
The xCAT osimage.osarch field value is recommended.
Profile Specify the value of the xCAT osimage.profile field. Hypervisor group name Specify the name of the hypervisor group.
This value is used to reference the xCAT "noderes" table while provisioning hypervisors. In the following example, "servers" will be used.
[root@xcat]# tabdump noderes
#node, servicenode, netboot, tftpserver, nfsserver, monserver, nfsdir, installnic, primarynic, discoverynics, cmdinterface, xcatmaster, current_osimage, next_osimage, nimserver, routenames, comments, disable
"esxvm",,"xnba","<10.1.3.252>","<10.1.3.252>",,,"<eth0>","<eth0>",,,,,,,,,
"servers",,"xnba","<10.1.3.252>","<10.1.3.252>",,,"<eth0>","<eth0>",,,,,,,,,
VM group name Specify the name of the VM group.
This value is used to reference the xCAT "noderes" table while provisioning VMs associated with hypervisors that are using this image. In the following example, "esxvm" will be used.
[root@xcat]# tabdump noderes #node, servicenode, netboot, tftpserver, nfsserver, monserver, nfsdir, installnic, primarynic, discoverynics, cmdinterface, xcatmaster, current_osimage, next_osimage, nimserver, routenames, comments, disable "esxvm",,"xnba","<10.1.3.252>","<10.1.3.252>",,,"<eth0>","<eth0>",,,,,,,,, "servers",,"xnba","<10.1.3.252>","<10.1.3.252>",,,"<eth0>","<eth0>",,,,,,,,, - Associate each existing hypervisor with the new hypervisor image created above by modifying the nodetype.comments field, setting the _MSMFLAVOR to the name of the hypervisor image (for example, "esxi5.1-x86_64-install-hypervisor”).
- Restart the moab service.
- After Moab and its resource managers have started (usually about a minute), restart the tomcat service.
Both new images will now appear in Viewpoint on the Image Management page.
[root@xcat]# tabedit nodetype
#node,os,arch,profile,provmethod,supportedarchs,nodetype,comments,disable
"hv1","esxi5.1","x86_64","hypervisor","netboot",,,"_MSMFLAVOR=esxi5.1-x86_64-install-hypervisor",
"hv2","esxi5.1","x86_64","hypervisor","netboot",,,"_MSMFLAVOR=esxi5.1-x86_64-install-hypervisor",
"hv3","esxi5.1","x86_64","hypervisor","netboot",,,"_MSMFLAVOR=esxi5.1-x86_64-install-hypervisor",
...
[root] # service moab restart
[root]# service tomcat6 start
These instructions explain how to create a basic container and VM service template in Viewpoint.
To create service templates
- Log in to Viewpoint as the super user.
- Navigate to the Service Template Management page (Services > Service Template Management).
- Create a new VM service template. Do the following:
- Click New.
- Select a tenant to associate with the template from the Select Tenant drop-down, and choose OK.
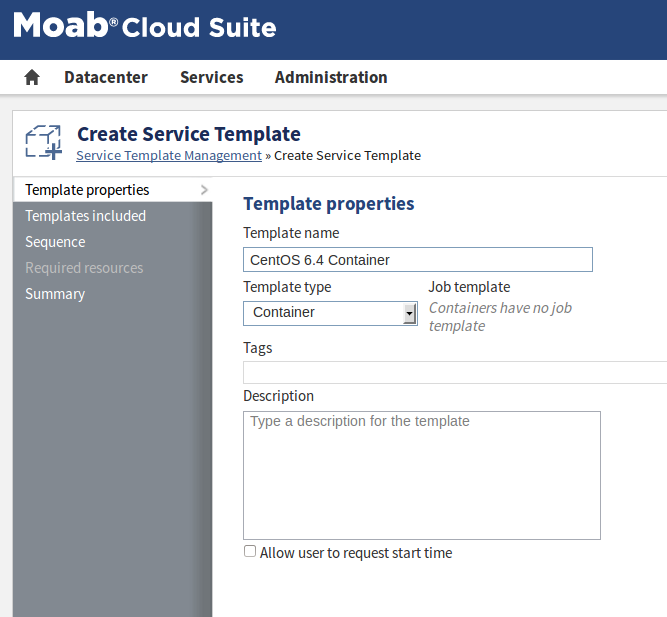
- In the Template Properties tab, complete the fields a follows:
- Leave the defaults for the fields on the Required resources tab.
- Check the information on the Summary tab, and choose Save template.
The Create Create Service Template page displays.
Field Action Template name Specify the name of the VM service template. Template type Specify Virtual machine. Job template Specify genericVM. For example:

- Create a new container service template. Do the following:
- On the Service Template Management page, click New.
- Select a tenant to associate with the template from the Select Tenant drop-down. (This tenant should be the same tenant you specified for the VM service template you created previously.) Choose OK.
- In the Template Properties tab, complete the fields a follows:
- On the Templates included tab, select the VM template you created (in our example, "CentOS 6.4 VM"), and choose Include.
- Because there is only one VM, the information on the Sequence tab can be left as it is.
- Check the information on the Summary tab, and choose Save template.
The Create Create Service Template page displays.
Field Action Template name Specify the name of the VM service template. Template type Specify Container. Job template Specify genericVM. For example:
Both new service templates now appear on the Service Template Management page.
For more information about working with service templates in Viewpoint, see "About service template management" in the Viewpoint Management and User Guide.
To submit a service
- In Viewpoint, navigate to the Service Management page (Services > Service Management).
- Click New.
- Select the name of the service container you created (in our example, "CentOS 6.4 Container"), and choose Request service.
- Make modifications to the fields, as necessary, and choose Add to cart.
- If you are satisfied with the contents of the cart, choose Submit cart.
The New Service page displays.
The Cart Details page displays.
For more information about working with services in Viewpoint, see "About service management" in the ViewpointManagement and User Guide.