2.7 Installing Nitro Web Services
This topic contains instructions on how to install Nitro Web Services.

Nitro Web Services is not available for SUSE 11-based systems.
Do the following in the order presented:
- Open Necessary Ports
- Install MongoDB
- Install and Configure Nitro Web Services
- Configure Viewpoint for Nitro Web Services
- Publish Nitro Events to Nitro Web Services
If your site is running firewall software on its hosts, you will need to configure the firewall to allow connections to the necessary ports.
In this section:
- 2.7.1.A Open the Tornado Web Port (9443) and the ZMQ Port (47100)
- 2.7.1.B Open the MongoDB Database Port (27017)
2.7.1.A Open the Tornado Web Port (9443) and the ZMQ Port (47100)
On the Nitro Web Services Host, do the following:
-
Red Hat 6-based systems using iptables
[root]# iptables-save > /tmp/iptables.mod
[root]# vi /tmp/iptables.mod

# Add the following lines immediately *before* the line matching
# "-A INPUT -j REJECT --reject-with icmp-host-prohibited"

-A INPUT -p tcp --dport 9443 -j ACCEPT
-A INPUT -p tcp --dport 47100 -j ACCEPT

[root]# iptables-restore < /tmp/iptables.mod
[root]# service iptables save
-
Red Hat 7-based systems using firewalld
[root]# firewall-cmd --add-port=9443/tcp --permanent
[root]# firewall-cmd --add-port=47100/tcp --permanent
[root]# firewall-cmd --reload
-
SUSE 12-based systems using SuSEfirewall2
[root]# vi /etc/sysconfig/SuSEfirewall2

FW_SERVICES_EXT_TCP="9443 47100"

[root]# service SuSEfirewall2 restart
2.7.1.B Open the MongoDB Database Port (27017)

Nitro Web Services requires access to a MongoDB database. Depending on your system configuration, your MongoDB databases may not be installed on the same host as their corresponding component servers. For example, you may choose to install the Nitro Web Services MongoDB on the same host where you have installed other MongoDB databases.
Do the following, as needed:
- If you have chosen to install the Nitro Web Services MongoDB database on the same host you installed other MongoDB databases, confirm the firewall port (27017) is already opened on that host.
- If you have chosen to install the Nitro Web Services MongoDB database on a different host from other MongoDB databases, you will need to open the Nitro Web Services MongoDB database port in firewall for that host. To open the port in the firewall, do the following:
- Red Hat 6-based systems using iptables
[root]# iptables-save > /tmp/iptables.mod
[root]# vi /tmp/iptables.mod

# Add the following lines immediately *before* the line matching
# "-A INPUT -j REJECT --reject-with icmp-host-prohibited"

-A INPUT -p tcp --dport 27017 -j ACCEPT

[root]# iptables-restore < /tmp/iptables.mod
[root]# service iptables save
- Red Hat 7-based systems using firewalld
[root]# firewall-cmd --add-port=27017/tcp --permanent
[root]# firewall-cmd --reload
- SUSE 12-based systems using SuSEfirewall2
[root]# vi /etc/sysconfig/SuSEfirewall2

FW_SERVICES_EXT_TCP="27017"

[root]# service SuSEfirewall2 restart
- Red Hat 6-based systems using iptables
To install and enable MongoDB on the Nitro Web Services Host, do the following:
- Install MongoDB.
- Red Hat 6-based or Red Hat 7-based systems
[root]# cat > /etc/yum.repos.d/mongodb.repo <<End-of-file
[mongodb]
name=MongoDB Repository
baseurl=http://downloads-distro.mongodb.org/repo/redhat/os/x86_64
gpgcheck=0
enabled=1
exclude=mongodb-org mongodb-org-server
End-of-file
[root]# yum install mongo-10gen-server
- SUSE 12-based systems
[root]# zypper ar --refresh -r http://download.opensuse.org/repositories/server:/database/SLE_12/server:database.repo
[root]# zypper install mongodb
- Red Hat 6-based or Red Hat 7-based systems
- Start MongoDB.
There may be a short delay (approximately 3 minutes) for Mongo to start the first time.
- Red Hat 6-based systems
[root]# chkconfig mongod on
[root]# service mongod start
- Red Hat 7-based systems
[root]# cat > /usr/lib/systemd/system/mongodb.service <<End-of-file
[Unit]
Description=High-performance, schema-free document-oriented database
After=syslog.target network.target

[Service]
Type=forking
User=mongod
Group=mongod
Environment=CONFIG=/etc/mongod.conf
Environment=OPTIONS=
EnvironmentFile=-/etc/sysconfig/mongod
ExecStart=/usr/bin/mongod -f \$CONFIG \$OPTIONS
PrivateTmp=true
LimitNOFILE=65536
TimeoutStartSec=180
StandardOutput=syslog
StandardError=syslog

[Install]
WantedBy=multi-user.target
End-of-file
[root]# rm -f /etc/init.d/mongod
[root]# systemctl enable mongodb.service
[root]# systemctl start mongodb.service
[root]# systemctl daemon-reload
- SUSE 12-based systems
[root]# systemctl enable mongodb.service
[root]# systemctl start mongodb.service
[root]# systemctl daemon-reload
- Red Hat 6-based systems
- Prepare the MongoDB database by doing the following:
- Add the required MongoDB users.
The password used below (secret1) is an example. Choose your own password for this user.
[root]# mongo
> use admin;
> db.addUser("admin_user", "secret1");
> db.auth ("admin_user", "secret1");
> exit
Because the admin_user has read and write rights to the admin database, it also has read and write rights to all other databases. See Control Access to MongoDB Instances with Authentication for more information.
- Enable authentication in MongoDB.
- Red Hat 6-based systems
[root]# vi /etc/mongod.conf
auth = true
[root]# service mongod restart
- Red Hat 7-based systems
[root]# vi /etc/mongod.conf
auth = true
[root]# systemctl restart mongodb.service
SUSE 12-based systems
MongoDB authentication is already enabled. No further action is needed.
- Red Hat 6-based systems
- Add the required MongoDB users.
2.7.3 Install and Configure Nitro Web Services
You must complete the tasks earlier in this topic before installing Nitro Web Services.
On the host where Nitro Web Services will reside, do the following:
- If you have not already do so, complete the steps to prepare the host. See 2.4 Preparing for Manual Installation or Upgrade.
- Identify and unpack the Nitro Web Services tarball (nitro-web-services-<version>-<OS>.tar.gz).
[root]# tar -xzvpf nitro-web-services-<version>-<OS>.tar.gz
-
Install Nitro Web Services.
[root]# cd /opt/nitro-web-services-<version>
[root]# ./install <directory>
# <directory> is optional; defaults to /opt/nitro-web-services when not given
-
Understand and edit the configuration files.
This includes clarifying what each configuration file is for and what to expect the first time the NWS service is started vs. each subsequent start.
MongoDB user, table, and index creation is performed at initial startup. Many of the options defined in the Nitro Web Service configuration files influence Mongo user/password and index creation.
Usernames and passwords are created only if they do not yet exist. Changing a password in the configuration file after initial startup will not update the password in Mongo.
The installation provides two configuration files.
/opt/nitro-web-services/etc/nitro.cfg
This is the Nitro Web Services web application configuration file.
Before initial startup, set "admin_username" and "admin_password" to the MongoDB admin username and password you used when setting up MongoDB. It is also recommended that you change all other default passwords before starting Nitro Web Services. If you do not change the passwords at this point, it will be more difficult to change them later.
By default, NWS uses an auto-generated self-signed SSL certificate. However, you can use your own certfile, keyfile, and ca_certs files if you wish.
/opt/nitro-web-services/etc/zmq_job_status_adapter.cfg
This is the Nitro ZMQ Job Status Adapter configuration file.
The Nitro ZMQ Job Status Adapter listens to job status updates on the ZMQ bus and publishes them to MongoDB using the Nitro Web Services REST API. The username and password must be set to a MongoDB user with write permissions. At minimum, set the password for nitro-writeonly-user to the password defined in /opt/nitro-web-services/etc/nitro.cfg and make sure the SSL options are set correctly based on SSL settings in /opt/nitro-web-services/etc/nitro.cfg.
- Start the services and configure Nitro Web Services to start automatically at system boot.
- Red Hat 6-based systems
[root]# chkconfig --add nitro-web-services
[root]# chkconfig --add nitro-zmq-job-status-adapter
[root]# service nitro-web-services start
[root]# service nitro-zmq-job-status-adapter start
- Red Hat 7-based or SUSE 12-based systems
[root]# systemctl enable nitro-web-services.service
[root]# systemctl enable nitro-zmq-job-status-adapter.service
[root]# systemctl daemon-reload
[root]# systemctl start nitro-web-services.service
[root]# systemctl start nitro-zmq-job-status-adapter.service
- Red Hat 6-based systems
2.7.4 Configure Viewpoint for Nitro Web Services
Do the following:
- Using a web browser, navigate to your Viewpoint instance (http://<server>:8081) and then log in as the MWS administrative user (moab-admin, by default).
-
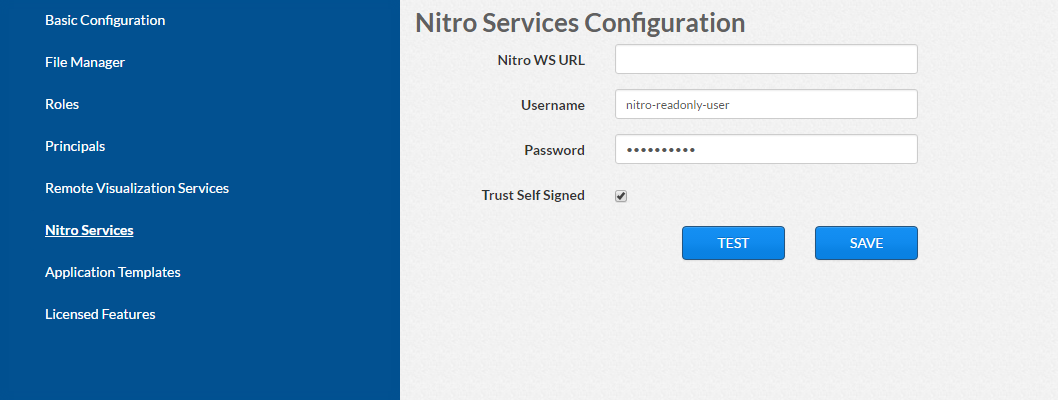
Click Configuration from the menu and then click Nitro Services from the left pane. The following is an example of the Nitro Services Configuration page.

Click to enlarge
- Enter the configuration information. The following table describes the required information.
Field Description Nitro WS URL Hostname (or IP address) and port number for the host on which you installed Nitro Web Services. For example, https://<hostname>:9443 Username Name of the user. This typically nitro-readonly-user. Password The user's password. Trust Self Signed
Indicates whether Nitro Web Services was set up using self-signed certificates. - Click TEST to confirm the settings are correct. This confirms whether Nitro Web Services is up and receiving connections.
- Click SAVE.
-
(Recommended) Use curl to test Nitro Web Services connectivity.
[root]# curl --insecure --data '{"username": "nitro-admin", "password": "ChangeMe2!"}' \
 https://<hostname>:9443/auth
You should see output similar to the following.
{
  "status": 200,
  "data": {
    "nitro-key": "3e0fb95e9a0e44ae91daef4deb500dcc67a3714880e851d781512a49",
    "user": {
      "username": "nitro-admin",
      "last_updated": "2016-02-26 23:34:55.604000",
      "name": "Nitro Admin",
      "created": "2016-02-26 23:34:55.604000",
      "auth": {
        "job": [
          "read",
          "write",
          "delete"
        ],
        "user": [
          "read",
          "write",
          "delete"
        ]
      }
    }
  }
}
2.7.5 Publish Nitro Events to Nitro Web Services
You need to configure the Nitro coordinators to send job status updates to the Nitro Web Services's ZMQ Job Status Adapter. The ZMQ Job Status Adapter is responsible for reading job status updates off of the ZMQ bus and persisting them to Mongo. Nitro Web Services can then be used to access Nitro job status.
Each Nitro job has a Nitro Coordinator. Nitro Coordinators can be configured to publish job status updates to ZMQ by setting the "nws-connector-address" configuration option in Nitro's nitro.cfg file. Each compute node allocated/scheduled to a Nitro Job can play the role of a Nitro coordinator. Therefore, you must update the "nws-connector-address" in each compute node's nitro.cfg file.
Configuring nws-connector-address is simplified if each node is sharing Nitro's configuration over a shared filesystem. If you are not using a shared filesystem, update the Nitro configuration on each compute node.
Do the following:
- If you have not already done so, on the Nitro Web Services Host, locate the msg_port number in the /opt/nitro-web-services/etc/zmq_job_status_adapter.cfg file. This is the port number you need to specify for the nws-connector-address.
-
On each Nitro compute note (Torque MOM Host), specify the nws-connector-address in the /opt/nitro/etc/nitro.cfg file.
...
# Viewpoint connection allows Nitro to communicate job status information
# to viewpoint.  This option indicates name and port of the remote server
# in the form: <host>:<port>
nws-connector-address <nitro-web-services-hostname>:47100
...