Configuring reservations > Configuring buttons in the Reservation Management table

6.2 Configuring buttons in the Reservation Management table

The Reservation Management page consists of a table that displays reservations and a set of buttons above the table that perform operations on a reservation selected in the table. The columns of the table, as well as the buttons above the table, are configured in the reservations.xml file.

To add/remove/modify buttons in the Reservation Management Table

  1. Open the reservations.xml file located in the Viewpoint home directory. Locate the <controls> element within <manage>.
  2. Create any drop-down menu buttons to contain related links. For example, you might create a Reservation Actions button to contain Refresh and Delete. To do so:
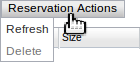
    1. Use the <menu> element inside of <controls>.
    2. Give it a descriptive label – Reservation Actions in this case - and insert the related buttons as its child elements.
    3. <menu label="All Buttons">
         <refresh label="Refresh" />
         <delete label="Delete" />
      </menu>

      Buttons may stand on their own as child elements of <controls>; they are not required to be in a menu button.

  3. Set any of the following child elements to configure the corresponding button:
  4. Element Description
    <refresh /> Refreshes page
    <delete /> Deletes selected reservation
    <generic-command /> Performs functions not built into Viewpoint
  5. Set the reservation.readAll permission to allow users to perform actions on all jobs. By default, users can only perform actions on their own reservations (even administrators). For more information, see Setting permissions.
  6. Modify the appearance of the button according to your preferences.
    1. Set the tooltip attribute of the button's corresponding element to the text to be displayed on the button when the mouse hovers over it.
    2. Set the label attribute of the button's corresponding element to the text to be displayed either on the button or, if an image is specified, to its right side.
    3. Set the image-url attribute of the button's corresponding element to the path to an icon that will be used to display the button.
    4. For example:
    5. <controls>
          <refresh label="Refresh" tooltip="Refresh selected reservation" />
          <delete label="Delete"image-url="../images/reservation_icon.png" />
      </controls>

Related topics