7.3.2 Defining the queue interface
You can configure the way a queue item is displayed to the user.
To define the queue interface
- Open the appropriate XML file located in the Viewpoint home directory. Locate the <queue> element. Modify the name if desired.
- Locate the <title> element and set the <description> text to whatever explanatory text you would like displayed before the value. Ensure that the title contains the desired component.

The <title> element is optional.
- Modify the <row> element.
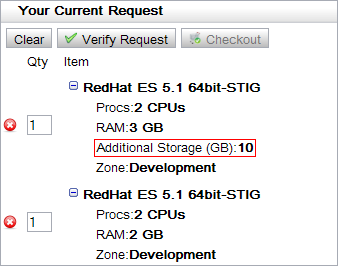
- Set the order attribute to the number order which the indicated line should be displayed on the page. For example, to place a row at the top, set order to "1".
- Set the required attribute to either true or false, depending on whether the row should display even if the value is empty or zero.
- Make a row dynamic so that the exact number of rows is dependent on the components in the form.
- Set the type attribute of <row> to "dynamic".
- Set the source attribute of <row> to any component that contains a list of values. For example, you might use a list edit component.
<row order="2" type="dynamic" source="storage-list">
<description>Storage:</description>
<component id="storage-list" />
</row>
The second row in the queue item creates however many items are in the "storage-list" component.
- Modify the CSS to customize the view for individual components.
- Open the utility-hosting.css file.
- Modify the CSS styles according to the following:
- Modify the "ace-DynamicQueueItem-titleDescription" style to customize the style of the title's description, assuming the description is not empty.
- Modify the "ace-DynamicQueueItem-titleValue to customize the style of the title's value, assuming the value is not empty.
- Modify the "ace-DynamicQueueItem-rowDescription" to customize the style of the row's description, assuming the description is not empty.
- Modify the "ace-DynamicQueueItem-rowValue" to customize the style of the row's value, assuming the value is not empty.
Related topics
© 2012 Adaptive Computing