1.1 Installing Moab Viewpoint |

|
1.1 Installing Moab Viewpoint |
|
This section explains how to install Moab Viewpoint 6.1. The following is a brief outline of the contents:
For the best experience, use only components from the following list:

|
Viewpoint requires the Java Runtime Environment from Sun/Oracle version 6.0 or higher. Other implementations of the Java Runtime Environment, such as OpenJDK or GIJ, will not run on Viewpoint as expected. |
A few steps are required before the automated installation can take place:
As an example, you could run the following commands:
mkdir /opt/viewpoint
chown tomcat6:tomcat6 /opt/viewpoint
|
|
This is necessary if you are using the package-manager version of Tomcat. "tomcat6" is the standard user for Tomcat 6.0. You should use the same owner as "/var/lib/tomcat" chown tomcat6:tomcat6 /opt/viewpoint. |
By default, the Viewpoint configuration files are written to "/opt/viewpoint". To override the default configuration location, define the environment variable VIEWPOINT_HOME with a path such as /home/name/viewpoint. The Viewpoint home directory must be empty in order for the installation to occur correctly. Even hidden files will cause the installation to fail.
adaptive@viewpointMoab Viewpoint:~$ mysql -uadmin -p
Enter password:
mysql> CREATE DATABASE viewpoint;
Query OK, 1 row affected (0.08 sec)
mysql> GRANT ALL ON viewpoint.* TO viewpoint@localhost IDENTIFIED BY 'p@ssw0rd';
Query OK, 0 rows affected (0.31 sec)
mysql> GRANT ALL ON viewpoint.* TO [email protected] IDENTIFIED BY 'p@ssw0rd';
Query OK, 0 rows affected (0.31 sec)
| Verify that it ran correctly using a query such as mysql -u viewpoint -p viewpoint. |
ADMINCFG[1] USERS=root,tomcat6
ADMINCFG[1] ENABLEPROXY=TRUE
For more information, see ADMINCFG in Appendix F: Scheduler Parameters in the Moab Workload Manager documentation.
| Reporting is an optional feature. If you do not want to use the reporting feature, do not copy the reporting.war file as it runs as a service and increases Viewpoint's memory footprint. |
In order to avoid potential java.lang.OutOfMemoryError issues, if you're going to use the reporting feature, or if you are going to view high volumes of jobs (around 10,000), you should increase Tomcat's memory. Add the following configuration setting to your other JAVA_OPTS settings in your Tomcat init script:
JAVA_OPTS="$JAVA_OPTS -XX:MaxPermSize=256m"
|
|
If you are using MySQL, you must download the MySQL database connection library, untar it, and copy the mysql-connector-java-x.x.x-bin.jar file to Tomcat's lib directory (normally $Catalina-Home/lib; for example, /usr/share/tomcat6/lib). |
When all the prerequisites have been met, you can start the Viewpoint installer by visiting this URL ([hostname] is the hostname of the Tomcat server):
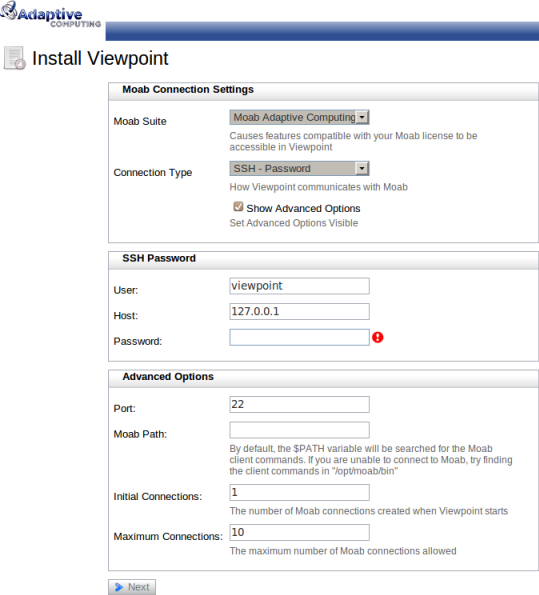
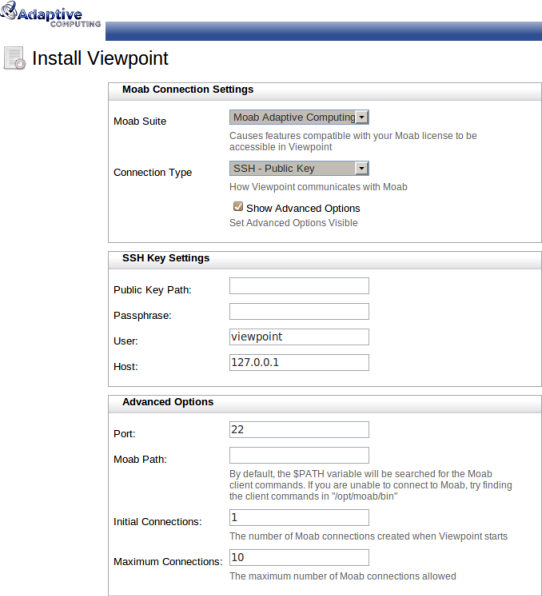
The initial screen requests your Moab suite and the type of connection Viewpoint has to the Moab server. Viewpoint can communicate with the Moab server in one of three ways:
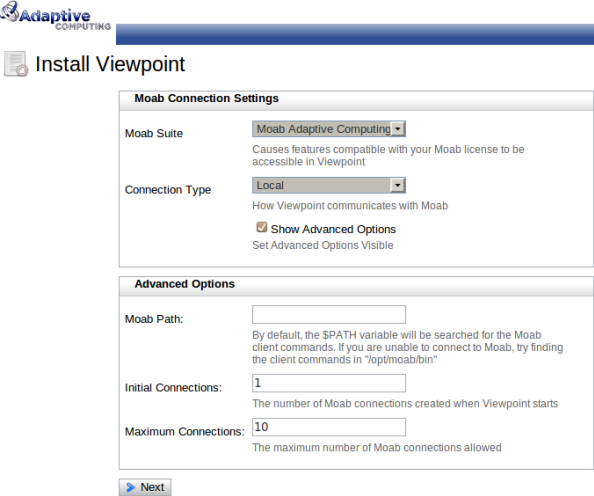
|
SSH - Password - Selecting this connection type loads another form that allows you to specify the secure connection details.
|
SSH - Public Key - Selecting this connection type loads another form that allows you to specify the secure connection details.
|
Fill out the form and click Next to test the Moab connection. Clicking Next loads the Database Settings page only if the Moab connection test is successful.
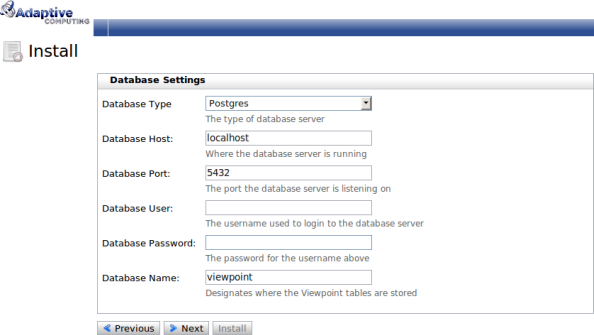
Viewpoint supports connections to MySQL, SQL Server, PostgreSQL, and Oracle databases. See Configuring the Viewpoint Database for more information.
Fill out the form and click Next to test the database connection. Clicking Next loads the Security page only if the database connection test is successful.
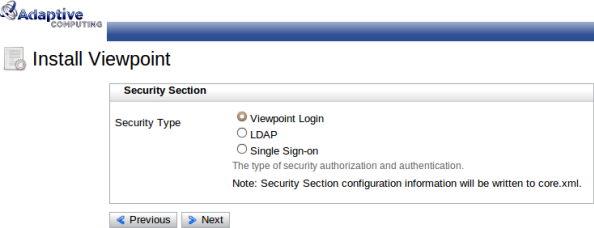
On the Security page you can choose how to authenticate Viewpoint users. You can use Viewpoint Login security, LDAP, or Single sign-on (SSO).

Selecting Viewpoint Login at the Security screen will store usernames and passwords in the Viewpoint database. The next page will ask you to specify a password for the Viewpoint administrator. This is the simplest way to authenticate because it doesn't require external configuration.
Selecting LDAP at the Security screen allows you to authorize LDAP users to perform actions in Viewpoint.
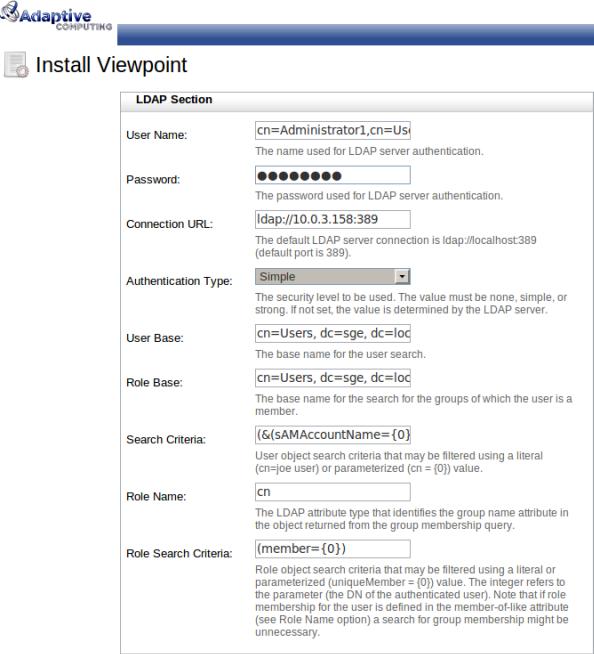
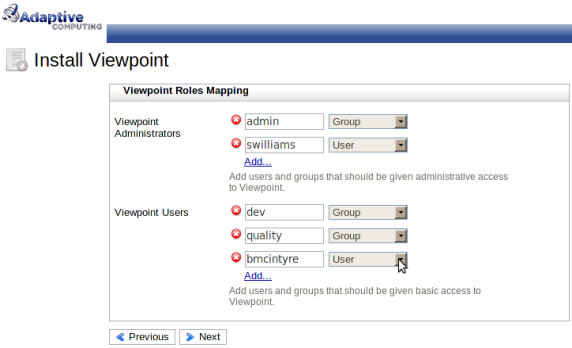
When the Viewpoint Role Mapping section is complete, the Security screen allows you to specify an LDAP server as your authentication mechanism. Your LDAP server may already contain authentication information you can use. If you need help understanding your set up, talk to your LDAP administrator. Common LDAP servers include Active Directory and OpenLDAP.
If a different security type is chosen, LDAP authentication can be configured manually by following the instructions given in the Integrating with LDAP/Active Directory documentation.
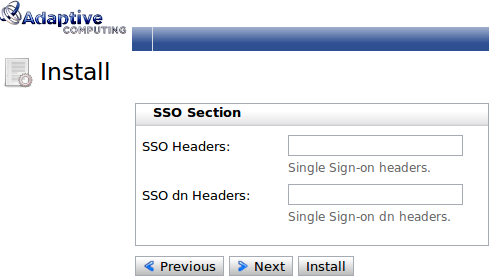
Selecting SSO at the Security screen allows you to specify your SSO configuration. SSO allows multiple sites to be accessed with one login. Use SSO if you want to use the same login name and password that are already used for other sites. An external SSO solution must be installed in order to use this functionality.
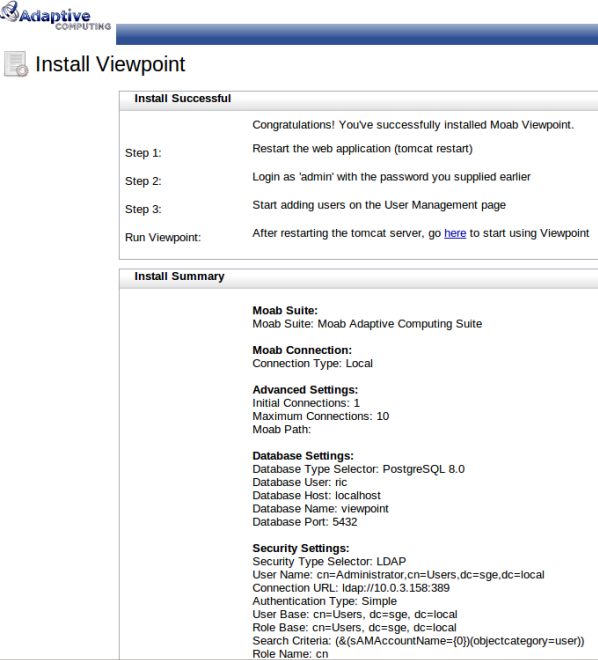
The Summary page provides a review of the settings you've entered throughout the installer. You can now click Install which:
If these actions are successful, a message instructs you to restart Tomcat. After Tomcat is restarted, you can connect to Viewpoint at:
|
|
Viewpoint logs are written to /tmp/viewpoint.log if the logging configuration can't be parsed. |
To upgrade to Viewpoint 6.1, you must add the EventFilter table and modify the existing AbstractPendingAction and VM tables in the Viewpoint database. The examples below demonstrate how to perform the upgrade for a MySQL database:
CREATE TABLE `EventFilter` (   `id` varchar(255) NOT NULL,   `name`
varchar(255) DEFAULT NULL,   `query` longtext,   `user` varchar(255)
DEFAULT NULL,   `viewState` longtext,   PRIMARY KEY (`id`) )
ENGINE=InnoDB DEFAULT CHARSET=latin1;
alter table AbstractPendingAction change column failureDetails failureDetails longtext;
alter table VM add column vcId varchar(255);
alter table VM add column trackingJob varchar(255);
| When you install Viewpoint 6.1 normally, Viewpoint will correctly configure the database. Only make the modifications above if you are upgrading from Viewpoint 2.0. |