Fields: Submit Job
Path: Jobs > Submit Job
|
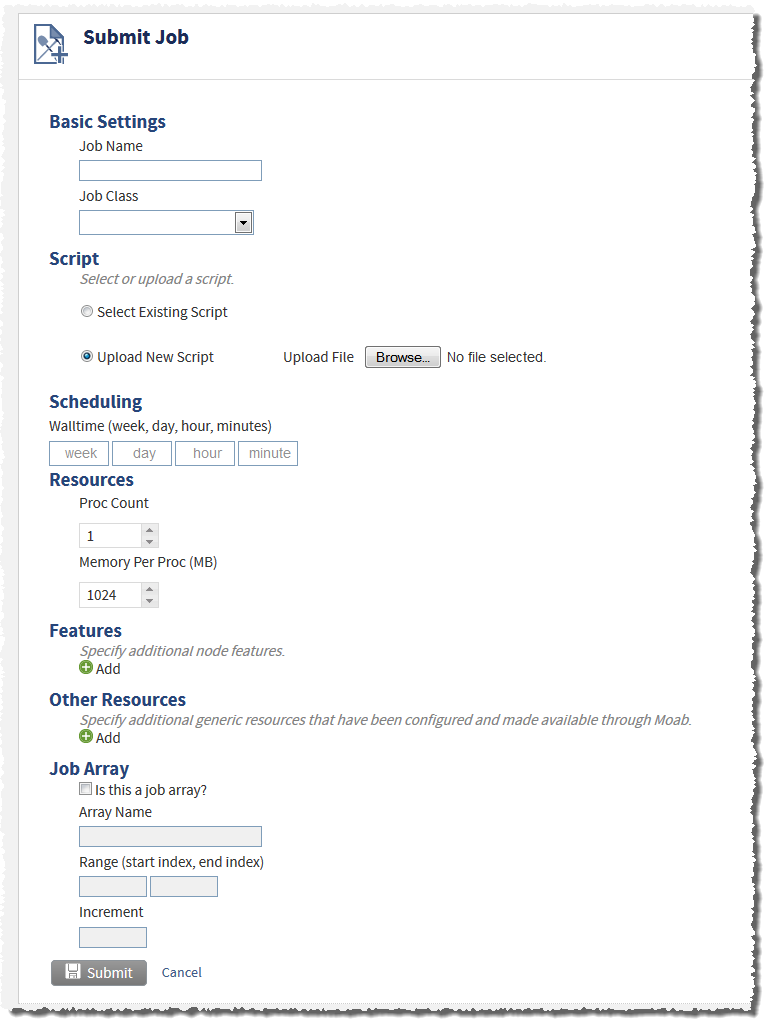
Image 6-3: Submit Job |
|
|
Click to enlarge |
The Submit Job page is designed to help you quickly and easily submit a Moab job through Viewpoint.
Basic Settings
Job Name
Lets you specify a name for the job. (The name must be unique per instance of Moab.) This field is optional.
Job Class
Lets you select, from the drop-down, a job class for the job. Job classes are derived from the resource manager class or queue object. You can specify the attributes of a class within your resource manager or directly within Moab.
If you do not wish to specify a job class, leave the field empty.
Script
This section lets you select the script you want the job to perform. You can choose from scripts you have already uploaded, or you can upload a new script.
Lets you specify that you want to use a script that you have previously uploaded. Previously uploaded scripts will appear in the Script field drop-down.
Lets you select the previously-uploaded script that you want the job to run.

This field only appears if you select the Select Existing Script option.
Lets you specify that you want to upload a new script for the job to run. When you select this option, the Upload File field appears.
Lets you choose and upload a script file for the job to run. Choose Browse..., then navigate to the script file you want to upload and select it.
This field only appears if you select the Upload New Script option.
The next time you want a to submit a job to run the script you just uploaded, you can select it by choosing Select Existing Script.
Scheduling
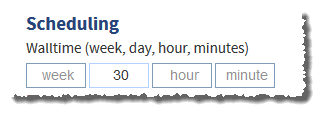
Walltime (week, day, hour, minutes)
Lets you specify the job walltime in weeks, days, hours, and minutes. In this field, you can manually specify the job walltime by entering in the values you need. The first box is the number of weeks; the second, days; the third, hours; the fourth, minutes. For example, if you want to specify a 30-day walltime for the job, enter 30 in the day (second) box.
Resources
Proc Count
Lets you specify the number of processors required by this job.
Memory Per Proc (MB)
Lets you specify how much memory is required on the processor(s) for this job. Specify the amount in megabytes (up to one terabyte—1048576 MB).
Features
Lets you set the feature tags (if any) to be attached to the job when it is scheduled to a node. Moab will strictly attempt to schedule the job to a node that matches the feature tags you set here.
To create feature tags, you must add node features via RM plugins or the NODECFG FEATURES attribute in your moab.cfg file. For more information, see Node Attributes in the Moab Workload Manager Administrator Guide.
Choose from the possible node features in the drop-down box. To add additional features to the job, choose Add ( ). To remove features, choose Remove (
 ).
).
It is possible to specify an invalid condition, or a job that requests features that do not exist on the same node. If this occurs, Moab will wait to schedule the job indefinitely.
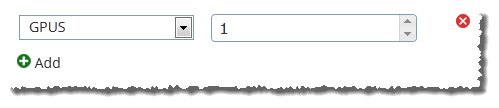
Other Resources
Use these fields and to specify other Moab resources that are required for the job. These can either be nodes or other generic resources that have been configured and made available through Moab.
Choose from configured generic resources which you want to include with the job submission. Select the generic resource from the drop-down list and specify the number required in the corresponding text box.
To add additional resources to the job submission, choose Add (). To remove resources, choose Remove ().
For information about configuring generic resources, see "Managing Consumable Generic Resources" in the Moab Workload Manager Administrator Guide.
Job Array
Is this a job array?
Lets you specify that the job is submission is for a job array.
Array Name
Lets you specify the name of the job array.
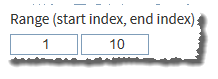
Range (start index, end index)
Lets you specify the start index (in the first box) and the end index (in the second box) for the range. For example, for a range of 1-10, the start index would be 1, and the end index would be 10.
Increment
Lets you specify the increment of the index range. (This field defaults to 1 if you do not specify a value.) For a range of 1-10 and an increment of 2, the list of indexes will be [1, 3, 5, 7, 9].
Submit
Lets you save and submit the job request. When you choose Submit, you are directed to the Job Management page and a message appears, stating whether the job submission was successful or not. If the job submission was successful, you will see the job in the list. For more information, see Fields: Job Management.
Cancel
Lets you cancel the job submission request. When you choose Cancel, you are redirected to the Job Management page (for details, see Fields: Job Management).
Related topics