


 |
2.11 Utility Computing Example - Setting Up a Test Center
While the total effort associated with creating a new production utility computing hosting center should not be underestimated, it is possible to bring up Moab in a test configuration relatively quickly. This test configuration will behave much like the production case and will give each organization a platform on which to create and evaluate local support infrastructure.
The initial test environment is designed to support a batch level access system with configuration for fully customized compute resources and tight integration with the existing customer batch system. It will be set up to allow both manual and automatic resource requests and will enable host and network security along with both job and data migration.
2.11.1 Prerequisites
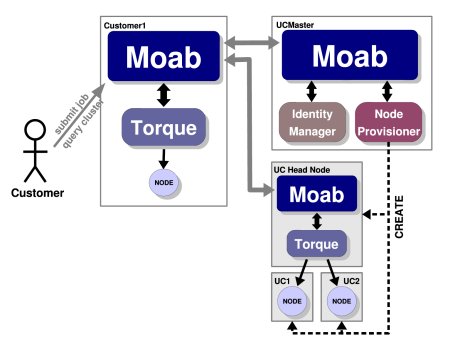
This setup can be conducted with a minimum of 4 nodes which are network connected although additional nodes can make the example more useful. The nodes would be used as follows:
Simple Case - five nodes- Customer1 - represents the batch cluster local to the customer
- UCMaster - utility computing master node
- UC1 - utility computing node offered to customers
- UC2 - utility computing node offered to customers
 |
A more advanced example providing multiple customers and a larger utility computing center is also available. |
In the example below, we will set up a utility computing center and run through the following steps:
- Install Customer1 to create a local batch cluster of 1 node.
- Install UCMaster to manage a utility computing hosting center of 2 nodes.
- Configure UC1 and UC2 to be ready to be provisioned for customer usage.
- Configure basic utility computing infrastructure.
- Establish trusted communication between the customer and UCMaster.
- Configure Customer1 to automatically use utility computing when a high load is detected.
- Set up UCMaster to enable automatic provisioning of utility computing nodes.
- Set up UCMaster to automatically provide host and network security.
- Submit jobs locally to customer cluster.
- Verify proper utility computing behavior.
Root authority on the five test nodes is required. Other prerequisites include having Moab, Utility Computing Edition, TORQUE resource manager, and a basic understanding of Linux.
2.11.2 Install Customer Cluster
The customer cluster will consist of a single node that provides both head node and compute node services. In the real world, this will rarely be the case as head node and compute node functionality is most often separated. On this node, we will install and configure the TORQUE resource manager. (In actual practice, other resource managers may be selected.) Once TORQUE is installed, configured, and tested, Moab, Cluster Edition will be installed.
Installing TORQUE
Installing TORQUE on each customer cluster can be accomplished by following the steps listed in the TORQUE QuickStart Guide. This guide will step you through downloading, installation, configuration, and testing of TORQUE. This process should take about 10 minutes. Once TORQUE is operational, you can move on to the next step.
Installing Moab
The steps required to install Moab are documented in the Moab Installation section. This section covers installation, configuration, and initial testing. This step should be accomplished in about five minutes.
2.11.3 Install Utility Computing Master Node
The utility computing master node will not use a standard resource manager such as TORQUE or Loadleveler. Instead, it will use a native resource manager interface to import the information about the utility computing nodes and to drive allocation decisions. For the example, this information will be read in from a text file. The Utility Computing Monitoring section describes how to incorporate information from multiple sources to allow more complete and dynamic scheduling. In brief, installing the utility computing master consists of the following steps:
- Install Moab
- Specify compute resource information
- Configure resource monitor interface
To install Moab, follow the steps listed in the Moab Installation section. Once Moab is installed, the next step is to provide the node information associated with the utility computing cluster. For the purpose of this example, we will assume that Moab is installed into /opt/moab on all nodes. Node information can be provided using the Moab Native Resource Manager interface by creating the following file:
uc1  state=idle cproc=2 cmemory=512 oslist=linux
uc2  state=idle cproc=2 cmemory=512 oslist=linux
To instruct Moab to use this information, use the following configuration:
SCHEDCFG[ucmaster] SERVER=ucmaster.ucprovider.com
RMCFG[ucmaster]    TYPE=NATIVE CLUSTERQUERYURL=file://$HOME/node.dat
Moab can now be started on the UCMaster node using the moab command. The output of the mdiag -n command should look like the following:
compute node summary
Name                    State   Procs      Memory         Opsys

uc1                      Idle    2:2       512:512        linux
uc2                      Idle    2:2       512:512        linux
-----                     ---    4:4      1024:1024       -----

Total Nodes: 2  (Active: 0  Idle: 2  Down: 0)
Once this output is verified, the initial Moab configuration is complete.
2.11.4 Install the Utility Computing Slave Nodes
With the customer cluster and the utility computing master node configured, the next step is to prepare the utility computing slave nodes. In actual practice this step may not be required depending on the provisioning model being used. See the Utility Computing Provisioning section for more information. In this example, the utility computing provider is offering a single fixed node image that does not require re-provisioning before each allocation. In actual practice, with the exception of the service-access model, this would rarely be the case due to security, customization, or reliability constraints. In these more common cases, the node configuration would be enabled within the default node image or would be fully automated using tools provided locally or by Cluster Resources.
To set up the utility computing slaves, again follow the steps in the TORQUE QuickStart Guide and the Moab Installation section. In this case, install Moab and TORQUE on each slave node. (For example: UC1 and UC2) At this point, it is not required to configure or start the daemons. This step will be automatically handled as the master Moab allocates resources to a request.
|
As a prerequisite, the remainder of this example assumes password-less SSH/SCP access has been enabled from the head node to each of the compute nodes. If this has not been set up, consult an online reference for configuration instructions. |
|
The following examples use a new line delimited node file representing each of the compute nodes in the utility computing cluster. |
> tools/torque.install.pl -f nodefile.txt
> tools/moab.install.pl -f nodefile.txt
2.11.5 Define a Basic Computing Package (VPC)
To use utility computing resources, the utility computing master must be configured with one or more virtual private cluster (VPC) definitions. Use of these definitions is described in the Utility Computing Allocation section. In this case, we will define a VPC that declares that each resource requested require an associated head node. This is done by adding the following to the Moab configuration file located on the ucmaster node:
VCPROFILE[basic]  DESCRIPTION="basic cluster extension package"
VCPROFILE[basic]  QUERYDATA=minnodes=1,label=head,rsvprofile=createhead
VCPROFILE[basic]  OPRSVPROFILE=createcomp

RSVPROFILE[createcomp] TRIGGER=action='$TOOLSDIR/createcompute.sh $HOSTLIST',sets=comp,etype=start,atype=exec
RSVPROFILE[createhead] TRIGGER=action='$TOOLSDIR/createhead.sh $HOSTLIST $CLIENTNAME $CLIENTKEY',requires=comp,etype=start,atype=exec
With this configuration, each time a requestor asks for one or more compute nodes with the basic package, they will receive the requested nodes, plus have one head node allocated. When the head node is allocated, a trigger executes that will properly provision it as a head node. When any explicitly requested node is allocated, the createcompute.pl script executes.
Normally, these scripts coordinate activities with provisioning management systems, network routers, storage managers, and other systems to create a full end-to-end cluster package. Further, these tools also are responsible for installing and automatically configuring the batch system on the utility computing slave nodes. In our example, due to a number of simplifying assumptions, a number of these activities can be skipped. The sample scripts compute.conf and head.conf are available for this demo that automates the configuration and security of the utility computing nodes.
Once Moab has been configured and these scripts are created, start Moab on the Customer1 with the command moab and recycle the Moab server on UCMaster with the command mschedctl -R.
|
The Moab server running on the UCMaster node must run as root. |
> mschedctl -l vpcprofile

VPCPROFILE[basic] -------
Description:  'basic cluster extension package'
RsvProfile:   createcompute
QueryData[head]=<Set><Where name="minnodes">1</Where><Where name="label">head</Where>
                <Where name="rsvprofile">createhead</Where></Set>
2.11.6 Establish Trusted Communication Between the Customer and UCMaster
At this point, there should be two clusters enabled, one at the customer site and one on the utility computing master node. The next step is to enable trust between these two clusters allowing the customer Moab to request needed resources on demand from the utility computing master.
Utility Computing Master Configuration
To enable trust between the utility computing master and the customer head node, we will need to create a shared secret key. This key can be any string known only to the utility computing provider and the customer. To use this key, we will enable the Moab identity manager interface.
In actual practice, it would most likely make sense to provide this information via a local database, but for this example Moab will extract it from a text file. Create the following file and specify the IDCFG parameter in the Moab configuration file.
RM:customer1 key=mysecr3t
IDCFG[ucmaster] SERVER=file://$HOME/id.dat
|
To enable a direct Moab interface to a database, the SERVER attribute would be specified with a protocol of sql. See the identity manager section for more information. |
Customer Cluster Configuration
The next step is to configure the customer Moab to recognize and trust the utility computing master. This is done in two steps. First, we must indicate the type of relationship between the two Moab servers using the RMCFG parameter as in the following example:
RMCFG[ucmaster] server=moab://ucmaster.ucprovider.com flags=hostingcenter
The next step is to add the shared secret key information to the customer's moab-private.cfg file as in the following example:
CLIENTCFG[RM:ucmaster] key=mysecr3t
With this configuration, the Moab server running on the utility computing master will trust requests received from customer1 since the request is encrypted using the specified secret key. To test this configuration, restart the Moab server at the utility computing center and the one on the customer cluster using mschedctl -R. Once recycled, issue mdiag -R on the customer cluster and a result like the following should be displayed:
> mdiag -R

RM[ODM]  Type: MOAB(hosting center)  State: Active  ResourceType: COMPUTE
  Server:             oahu:42559
  Flags:              hostingCenter
  Partition:          ODM
  WARNING:  clock skew detected (RM/Sched clocks offset by 1:07:35)
  UC Backlog Threshold: 00:02:00  AllocSize: 0  MaxSize: 1  AllocDuration: 0
  DefaultClass:       CH2class
  RM Performance:     AvgTime=0.03s  MaxTime=0.03s  (1 samples)
  RM Languages:       NATIVE,MOAB
Utility Computing Slave Configuration
When provisioned, the dynamically allocated utility compute nodes must also trust the customer by knowing the shared secret key. In this example, the secret key is automatically provided to the provisioning tools so that the utility computing slaves can trust direct requests from the customer site.
|
To make the slave node more dynamic, the dynamic credential facility can also be enabled. This allows trusted requests to automatically create associated user and group credentials and the required directory infrastructure. See Resource Manager Configuration for more information. |
Activating the Utility Computing Service
With this configuration enabled, the customer Moab daemon is ready to dynamically provision and allocate new resources on demand. This is done using the mrmctl -x command as shown in what follows:
> mrmctl -x 1 -w starttime=13:00_4/6

resources expanded by 1 node (see RM hosting.0)
The newly created utility computing resources become visible immediately. The resources are reserved until 1:00 p.m. on April 6th, when the Moab server is provisioned and started on the head node. Depending on the provisioning scheme, this could take a minute or so.
On UCMaster, VPCs can be viewed using the mschedctl -l vpc as in the following example:
> mschedctl -l vpc

VPC vpc.1 (active) ---------
Owner: user:PEER:CUSTHEAD2
Available Time:        23:29:32_03/06 (-00:06:53)
Available Duration:    INFINITY
Provision Start Time:  23:29:32_03/06 (-00:06:53)
Cleanup End Time:      20:02:52_07/07 (  INFINITY)
PurgeTime:             20:02:52_07/08
Variables:
Rsv Group:             basic.3 (basic.3,basic.4)
VPC Profile:           basic
Once the utility computing resources are no longer needed, they can be released back to the utility computing master by issuing the following command:
> mrmctl -d -r hosting.0
The cluster will then return to its original setup with only the local compute node as an accessible compute resource.
2.11.7 Other Examples
Enabling a hosting center on demand can be done with very little configuration. The following sample files demonstrate the only required features:
- Sample OD Master "moab.cfg" file
- Sample Customer "moab.cfg" file
- Sample Customer "moab-private.cfg" file
2.11.8 Single System Image HPC Computing
- To specify hosting center interface with RMCFG:
- (optional) To specify thresholds for resource allocation:
- (optional) To specify resource template:
RMCFG[odmaster]     SERVER=moab://oahu:42559 FLAGS=HOSTINGCENTER,RSVIMPORT TIMEOUT=15
RMCFG[odmaster]     CLUSTERQUERYURL=moab://hosting.clusterresources.com

NODECFG[hosting1]   PROCS=1 OS=SUSE9.0 ARCH=ia64 MEM=2000 APPLIST=matlab,chimera3
...
If workload aggregation is desired to reduce provisioning overhead, allocation thresholds can be specified to group workload together before allocating resources.
RMCFG[odmaster]     MAXPS=63000
...
If specific resource types are required that may be only partially specified by submitted workload, a local node template may be specified to indicate what type of resources should be allocated and how they should be provisioned.
RMCFG[odmaster]     NODEPROFILE=hosting1
NODECFG[hosting1]   PROCS=1 OS=SUSE9.0 ARCH=ia64 MEM=2000 APPLIST=matlab,chimera3
...
2.11.9 Automating Replacement of Failed Nodes
Moab can be configured to enable automated replacement of nodes that are unavailable due to compute host, network, or storage failures. This can be accomplished by specifying a node trigger on all nodes (using the DEFAULT node template) or on a subset of critical nodes.
For this to occur, the node event type should be set to fail and the action should modify the nodes attribute of the hosting center resource manager as in the following example:
NODECFG[DEFAULT] TRIGGER=AType=internal,EType=fail,MultiFire=TRUE,RearmTime=10:00,Action=RM:ODM:modify:nodes:1
With this configuration, each time a node fails, an additional replacement node from the utility computing center will be automatically provisioned and allocated.
2.11.10 Automating Cluster Sizing Using QoS Thresholds
Moab can automatically grow and shrink the pool of available nodes within a cluster based on the backlog and response time available for certain key jobs. To configure Moab to add utility computing resources if a high priority job has been queued for a certain duration or if Moab predicts that it will be unable to run for a certain duration, use the TRIGGERQTTHRESHOLD attribute of the QoS credential as in the following example:
QOSCFG[high] TRIGGERQTTHRESHOLD=30:00
QOSCFG[high] TRIGGER=atype=internal,EType=fail,MultiFire=TRUE,RearmTime=600,Action=RM:ODM:modify:nodes:1
With this configuration in place, Moab will add one node each iteration this job sits in the queue with an actual or predicted queue time over 30 minutes.
See Also
|
|