4.4 Configuring the Job Details pane
The Job management page contains a panel for displaying a job in detail. These panels currently allow one to configure a title, a set of controls, and a list of sections to display information in.
To configure the job details pane
- Open the jobs.xml file located in the Viewpoint home directory. Find the <details> element within the <job-management> section.
- Customize the title of the details pane by inserting the <title> element within <details>.

The <title> can include field references that are replaced with the value of the field of the current object being viewed. Any scalar field types are allowed. Fields are specified by prefixing a field name with a dollar sign ($) and optionally wrapping it in curly brackets, such as $id, ${name}, or $expected-state. Job variables can also appear in the title by using a map variable syntax, which suffixes the field name with a key enclosed in square brackets. For example, the reference $variable[aitId] would be substituted with the value of the job variable "aitId" in the title.
- Configure any desired buttons in the details pane by using the <controls> element. This accepts the same child elements as the <controls> element for the Job Management table (for details, see Buttons).
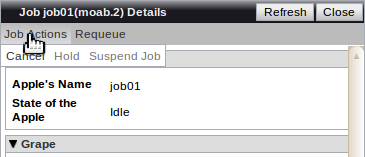
- Create drop-down buttons to contain buttons that relate to one another by setting the <menu> child element, creating a descriptive label, and setting the buttons as its child elements. For example:
<controls>
   <menu label="Job Actions">
     <cancel />
     <hold />
     <suspend label="Suspend Job" tooltip="Request that Moab suspend this job" />
   </menu>
   <requeue />
</controls>

- Set <menu>'s vertical attribute to false to switch the menu's layout direction from its default vertical orientation. For example:
<controls>
   <menu label="Job Actions" vertical="false">
      <cancel />
      <hold />
      <suspend label="Suspend Job" tooltip="Request that Moab suspend this job" />
   </menu>
   <requeue />
</controls>
- Customize the sections using the <sections> element. Specify a <section> for each collapsible section in the Job Details pane.
- For each <section>, set the <title> that will separate the section in the pane.
- Set the <fields> element as a child of <section>. This element will hold the field details.
- Within the <fields> element, set any of the table field types (for details, see Configuring columns in the Job Management table). You may also set any of the following child elements:
| Element |
Description |
| <variables> |
Displays a list of all the current job variables |
| <messages> |
Displays a list of all messages currently associated with the job |
| <header> |
Adds a line of header text to be used as a sub-header inside a details section or to separate groups of values in a details section. |
| <download-stdout> |
Provides a link to download the standard output of a completed job |
| <download-stderr> |
Provides a link to download the standard error of a completed job |
- Give any desired fields the editable="true" attribute to specify that it can be edited in the Job Details pane by clicking the
 edit icon. The following field types are editable:
- <account>
- <class>
- <group>
- <name>
- <qos>
- <wallclock-requested>
- <variable>
- <variables>
For example:
<fields>
   <name editable="true">
      <title>Apple's Name</title>
   </name>
</fields>
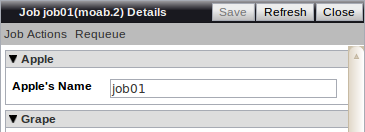
If at least one field is marked as editable, the job details section displays a Save button.
<details>
    <title>Job ${name}($id) Details</title>
    <controls>
        <cancel />
        <hold />
        <suspend label="Suspend Job" tooltip="Request that Moab suspend this job" />
        <requeue />
    </controls>
    <sections>
        <section>
           <title>Apple</title>
           <fields>
              <name>
                 <title>Apple's Name</title>
              </name>
              <state>
                 <title>State of the Apple</title>
              </state>
           </fields>
        </section>
        <section>
           <title>Grape</title>
           <fields>
              <user>
                 <title>Grape Users</title>
              </user>
              <group>
                 <title>Grape Groups</title>
              </group>
              <account>
                 <title>Grape Accounts</title>
              </account>
           </fields>
        </section>
        <section>
           <title>Peach</title>
           <fields>
              <wallclock-requested>
                 <title>Requested Peach Walltime</title>
              </wallclock-requested>
              <proc-count>
                 <title>Peach Processor Count</title>
              </proc-count>
              <memory>
                 <title>Peach's Memory in GB</title>
              </memory>
              <submit-date>
                 <title>Date Peach Was Submitted</title>
              </submit-date>
           </fields>
        </section>
        <section>
           <title>Orange</title>
           <fields>
               <variable name="aitId">
                   <title>AIT ID</title>
               </variable>
           </fields>
        </section>
        <section>
           <title>Mango</title>
           <fields>
              <variables />
           </fields>
        </section>
   </sections>
</details>

Related topics