
1 Introduction
1.1 Moab® Web Services Overview
Moab Web Services (MWS) is a component of Adaptive Computing Suites that enables programmatic interaction with Moab Workload Manager via a RESTful interface. MWS allows you to create and interact with Moab objects and properties such as jobs, nodes, virtual machines, and reservations. MWS is the preferred method for those wishing to create custom user interfaces for Moab and is the primary method by which Moab Viewpoint communicates with Moab.MWS communicates with the Moab Workload Manager (MWM) server using the same wire protocol as the Moab command-line interface. By publishing a standard interface into Moab's intelligence, MWS significantly reduces the amount of work required to integrate MWM into your solution.This documentation is intended for developers performing such integrations. If you are a Moab administrator, and for conceptual information about MWM, see the Moab Administrator's Guide.1.2 Upgrading from Previous Versions
In order to upgrade from previous versions of MWS, the following steps must be completed. MWS is capable of detecting and performing necessary database updates, but this process must be triggered manually (see steps 3 and 4 below) by the admin user. It is not always necessary to perform database updates even when MWS is upgraded to a new version.
It is highly recommended to perform a full database backup before performing database updates. This may be done
using the mongodump utility documented in the MongoDB documentation.
1) Stop Tomcat, re-deploy mws.war, remove exploded mws directory, and start Tomcat.
# CentOS 6 example
service tomcat6 stop
cp /tmp/mws-install/mws-<VERSION>/mws.war /var/lib/tomcat6/webapps
rm -rf /var/lib/tomcat6/webapps/mws
service tomcat6 start
2) Visit http://localhost:8080/mws/ in a web browser to verify that MWS is running again.
You will see some sample queries and a few other actions.3) Log into MWS to verify configuration and check for required database updates.
The credentials are the values ofauth.defaultUser.username and auth.defaultUser.password set in the MWS
configuration file.
If you encounter problems, or if MWS does not seem to be running, see the steps in the Troubleshooting section.
4) Perform database updates.
If database updates are required, a warning box will be shown at the top of the MWS home page. Click "Please upgrade now" to continue. A dialog will appear confirming if the upgrade should be applied or not.
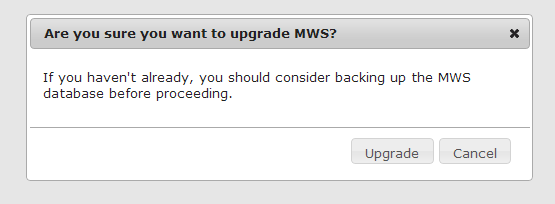 When the upgrade is completed, a confirmation notice will be displayed. MWS is then ready for normal usage.
1.3 Installation Guide
These instructions describe how to install Moab® Web Services (MWS).1.3.1 Requirements
Hardware Requirements
- Dual-core Intel/AMD x86-64 processor
- At least 4 GB of RAM
Software Requirements
- Moab® Workload Manager (version must match exactly the version of MWS)
- Oracle® Java® 6 Runtime Environment
- Apache Tomcat™ 6
- MongoDB® 2.0.2 - 2.0.8
Oracle Java 6 Runtime Environment is the only supported Java environment.All other versions of Java, including Oracle Java 7, OpenJDK/IcedTea, GNU Compiler for Java, and so on, are not supported.
Microsoft Active Directory or OpenLDAP (must support the LDAPv3 protocol) is required if you want the Principal resource functionality in Moab Web Services, or if you are going to install Moab Viewpoint. For a basic tutorial on how to set up OpenLDAP, see Setting up OpenLDAP on Centos 6 in the Viewpoint Management and User Guide.
1.3.2 Quickstart Guide
1) Install MongoDB version 2.0.8.
MWS does not yet support MongoDB 2.2 or later. Be sure to install the 2.0.8 packages. The RPM package names aremongo20-10gen-2.0.8-mongodb_1.x86_64.rpmandmongo20-10gen-server-2.0.8-mongodb_1.x86_64.rpm.
2) Start MongoDB.
# CentOS 6 examplechkconfig mongod on
service mongod start
The instructions provided above for installing MongoDB describe a base installation only. See the MongoDB section of the security page.
3) Install and configure Moab Workload Manager (MWM).
- You must deploy Moab Web Services (MWS) on the same server as Moab Workload Manager (MWM).
- The version of MWS must match exactly the version of MWM. For example, MWS 7.1.1 works only with MWM 7.1.1.
4) Generate a secret key to be used for communication between MWM and MWS.
# All these steps are required. Do not skip any steps.service moab stop
dd if=/dev/urandom count=18 bs=1 2>/dev/null | base64 > /opt/moab/etc/.moab.key
chown root:root /opt/moab/etc/.moab.key
chmod 400 /opt/moab/etc/.moab.key
service moab start
5) Install Apache Tomcat 6.
# CentOS 6 exampleyum install tomcat6
6) Install the 64-bit RPM version of the Oracle Java SE 6 JRE.
Oracle Java 6 Runtime Environment is the only supported Java environment.All other versions of Java, including Oracle Java 7, OpenJDK/IcedTea, GNU Compiler for Java, and so on, are not supported.
# CentOS 6 examplesh jre-6u45-linux-x64-rpm.bin
7) Create the MWS home directory and its subdirectories etc, hooks, plugins, and log.
The default location for the MWS home directory is /opt/mws. These instructions assume the default location.
- Give the Tomcat user read access to these directories and write access to the
pluginsandlogdirectories. - Here is a sample script for these steps:
mkdir -p /opt/mws/etc /opt/mws/hooks /opt/mws/plugins /opt/mws/log
chown -R tomcat:tomcat /opt/mws # Depending on your OS, the Tomcat username might be tomcat6.
chmod -R 555 /opt/mws
chmod u+w /opt/mws/plugins /opt/mws/log
8) Extract the contents of the MWS tarball into a temporary directory.
mkdir /tmp/mws-install
cd /tmp/mws-install
tar xvzf $HOME/Downloads/mws-<VERSION>.tar.gz
cd /tmp/mws-install/mws-<VERSION>
9) Set up the MWS configuration file.
- In the extracted MWS directory are two sample configuration files:
mws-config-cloud.groovyandmws-config-hpc.groovy. mws-config-cloud.groovyprovides sample configuration for the Moab Cloud Suite.mws-config-hpc.groovyprovides sample configuration for the Moab HPC Suites.- Choose the correct file for your suite, rename it to
mws-config.groovy, and copy it to/opt/mws/etc. - Give the Tomcat user read access to
/opt/mws/etc/mws-config.groovy. - In the
/opt/mws/etc/mws-config.groovyfile, change these settings: moab.secretKey: needs to match the MWM secret key you generated earlier (contained in/opt/moab/etc/.moab.key)auth.defaultUser.username: any value you like, or leave as isauth.defaultUser.password: any value you like, but choose a good password
vi /opt/mws/etc/mws-config.groovy…
moab.secretKey = "<ENTER-KEY-HERE>"
moab.server = "localhost"
moab.port = 42559// Change these to be whatever you like.
auth.defaultUser.username = "admin"
auth.defaultUser.password = "adminpw"
If you do not change auth.defaultUser.password, then your MWS is not secure, since anyone reading these instructions can log into your MWS.
Here are some tips for choosing a good password.
10) Add the following lines to the end of /etc/tomcat6/tomcat6.conf:
CATALINA_OPTS="-DMWS_HOME=/opt/mws -Xms256m -Xmx3g -XX:MaxPermSize=384m"
JAVA_HOME="/usr/java/latest"
Some Linux distributions use/etc/default/tomcat6or/etc/sysconfig/tomcat6instead of/etc/tomcat6/tomcat6.conf.
11) Start Tomcat and deploy mws.war.
# CentOS 6 examplechkconfig tomcat6 on
service tomcat6 stop
cp /tmp/mws-install/mws-<VERSION>/mws.war /var/lib/tomcat6/webapps
service tomcat6 start
12) Visit http://localhost:8080/mws/ in a web browser to verify that MWS is running.
You will see some sample queries and a few other actions.13) Log into MWS to verify that the MWS credentials are working.
The credentials are the values ofauth.defaultUser.username and auth.defaultUser.password that you set above.
If you encounter problems, or if MWS does not seem to be running, see the steps below in the Troubleshooting section.
1.4 Troubleshooting
If something goes wrong with MWS, look in the following files:- The MWS log file. By default this is
/opt/mws/log/mws.log. - The Tomcat
catalina.outfile, usually in/var/log/tomcat6or$CATALINA_HOME/logs.
If you remove theHere is a list of some errors and their fixes:log4jconfiguration frommws-config.groovy, MWS will write its log files tojava.io.tmpdir. For Tomcat,java.io.tmpdiris generally set to$CATALINA_BASE/temporCATALINA_TMPDIR.
MongoDB: Errors during MWS startup
If the application fails to start and gives error messages such as these:Error creating bean with name 'mongoDatastore' can't say something; nested exception is com.mongodb.MongoException
MongoDB: Out of semaphores to get db connection
To resolve this error, adjust the values ofconnectionsPerHost
or threadsAllowedToBlockForConnectionMultiplier by adding them to
mws-config.groovy. Example:
grails.mongo.options.connectionsPerHost = 60
grails.mongo.options.threadsAllowedToBlockForConnectionMultiplier = 10
- The Configuration page under Moab Web Services in the Quick Reference menu, which briefly discusses a few MongoDB driver options.
- The MongoOptions documentation, which contains full details on all MongoDB driver options.
- You must restart Tomcat after adding, removing, or changing
grails.mongo.optionsparameters.- As shipped,
mws-config.groovydoes not contain anygrails.mongo.optionsparameters. To adjust their values, you need to add them tomws-config.groovy.- The default value of
connectionsPerHostis normally 10, but MWS sets it internally to 50.- The default value of
threadsAllowedToBlockForConnectionMultiplieris 5.- Any of the options listed in MongoOptions can be specified in
mws-config.groovy. Just use the prefixgrails.mongo.optionsas shown above.
MongoDB: Connection wait timeout after 120000 ms
See the section "MongoDB: Out of semaphores to get db connection" above.java.lang.OutOfMemoryError: Java heap space
Increase the size of the heap using JVM options-Xms and -Xmx. Here are the suggested values from the Quickstart Guide:
CATALINA_OPTS="-DMWS_HOME=/opt/mws -Xms256m -Xmx3g -XX:MaxPermSize=384m"-Xms: Set initial Java heap size.-Xmx: Set maximum Java heap size.
java.lang.OutOfMemoryError: PermGen space
Increase the size of the permanent generation using JVM option-XX:MaxPermSize. Here are the suggested values from the Quickstart Guide:
CATALINA_OPTS="-DMWS_HOME=/opt/mws -Xms256m -Xmx3g -XX:MaxPermSize=384m"SEVERE: Context [/mws] startup failed due to previous errors
Ifcatalina.out contains this error, look in /opt/mws/log/mws.log and /opt/mws/log/stacktrace.log for more details on the error.Moab Reached Maximum Number of Concurrent Client Connections
When this error message is encountered, simply add a new line to themoab.cfg file:CLIENTMAXCONNECTIONS 256
changeparam CLIENTMAXCONNECTIONS 256
The number 256 above may be substituted for the desired maximum number of MWM client connections.
1.5 Configuration
This section describes the location of the Moab Web Services configuration files. It also shows some examples of how to configure logging.To see a full reference to all configuration and logging parameters available in MWS, see the Configuration page under Moab Web Services in the Quick Reference menu.
Home Directory
The MWS home directory contains configuration files, log files, and files that serve features of MWS such as hooks and plugins. You should set the location of the MWS home directory using theMWS_HOME property
as shown in the Quickstart Guide. If you do not set
MWS_HOME as a Java property or as an environment variable, then MWS
will use /opt/mws as the default MWS_HOME.Configuration Files
The primary configuration file isMWS_HOME/etc/mws-config.groovy.
If this file is missing or contains errors, MWS will not start.
If MWS_HOME/etc/log4j.properties exists, MWS will load it as well.Logging Configuration Using mws-config.groovy
Shown below is an example that logs all error messages and fatal
messages to /opt/mws/log/mws.log. It also logs all stack traces to
/opt/mws/log/stacktrace.log. Note that this example is not configured
to log events.Minimal Logging Configuration
log4j = {
	appenders {
		rollingFile name: 'stacktrace',
			file: '/opt/mws/log/stacktrace.log',
			maxFileSize: '1GB'
		rollingFile name: 'rootLog',
			file: '/opt/mws/log/mws.log',
			threshold: org.apache.log4j.Level.ERROR,
			maxFileSize: '1GB'
	}
	root {
		debug 'rootLog'
	}
}Console Logging Configuration
log4j = {
	appenders {
		rollingFile name: 'stacktrace',
			file: '/opt/mws/log/stacktrace.log',
			maxFileSize: '1GB'
		console name: 'consoleLog',
			threshold: org.apache.log4j.Level.ERROR
	}
	root {
		debug 'consoleLog'
	}
}
- You may configure logging using either
MWS_HOME/etc/mws-config.groovyorMWS_HOME/etc/log4j.properties.- If you do not define any
log4jconfiguration, MWS will write its log files tojava.io.tmpdir. For Tomcat,java.io.tmpdiris generally set to$CATALINA_BASE/temporCATALINA_TMPDIR.
LDAP Configuration Using mws-config.groovy
Using a Supported LDAP Directory Type
To configure an MWS connection to an LDAP server, add the following parameters tomws-config.groovy:Throughout the following examples in this topic, you will see dc=acme,dc=com. "acme" is only used as an example to illustrate what you would use as your own domain controller if your domain name was "acme.com." You should replace any references to "acme" with your own organization's domain name.
- ldap.server: The hostname or IP address of the LDAP server.
- ldap.port: The port the LDAP server is listening on.
- ldap.baseDNs: A list of distinguished names that are the root entries for LDAP searches.
- ldap.bindUser: The distinguished name of the bind user.
- ldap.password: The password of the ldap.bindUser.
- ldap.directory.type: The type of LDAP directory (e.g. "Microsoft Active Directory").
- Microsoft Active Directory
- OpenLDAP Using InetOrgPerson Schema
- OpenLDAP Using NIS Schema
- OpenLDAP Using Samba Schema
If you followed the Adaptive Computing tutorial "Setting up OpenLDAP on CentOS 6" your ldap.directory.type should be set to "OpenLDAP Using InetOrgPerson Schema".
Sample OpenLDAP Configuration
ldap.server  = "192.168.0.5"
ldap.port = 389
ldap.baseDNs = ["dc=acme,dc=com"]
ldap.bindUser = "cn=Manager,dc=acme,dc=com"
ldap.password = "*****"
ldap.directory.type = "OpenLDAP Using InetOrgPerson Schema"
Sample Active Directory Configuration
ldap.server  = "192.168.0.5"
ldap.port = 389
ldap.baseDNs = ["CN=Users,DC=acme,DC=com","OU=Europe,DC=acme,DC=com"]
ldap.bindUser = "cn=Administrator,cn=Users,DC=acme,DC=com"
ldap.password = "*****"
ldap.directory.type = "Microsoft Active Directory"
To see how to configure a secure connection to the LDAP server, see Connection to LDAP in the Security section.
Using an Unsupported LDAP Directory Type
If you are not using one of the supported directory types, you can explicitly configure MWS to work with your LDAP schema by using the following parameters:- ldap.user.objectClass: The name of the class used for the LDAP user object. Example:
- user
- person
- inetOrgPerson
- posixAccount
- ldap.group.objectClass: The name of the class used for the LDAP group object. Example:
- group
- groupOfNames
- posixGroup
- ldap.ou.objectClass: The name of the class used for the LDAP organizational unit object. Example:
- organizationalUnit
- ldap.user.membership.attribute: The attribute field in a user entry to use when loading the user's groups (optional if ldap.group.membership.attribute is defined). Example:
- memberOf
- ldap.group.membership.attribute: The attribute field in a group entry to use when loading the group's members (optional if ldap.user.membership.attribute is defined). Example:
- member
- memberUid
- ldap.user.name.attribute: The attribute field to use when loading the username. This field must uniquely identify a user. Example:
- sAMAccountName
- uid
Advanced Active Directory Configuration
ldap.server  = "myldaphostname"
ldap.port = 389
ldap.baseDNs = ["CN=Users,DC=acme,DC=com","OU=Europe,DC=acme,DC=com"]
ldap.bindUser = "cn=Administrator,cn=Users,DC=acme,DC=com"
ldap.password = "*****"
ldap.user.objectClass = "person"
ldap.group.objectClass = "group"
ldap.ou.objectClass = "organizationalUnit"
ldap.user.membership.attribute = "memberof"
ldap.group.membership.attribute = "member"
ldap.user.name.attribute = "sAMAccountName"
Advanced OpenLDAP Configuration
ldap.server  = "myldaphostname"
ldap.port = 389
ldap.baseDNs = ["dc=acme,dc=com"]
ldap.bindUser = "cn=Manager,dc=acme,dc=com"
ldap.password = "*****"
ldap.user.objectClass = "inetOrgPerson"
ldap.group.objectClass = "groupOfNames"
ldap.ou.objectClass = "organizationalUnit"
ldap.user.membership.attribute = null
ldap.group.membership.attribute = "memberUid"
ldap.user.name.attribute = "uid"
Overriding Attributes in a Supported LDAP Directory Type
You can also override attributes in supported directory types. For example, say you are using OpenLDAP with an NIS Schema. The group objectClass for NIS defaults to "groupOfNames," but you want to use "groupOfUniqueNames" instead while retaining all other defaults for NIS. You can do this by setting ldap.directory.type to "OpenLDAP Using NIS Schema" and overriding the ldap.group.objectClass attribute as follows:Advanced OpenLDAP Configuration
ldap.directory.type = "OpenLDAP Using NIS Schema"
ldap.group.objectClass = "groupOfUniqueNames"
- LDAP is not currently used to authenticate users to MWS. LDAP is only used to map principals to roles, as explained in Principals.
- The user class in your LDAP schema must have an attribute that uniquely identifies a user (e.g. uid, sAMAccountName).
1.6 Security
When running MWS in production environments, security is a major concern. This section focuses on securing the three kinds of connections with MWS:- The connection between MWS and Moab Workload Manager (MWM)
- The connection between MWS and MongoDB
- The connections between clients and MWS
Connection with MWM
MWS communicates with MWM via the Moab Wire Protocol, which uses a direct connection between the two applications. The communication over this connection uses a shared secret key, which is discussed in the Quickstart Guide. However, the communication is not encrypted and is therefore susceptible to eavesdropping and replay attacks. For this reason, MWS is supported only when running on the same machine as MWM. This assures that any connections between the two applications occur internally on the server and are not exposed to external users.Connection with MongoDB
By default, the connection between MWS and MongoDB is not authenticated. To enable authentication, follow the instructions below. For further reading, see the MongoDB tutorial Control Access to MongoDB Instances with Authentication.- Add an administrative user to the
admindatabase. - Add an MWS user to the
mwsdatabase. - To support MWS API version 2, add an MWS user with read-only rights to the
moabdatabase. - Here is an example of how to create all the required users. The users in the
moabdatabase are required only for MWS API version 2.
[root]# service mongod start
[root]# mongo
> use admin;
> db.addUser("admin_user", "secret1");
> use moab;
> db.addUser("moab_user", "secret2");
> db.addUser("mws_user", "secret3", true);
> use mws;
> db.addUser("mws_user", "secret3");
> exit;
- Add the MWS user credentials (the ones you just created) to the
mws-config.groovyfile. Example:
grails.mongo.username = "mws_user"
grails.mongo.password = "secret3"
- Enable authentication in the MongoDB configuration file.
- The file is called
/etc/mongodb.confon many Linux distributions. - In that file, look for
#auth = trueand uncomment it. - Restart MongoDB.
- Restart Tomcat.
The passwords used here (secret1, secret2, and secret3) are examples. Choose your own passwords for these users.If authentication is enabled in MongoDB, but the MWS user was not properly created or configured, MWS will not start. See the log file(s) for additional information in this case.
Client Connections to MWS
All connections to MWS, except those requesting the documentation or the main page, must be authenticated properly. MWS uses a single-trusted-user authentication model, meaning a single user exists that has access to all aspects of MWS. The username and password for this user are configured with theauth.defaultUser properties in the configuration file. See the
Configuration reference guide for more information.When using the MWS user interface in a browser, the user will be prompted
for username and password. For information on how to authenticate requests
when not using a browser, see the Authentication
section in the user guide.The username and password in the Basic Authentication header are encoded but not encrypted. Therefore, it is strongly recommended that MWS be run behind a proxy (like Apache) with SSL enabled. The instructions below provide an example of how to do this.
Encrypting Client Connections using Apache and SSL
This section shows how to encrypt client connections to MWS using Apache and SSL. These instructions have been tested on CentOS™ 6.2 with the "Web Server" software set installed. The same ideas are applicable to other operating systems, but the details might be different. As shown in the diagram below, these instructions assume that Tomcat and Apache are running on the same server.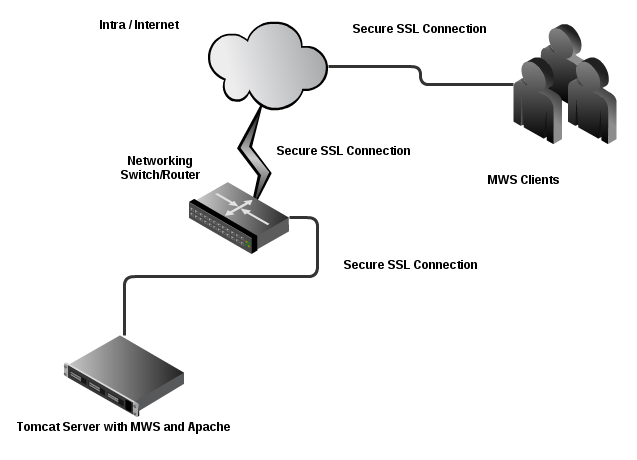
- Create a self-signed certificate. See http://www.openssl.org/docs/HOWTO/certificates.txt for more details if desired.
Instead of creating a self-signed certificate, you can buy a certificate from a certificate vendor. If you do, then the vendor will provide instructions on how to configure Apache with your certificate.
- Run these commands:
cd /etc/pki/tls/certs
cp -p make-dummy-cert make-dummy-cert.bak
cp -p localhost.crt localhost.crt.bak
- Edit
make-dummy-certand replace theanswers()function with code similar to this:
answers() {
		echo US
		echo Utah
		echo Provo
		echo Adaptive Computing Enterprises, Inc.
		echo Engineering
		echo test1.adaptivecomputing.com
		echo
}- Run this command:
./make-dummy-cert localhost.crt
- Configure Apache to use the new certificate and to redirect MWS requests to Tomcat. To do so, edit
/etc/httpd/conf.d/ssl.conf. - Comment out this line:
SSLCertificateKeyFile /etc/pki/tls/private/localhost.key
- Add these lines near the end, just above
</VirtualHost>:
ProxyPass /mws http://127.0.0.1:8080/mws retry=5
ProxyPassReverse /mws http://127.0.0.1:8080/mws
- Configure Apache to use SSL for all MWS requests.
- Add these lines to the end of
/etc/httpd/conf/httpd.conf:
RewriteEngine On
RewriteCond %{HTTPS} off
RewriteRule (/mws.*) https://%{HTTP_HOST}%{REQUEST_URI}- Give Apache permission to connect to Tomcat.
setsebool -P httpd_can_network_connect 1
- Turn on Apache.
chkconfig httpd on
service httpd start
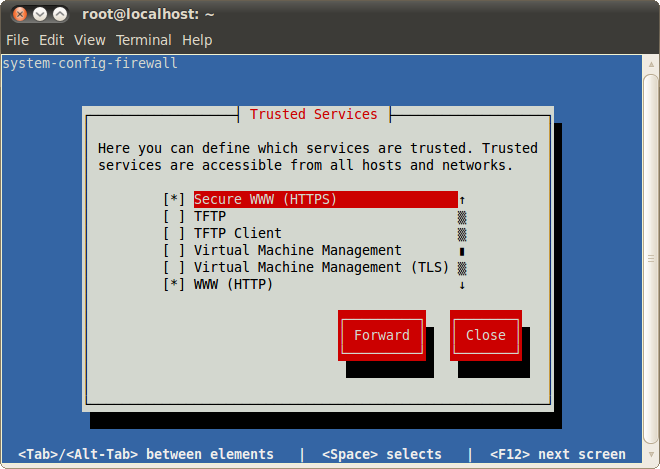
- Using
system-config-firewall-tui, enable "Secure WWW (HTTPS)" and "WWW (HTTP)" as trusted services.
Encrypting Client Connections using Tomcat and SSL
This section shows how to encrypt client connections to MWS using Tomcat and SSL but without requiring the use of Apache. These instructions have been tested on CentOS™ 6.2 with Tomcat 6.0.Generate a Certificate
First you must generate a certificate. To do so, use the keytool utility that is shipped with the Oracle Java Runtime Environment. As the Tomcat user, run the followingkeytool -genkey -alias tomcat -keyalg RSA
Enable the Tomcat SSL Connector
Open the server.xml file, usually located in $CATALINA_HOME/conf/ ($CATALINA_HOME represents the directory where Tomcat is installed). Verify the SSL HTTP/1.1 Connector entry is enabled. To do so locate the SSL HTTP/1.1 Connector entry and uncomment it.<Connector port="8443" protocol="HTTP/1.1" SSLEnabled="true" maxThreads="150" scheme="https" secure="true" clientAuth="false" sslProtocol="TLS" />The code above enables SSL access on port 8443. The default for HTTPS is 443, but just as Tomcat uses 8080 instead of 80 to avoid conflicts, 8443 is used instead of 443.Verify that server.xml is owned by the Tomcat user.
chown -R tomcat:tomcat server.xml
<web-app>
  …
    <security-constraint>
      <web-resource-collection>
        <web-resource-name>MWS Secure URLs</web-resource-name>
        <url-pattern>/*</url-pattern>
      </web-resource-collection>
      <user-data-constraint>
        <transport-guarantee>CONFIDENTIAL</transport-guarantee>
      </user-data-constraint>
    </security-constraint>
</web-app>
Connection to LDAP
MWS supports using SSL/TLS to secure connections to an LDAP server. Typically, LDAP servers reserve port 636 for SSL/TLS connections. In order to use SSL/TLS you need to place the PEM-encoded LDAP server security certificate in theMWS_HOME/etc/ssl.crt folder, and make sure the user running Tomcat either owns or has
permission to read this certificate.mkdir $MWS_HOME/etc/ssl.crt cp ldapServerCert.pem $MWS_HOME/etc/ssl.crt cd $MWS_HOME/etc/ssl.crt chown tomcat:tomcat ldapServerCert.pem
mws-config.groovy. (Note that ldap.security.server.certificate is the filename of a server certificate found
in the MWS_HOME/etc/ssl.crt folder.)
Configuring an SSL/TLS connection to LDAP
ldap.port = 636
ldap.security.type = "SSL"
ldap.security.server.certificate = "ldapServerCert.pem"
ldap.security.type parameter to StartTLS as follows:Configuring a StartTLS connection to LDAP
ldap.port = 389
ldap.security.type = "StartTLS"
ldap.security.server.certificate = "ldapServerCert.pem"
ldap.security.type.| ldap.security.type | Default Port | Notes |
|---|---|---|
| None | 389 | This is the default if no security type is configured. All data is sent in plain text. |
| SSL | 636 | Requires server certificate. All data is encrypted. |
| StartTLS | 389 | Starts as an insecure connection and is upgraded to an SSL/TLS connection. Requires server certificate. After upgrade all data is encrypted. |
MWS_HOME/etc/ssl.crt folder. You can change this location by setting the mws.certificates.location parameter
in mws-config.groovy. If the path specified is relative, MWS will resolve this path relative to the MWS_HOME directory. For example, if you set the
mws.certificates.location to "etc/someOtherCertsFolder" MWS will look for certificates in MWS_HOME/etc/someOtherCertsFolder.Changing the SSL/TLS security certificates location
mws.certificates.location = "etc/someOtherCertsFolder
1.7 Version and Build Information
To get detailed version information about MWS, use one of the following three methods:Browser
Using a browser, visit the MWS home page (for example, http://localhost:8080/mws/). At the bottom of the page is the MWS version information. See the screenshot below: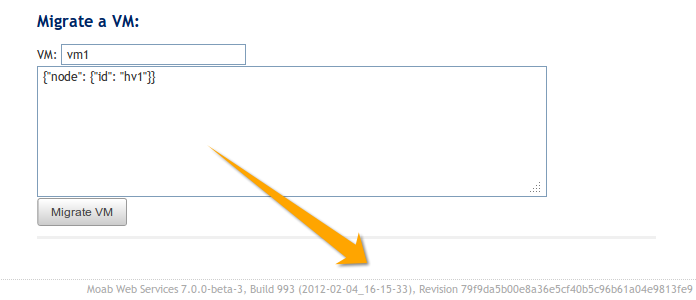
REST Request
Using a REST client or other HTTP client software, send a GET request to therest/diag/about resource. Here is an example:curl -u username:password http://localhost:8080/mws/rest/diag/about
MANIFEST.MF File
If MWS fails to start, version and build information can be found in theMETA-INF/MANIFEST.MF file inside the MWS WAR file. The version
properties begin with Implementation. Below is an excerpt of a
MANIFEST.MF file:Implementation-Build: 26 Implementation-Build-Date: 2012-06-19_14-18-59 Implementation-Revision: 376079a5e5f552f2fe25e6070fd2e84c646a98fdName: Grails Application Implementation-Title: mws Implementation-Version: 7.1.0-rc2 Grails-Version: 2.0.3
2 Access Control
This section describes how to manage access control in Moab Web Services.2.1 Application Accounts
Applications are the consumers of MWS. They include Moab Viewpoint and other applications that need the resources provided by MWS. An application account consists of four editable fields and resource specific access control settings:| Field | Required | Default Value | Value Type | Maximum Length | Description |
|---|---|---|---|---|---|
| Application Name | Yes | - | String | 32 | The name of the application. Must start with a letter and may contain letters, digits, underscores, periods, hyphens, apostrophes, and spaces. |
| Username | Yes | - | String | 32 | Used for authentication. Must start with a letter and may contain letters, digits, underscores, periods, and hyphens. |
| Description | No | - | String | 1000 | The description of the application. |
| Enabled | - | true | Boolean | - | Controls whether the application is allowed to access MWS. |
| Access Control Settings | Yes | All Permissions | - | - | The permissions granted to the application. This is controlled by selecting specific check boxes in a grid. |
- Application Name: Moab Viewpoint
- Username: viewpoint
- Description: This application account grants access to Moab Viewpoint for Moab Cloud Suite.
2.1.1 Managing Application Accounts
Application accounts are used to grant access to MWS. Every application with an application account must be granted at least one access control permission to a resource in MWS. To manage application accounts, start with Listing Application Accounts.2.1.2 Listing Application Accounts
To list all applications accounts, browse to the MWS home page (https://servername/mws for example). Log in as the admin user, then
click Admin and then Application Accounts.Each column (except Password) can be sorted in ascending or descending
order by clicking on the column heading.
2.1.3 Creating an Application Account
To create an application account, go to the Application List page and click Add Application. The Application Name and Username are required fields. See Application Accounts for more information on the fields.Access to specific resources and plugin custom web services is granted or revoked by checking or unchecking the check boxes in the respective resources or plugin web services access control sections. For each resource, access may be granted to a resource for each method supported by MWS, including GET, POST, PUT, and DELETE. See the figure below for an example. In this example, the application has access to all available methods for the Access
Control Lists and Accounts resources as well as to retrieve the Events resource through
the GET method, but is denied the permission to create new events through the POST method.Access may also be granted to each plugin type's custom web service(s). When
new plugin types or plugin web services are added to MWS, applications must be
updated with the new access control settings. See below for an example.
In this example, the application has access to all available methods for the Access
Control Lists and Accounts resources as well as to retrieve the Events resource through
the GET method, but is denied the permission to create new events through the POST method.Access may also be granted to each plugin type's custom web service(s). When
new plugin types or plugin web services are added to MWS, applications must be
updated with the new access control settings. See below for an example. In this example, the application has access to all the custom web services defined for the
"Test" plugin type. Note that though Unsecured Web Services are listed, access to them
cannot be denied (see Exposing Web Services for more
information).
In this example, the application has access to all the custom web services defined for the
"Test" plugin type. Note that though Unsecured Web Services are listed, access to them
cannot be denied (see Exposing Web Services for more
information).
2.1.4 Displaying an Application Account
To show information about an application account, go to the Application List page and click the desired application name.In addition to displaying the values for fields, grids are also displayed which represent the application's access control permissions defined for resources and plugin custom web services. Examples of the resources and the plugin web services access control displays are shown below.

2.1.5 Modifying an Application Account
To modify an application account, go to the Application List page, click the desired application name, and then click Edit. See Creating an Application Account for more information on available fields and access control settings.2.1.6 Resetting an Application Password
To reset an application password, go to the Application List page and click the Reset link for the desired application. Alternatively, go to the Display Application page for the desired application and click the Reset link.2.1.7 Deleting an Application Account
To delete an application account, go to the Application List page, click the desired application name, and then click Delete. A confirmation message is shown. If the OK button is clicked, the application account is deleted from the system and cannot be recovered.3 API Documentation
Introduction
The Moab® Web Services (MWS) provide a set of RESTful resources that can be used to create, read, update, and delete various objects in the Moab® Workload Manager.3.1 RESTful Web Services
In order to understand how to use Moab Web Services, it is first necessary to give a brief introduction to REST. REST (Representational State Transfer) is a set of guidelines which utilizes the full HTTP (Hypertext Transfer Protocol) specification along with endpoint URLs that describe resources. The HTTP methods used in REST are composed of the following:| Method | Description |
|---|---|
| GET | Query for a list or a single resource. |
| POST | Creating a resource. |
| PUT | Modifying a resource. |
| DELETE | Deleting a resource. |
1 represents a unique identifier for books in each case.| Method | URL | Description |
|---|---|---|
| GET | /books | Retrieves a list of all books in the library. |
| POST | /books | Creates a new book. |
| GET | /books/1 | Retrieves a single book. |
| PUT | /books/1 | Modifies a single book. |
| DELETE | /books/1 | Deletes a single book. |
Note that in the cases of the POST and PUT operations, additional information may be needed to describe the resource to be created or the fields that should be modified.Moab Web Services provides RESTful web services for many resources. The methods and URLs available are documented in the Resources section.
3.2 Data Format
JSON (JavaScript Object Notation) is the data format used for all communication with MWS. This format makes use of two main structures: collections of key/value pairs called objects and ordered lists of values called arrays . Objects are defined by using curly braces ({}), and arrays are defined by using square brackets ([]). A JSON
object or array may contain several different types of values including numbers, booleans (true/false), strings,
objects, arrays, or the keyword 'null' representing no value.
For
example, a simple JSON object might be defined as:{
"number": 1,
"decimalNumber": 1.2,
"boolean": true,
"string": "Any string",
"dateString": "2013-05-23 17:32:02 UTC",
"object": {
"key": "value"
},
"array": [
"value1",
"value2"
],
"nullValue": null
}"yyyy-MM-dd HH:mm:ss ZZZ". For more details on that pattern, see
Joda-Time DateTimeFormat.
For a list of valid time zone IDs, see
Joda-Time Available Time Zones.For more information on JSON, see json.org.The data format of MWS is defined as follows:
- Input for a POST or PUT must be in JSON format. Set the
Content-Typeheader toapplication/json. - Output is in JSON format and always consists of an object with zero or more key/value pairs.
- The output may also be "pretty-printed" or formatted for human viewing by sending a URL parameter. See Global URL Parameters for more information.
3.3 Global URL Parameters
All URL parameters are optional.
| Parameter | Valid Values | Description |
|---|---|---|
| api-version | Integer | Requests a specific API version |
| pretty | true | Controls pretty printing of output |
| fields | Comma-Separated String | Includes only specified fields in output |
| exclude-fields | Comma-Separated String | Excludes specified fields from output |
| max | Integer | The maximum number of items to return |
| offset | Integer | The index of the first item to return |
API Version (api-version)
See Requesting Specific API Versions for information on this parameter and how it should be used.Pretty (pretty)
By default, the output is easy for a machine to read but difficult for humans to read. The pretty parameter formats the output so that it is easier to read.Field Selection (fields)
The fields parameter will include only the specified fields in the output. For list queries, the field selection acts on the objects in results and not on the totalCount or results properties themselves.The format of the fields parameter is a comma-separated list of properties that should be included, as inid,state. Using periods, sub-objects may also be specified, and fields of these objects may be
included as well. This is done with the same syntax for both single sub-objects and lists of sub-objects,
as in id,requirements.requiredNodeCountMinimum,blockReason.message.Example for a job query
Request
GET /rest/jobs?api-version=2&fields=name,flags,requirements.taskCount,dates.createdDate
Response
{
  "totalCount": 1,
  "resultCount": 1,
  "results": [  {
    "dates": {"createdDate": "2012-10-17 01:11:54 UTC"},
    "flags": ["GLOBALQUEUE"],
    "name": "Moab.24",
    "requirements": [{"taskCount": 1}]
  }]
}
Field Exclusion (exclude-fields)
The exclude-fields parameter is the opposite of the fields parameter. All fields will be included in the output except those that are specified. For list queries, the field exclusion acts on the objects in results and not on the totalCount or results properties themselves.The format of the exclude-fields parameter is a comma-separated list of properties that should be excluded from the output, as inid,state. Using periods, sub-objects may also be specified, and fields of these
objects may be excluded as well. This is done with the same syntax for both single sub-objects and lists of sub-objects,
as in id,requirements.requiredNodeCountMinimum,blockReason.message.Example
Suppose a query returns the following JSON:Request with No Field Exclusion
GET /objects
Response
{
  "id": "1",
  "listOfStrings":   [
    "string1",
    "string2"
  ],
  "listOfObjects": [  {
    "item1": "value1",
    "item2": "value2"
  }],
  "singleObject":   {
    "id": "obj1",
    "field1": "value1"
  }
}Request with Field Exclusion
GET /objects?exclude-fields=id,listOfObjects.item2,singleObject.field1,listOfStrings
Response
{
  "listOfObjects": [{"item1": "value1"}],
  "singleObject": {"id": "obj1"}
}
Sorting (sort)
Services, Service Templates, Images, and Events support sorting based on MongoDB syntax by using the sort parameter. To sort in ascending order, specify a1 for the sorting field.
To sort in descending order, specify a -1. Objects can also be sorted on nested fields by using
dot notation to separate the sub-fields, such as field.subfield1.subfield2.Examples
To sort services in ascending order by account:http://localhost/mws/rest/services?sort={"account":1}http://localhost/mws/rest/services?sort={"account":-1}http://localhost/mws/rest/services?sort={"attributes.moab.job.resources.procs":-1}http://localhost/mws/rest/service-templates?sort={"name":1}http://localhost/mws/rest/service-templates?sort={"name":-1}http://localhost/mws/rest/service-templates?sort={"attributes.moab.job.template":1}3.4 Requesting Specific API Versions
Because of significant changes in the API introduced in 7.2, MWS possesses a versioned API. Theapi-version
URL parameter may be used to change the requested API version for any call to MWS. The current valid API versions
with their corresponding MWS versions are shown in the table below:| API Version | MWS Version | Documentation |
|---|---|---|
| 1 | 7.0 and 7.1 | MWS 7.1.1 Documentation |
| 2 | 7.2 | Contained within this document |
| latest | Latest | Contained within this document |
- If no API version is requested, it will default to version
1. - The Resources documentation contains information for the latest API version. For documentation of previous API versions, please see the table above.
- When the
latestAPI version is requested, it resolves to the latest API version of MWS, such as2for MWS 7.2.
Examples
GET http://localhost:8080/mws/rest/nodes
// Data returned uses API version 1GET http://localhost:8080/mws/rest/nodes?api-version=1
// Data returned uses API version 1GET http://localhost:8080/mws/rest/nodes?api-version=2
// Data returned uses API version 2GET http://localhost:8080/mws/rest/nodes?api-version=latest
// Data returned uses API version 2
3.5 Responses and Return Codes
Various HTTP responses and return codes are generated from MWS operations. These are documented below according to the operation that they are associated with.Listing and Showing Resources
For any successful list or show operation (GET), a 200 OK response code is always returned.
No additional headers beyond those typical of a HTTP response are given in the response.The body of this response consists of the results of the list or show operation. For a list operation,
the results are wrapped in metadata giving total and result counts. The result count represents
the number of resource records returned in the current request, and the total count represents the
number of all records available. These differ when querying or the max and offset parameters are
used. The following is an example of a list operation response:JSON List Response Body
{
	"resultCount":1,
	"totalCount":5,
	"results":[
		{
			"id":"Moab.1",
			…
		}
	]
}JSON Show Response Body
{
	"id":"Moab.1",
	…
}
Creating Resources
A successful creation (POST) of a resource has two potential response codes:
- If the resource was created immediately, a
201 Createdresponse code is returned. - If the resource is still being created, a
202 Acceptedresponse code is returned.
Location header is added to the response with the full URL which
can be used to get more information about the newly created resource or the task
associated with creating the resource (if a 202 is returned).Additionally, the body of the response will contain the unique identifier of the
newly created resource or the unique identifier for the task associated with creating
the resource (if a 202 is returned).For example, during creation or submission of a job, a 201 response code is returned
with the following response headers and body:Job Creation Response Headers
HTTP/1.1 201 Created
Server: Apache-Coyote/1.1
Location: /mws/rest/jobs/Moab.21
X-Moab-Status: Success
X-Moab-Code: 000
Content-Type: application/json;charset=utf-8
Content-Length: 16
Date: Wed, 21 Dec 2011 23:04:47 GMT
Job Creation Response Body
{"id":"Moab.21"}VM Creation Response Headers
HTTP/1.1 202 Accepted
Server: Apache-Coyote/1.1
Location: /mws/rest/jobs/vmcreate-1
X-Moab-Status: Success
X-Moab-Code: 000
Content-Type: application/json;charset=utf-8
Content-Length: 23
Date: Wed, 21 Dec 2011 23:12:50 GMT
VM Creation Response Body
{"jobId":"vmcreate-1"}Modifying Resources
For any successful resource modification operation (PUT), a 200 OK or
202 Accepted response code is returned. A 200 response code signifies
that the modification was immediately completed. No additional headers are
returned in this case. A 202 response code is used again to signify that the
modification is not yet complete and additional actions are taking place. In this case,
a Location header is also returned with the full URL of the resource describing
the additional actions.In the case of a 200 response code, the body of this response typically consists of
an object with a single messages property containing a list of statuses or results
of the modification(s). However, a few exceptions to this rule exist as documented in the
Resources section. In the case of a 202 response code, the format is
the same as for a 202 during a creation operation, in that the body consists of an object
with the unique identifier for the task associated with the additional action(s).For example, when modifying a job, several messages may be returned as follows with the
associated 200 response code.Job Modification Response Headers
HTTP/1.1 200 OK
Server: Apache-Coyote/1.1
X-Moab-Status: Success
X-Moab-Code: 000
X-Moab-Message:
Content-Type: application/json;charset=utf-8
Content-Length: …
Date: Thu, 22 Dec 2011 16:49:43 GMT
JSON Modify Response Body
{
	"messages":[
		"gevent processed",
		"variables successfully modified"
	]
}VM Modification Response Headers
HTTP/1.1 202 Accepted
Server: Apache-Coyote/1.1
Location: /mws/rest/jobs/vmmigrate-1
X-Moab-Status: Success
X-Moab-Code: 000
Content-Type: application/json;charset=utf-8
Content-Length: 22
Date: Wed, 21 Dec 2011 23:12:50 GMT
VM Modification Response Body
{"jobId":"vmmigrate-1"}Deleting Resources
For any successful resource deletion operation (DELETE), a 200 OK or
202 Accepted response code is returned. A 200 response code signifies
that the deletion was immediately completed. No additional headers are
returned in this case. A 202 response code is used again to signify that the
deletion is not yet complete and additional actions are taking place. In this case,
a Location header is also returned with the full URL of the resource describing
the additional actions.In the case of a 200 response code, the body of this response is empty. In the
case of a 202 response code, the format is the same as for a 202 during a
creation operation, in that the body consists of an object with the unique
identifier for the task associated with the additional action(s).For example, when deleting a job, a 200 response code is returned with an empty
body as shown below.Job Deletion Response
HTTP/1.1 200 OK
Server: Apache-Coyote/1.1
X-Moab-Status: Success
X-Moab-Code: 000
X-Moab-Message:
Content-Type: application/json;charset=utf-8
Content-Length: 0
Date: Thu, 22 Dec 2011 16:49:43 GMT
VM Deletion Response Headers
HTTP/1.1 202 Accepted
Server: Apache-Coyote/1.1
Location: /mws/rest/jobs/vmdestroy-1
X-Moab-Status: Success
X-Moab-Code: 000
Content-Type: application/json;charset=utf-8
Content-Length: 22
Date: Wed, 21 Dec 2011 23:12:50 GMT
VM Deletion Response Body
{"jobId":"vmdestroy-1"}Moab Response Headers
In addition to the typical HTTP headers and theLocation header described above,
several headers are returned if the operations directly interact with
Moab. These headers are described in the following table:| Name | Description |
|---|---|
| X-Moab-Status | One of Success, Warning, or Failure. Describes the overall status of the Moab request. |
| X-Moab-Code | A three digit code specifying the exact error encountered, used only in debugging. |
| X-Moab-Message | An optional message returned by Moab during the request. |
3.6 Error Messages
Below is an explanation of what error message format to expect when an HTTP status code other than 20x is returned. All error codes have a response code of 400 or greater.400 Bad Request
This response code is returned when the request itself is at fault, such as when trying to modify a resource with an emptyPUT request body or when
trying to create a new resource with invalid parameters. The response body is as
follows:{
"messages":[
"Message describing error",
"Possible prompt to take action"
]
}401 Unauthorized
This response code is returned when authentication credentials are not supplied or are invalid. The response body is as follows:{
"messages":[
"You must be authenticated to access this area"
]
}403 Forbidden
This response code is returned when the credentials supplied are valid, but the permissions granted are insufficient for the operation. This occurs when using Application Accounts with limited access.{
"messages":[
"You are not authorized to access this area"
]
}404 Not Found
This response code is returned when the request specifies a resource that does not exist. The response body is as follows:{
"messages":[
"The resource with id 'uniqueId' was not found"
]
}405 Method Not Allowed
This response code is returned when a resource does not support the specified HTTP method as an operation. The response body is as follows:{
"messages":[
"The specified HTTP method is not allowed for the requested resource"
]
}500 Internal Server Error
This indicates that there was an internal server error while performing the request, or that an operation failed in an unexpected manner. These are the most serious errors returned by MWS. If additional information is needed, the MWS log may contain further error data. The response body is as follows:{
"messages":[
"A problem occurred while processing the request",
"A message describing the error"
]
}3.7 Pre and Post-Processing Hooks
MWS provides functionality to intercept and modify data sent to and returned from web services for all available resources. This is done by creating hooks in Groovy files located in a sub-directory of theMWS_HOME directory (/opt/mws/hooks
by default).The full reference for available hooks and methods available to them can be found on the Hooks page in the reference guide.
Configuring Hooks
The directory of the hooks folder may be changed by providing a value formws.hooks.location in the configuration file.
If the directory starts with a path separator (ie /path/to/hooks), it will be treated as an absolute path. Otherwise, it
will be used relative to the location of the MWS home directory.For example, if the MWS home directory is set to /opt/mws, the hooks directory by default
would be in /opt/mws/hooks. Changing the mws.hooks.location property to myhooks would result in the hooks directory
being located at /opt/mws/myhooks. Due to the default location of the MWS home directory, the default directory
of the hooks directory is /opt/mws/hooks.On startup, if the hooks directory does not exist, it will be created with a simple README.txt file with instructions
on how to create hooks, the objects available, and the hooks available. If the folder or file is unable to be created,
a message will be printed on the log with the full location of a README file, copied into a temporary directory.Defining Hooks for a Resource
Hooks are defined for resources by creating groovy class files in the hooks directory (MWS_HOME/hooks by default).
Each groovy file must be named by the resource URL it is associated with and end in ".groovy". The following table shows
some possible hook files that may be created. Notice that the virtual machines hook file is abbreviated as vms, just
as the URL for virtual machines is /rest/vms. In all cases, the hook file names will match the URLs.| Resource | Hook Filename |
|---|---|
| Jobs | jobs.groovy |
| Nodes | nodes.groovy |
| Virtual Machines | vms.groovy |
| Pending Actions | pending-actions.groovy |
| url | url.groovy |
Complete Hook File
// Example before hook
def beforeList = {
	// Perform actions here
	// Return true to allow the API call to execute normally
	return true
}def beforeShow = {
	// Perform actions here
	// Render messages to the user with a 405 Method Not Allowed
	//	HTTP response code
	renderMessages("Custom message here", 405)
	// Return false to stop normal execution of the API call
	return false
}// Example after hook
def afterList = { o ->
	if (!isSuccess()) {
		// Handle error here
		return false
	}
	// Perform actions here
	return o
}before and after are different, each will be explained separately.Before Hooks
As shown above,before hooks require no arguments. They can directly act on several properties, objects, and methods
as described in the Hooks reference guide. The return value is one of the most important aspects of
a before hook. If it is false, a renderMessages, renderObject, renderList, render, or redirect method must
first be called. This signifies that the API call should be interrupted and the render or redirect action specified within
the hook is to be completed immediately.A return value of true signifies that the API call should continue normally. Parameters, session variables, request and
response variables may all be modified within a before hook.If no return value is explicitly given, the result of the last statement in theFor all methods available tobeforehook to be executed will be returned. This may cause unexpected behavior if the last statement resolves tofalse.
before hooks as well as specific examples, see the Hooks page in the reference guide.After Hooks
After hooks are always passed one argument: the object or list that is to be rendered as JSON. This may be modified as
desired, but note that the object or list value is either a
JSONArray or
JSONObject. Therefore, it may not be accessed and modified as a typical groovy Map.Unlike before hooks, after hooks should not call the render* methods directly. This method will automatically be called on the
resulting object or list returned. The redirect and render methods should also not be called at this point. Instead, if a custom object
or list is desired to be used, the serializeObject and serializeList methods are available to create suitable results to return.The return value of an after hook may be one of two possibilities:
- The potentially modified object or list passed as the first argument to the hook. In this case, this value will override the output object or list unless it is null.
- Null or false. In this case, the original, unmodified object or list will be used in the output.
The return value of theFor all methods available toafterhook, if not null or false, must be the modified object passed into the hook or an object or list created with theserialize*methods.
after hooks as well as specific examples, see the Hooks page in the reference guide.Error Handling
After hooks, unlike the before hooks, have the possibility of handling errors encountered during the course of the request.
Handling errors is as simple as adding a one-line check to the hook as shown above or in the following code:if (!isSuccess()) { // Handle error return false }
after hook contain at least these lines of code to prevent confusion on what the input object or list represents
or should look like.The isSuccess() function is false if and only if the HTTP response code is 400 or higher, such as a 404 Not Found, 400 Bad Request, or
500 Internal Server Error and the cause of the error state was not in the associated before hook. In other words, objects and lists
rendered in the before hook with any HTTP response code will never run the associated after hook.When handling errors, the passed in object will always contain a messages property containing a list of Strings describing
the error(s) encountered.Defining Common Hooks
Sometimes it is beneficial to create hooks which are executed for all calls of a certain type, such as abeforeList hook that is
executed during the course of listing any resource. These are possible using an all.groovy file. The format of this file
is exactly the same as other hook files. The order of execution is as follows:
Beforecommon hook executedBeforeresource-specific hook executed- Normal API call executed
Afterresource-specific hook executedAftercommon hook executed
3.8 Authentication
MWS uses Basic Authentication for all REST API requests. This means that a username and password must be provided for each call to resources. There are two types of accounts that can be granted access: Users and Applications.- For insructions on how to set the credentials for the default User account, see the "Client Connections to MWS" section in Security.
- For insructions on how to manage Application accounts, see Application Accounts.
Authorization: Basic YWRhcHRpdmU6YzNVU3R1bkU=
Basic is the base64 encoding of
username : password . In the example above, YWRhcHRpdmU6YzNVU3R1bkU=
is the base64 encoding of adaptive:c3UStunE. See section 2 of
RFC 2617 for more details.The username and password in the Basic Authentication header are encoded but not encrypted. Therefore, it is strongly recommended that MWS be run behind a proxy (like Apache) with SSL enabled. See the section "Encrypting Client Connections using Apache and SSL" under Security.
4 Resources
The sections below show the MWS resources and the HTTP methods defined on them. The prefix for these resources depends on how themws.war file is deployed. A typical prefix would be http://localhost:8080/mws.
Using this example, one absolute resource URI would be http://localhost:8080/mws/rest/jobs.This section only contains documentation for the latest API version. Please see the table in the Requesting Specific API Versions section for links to documentation for previous versions.
4.1 Access Control Lists
This section describes behavior of the ACL Rules (Access Control List Rules) object in Moab Web Services. It contains the URLs, request bodies, and responses delivered to and from Moab Web Services.The ACL API contains the type and description of all fields in the ACL Rules object. It also contains details regarding which fields are valid during PUT and POST actions.
Supported Methods
ACLs are not directly manipulated through a single URL, but with sub-URLs of the other objects such as Virtual Containers and Reservations.
| Resource | GET | PUT | POST | DELETE |
|---|---|---|---|---|
| /rest/reservations/rsvId/acl-rules/aclId | Create or Update ACLs | Delete ACL | ||
| /rest/vcs/vcId/acl-rules/aclId | Create or Update ACLs | Delete ACL |
4.1.1 Getting ACLs
Although ACL Rules cannot be retrieved directly using the GET method on any of theacl-rules resources, ACL Rules are attached to supported
objects when querying for them. Each supported object contains a field
named aclRules, which is a collection of the ACL Rules defined on
that object.Supported Objects
The following is a list of objects that will return ACL Rules when queried:4.1.2 Creating or Updating ACLs
The HTTP PUT method is used to create or update ACL Rules. The request body can contain one or more ACL Rules. If an ACL Rule with the sametype
and value exists, then it will be overwritten.Quick Reference
PUT http://localhost/mws/rest/reservations/<rsvId>/acl-rules
PUT http://localhost/mws/rest/vcs/<vcId>/acl-rules
4.1.2.1 Create or Update ACL
URLs and Parameters
PUT http://localhost/mws/rest/reservations/<objectId>/acl-rules
PUT http://localhost/mws/rest/vcs/<objectId>/acl-rules
| Parameter | Required | Type | Valid Values | Description |
|---|---|---|---|---|
| objectId | Yes | String | - | The unique identifier of the object. |
Request Body
The request body below shows all the fields that are available for the PUT method, along with some sample values.JSON Request Body
{"aclRules": [{
  "affinity": "POSITIVE",
  "comparator": "LEXIGRAPHIC_EQUAL",
  "type": "USER",
  "value": "ted"
}]}
Sample Response
This message may not match the message returned from Moab exactly, but is given as an example of the structure of the response.
JSON Response
{"messages":["Virtual container 'vc1' successfully modified"]}Samples
Create or update multiple ACLs on a single object:PUT http://localhost/mws/rest/reservations/system.21/acl-rules
{"aclRules": [
    {
    "affinity": "POSITIVE",
    "comparator": "LESS_THAN_OR_EQUAL",
    "type": "DURATION",
    "value": "3600"
  },
    {
    "affinity": "POSITIVE",
    "comparator": "LEXIGRAPHIC_EQUAL",
    "type": "USER",
    "value": "ted"
  }
]}
Restrictions
- ACL Rules cannot be added to or updated on Standing Reservations.
- The affinity and comparator fields are ignored for Virtual Containers.
4.1.3 Deleting ACLs
The HTTP DELETE method is used to remove ACL Rules.Quick Reference
ACL Rules cannot be removed from Standing Reservations.
DELETE http://localhost/mws/rest/reservations/<rsvId>/acl-rules/<aclId>
DELETE http://localhost/mws/rest/vcs/<vcId>/acl-rules/<aclId>
4.1.3.1 Delete ACL
URLs and Parameters
DELETE http://localhost/mws/rest/reservations/<objectId>/acl-rules/<aclId>
DELETE http://localhost/mws/rest/vcs/<objectId>/acl-rules/<aclId>
| Parameter | Required | Type | Valid Values | Description |
|---|---|---|---|---|
| objectId | Yes | String | - | The unique identifier of the object from which to remove the ACL Rule. |
| aclId | Yes | String | - | A string representing the ACL Rule, with the format type:value. |
Sample Response
This message may not match the message returned from Moab exactly, but is given as an example of the structure of the response.
JSON Response
{"messages":["Successfully modified virtual container 'vc1'"]}Restrictions
- ACL Rules cannot be removed from Standing Reservations.
4.2 Accounts
This section describes behavior of the Accounts object in Moab Web Services. It contains the URLs, request bodies, and responses delivered to and from Moab Web Services.This resource refers to Moab Accounting Manager accounts, not Moab Workload Manager accounts.
The Account API contains the type and description of fields that all Accounts have in common.
Supported Methods
| Resource | GET | PUT | POST | DELETE |
|---|---|---|---|---|
| /rest/accounts | Get all accounts | |||
| /rest/accounts/id | Get specified account |
4.2.1 Getting Accounts
The HTTP GET method is used to retrieve Accounts information.Quick Reference
GET http://localhost/mws/rest/accounts
4.2.1.1 Get All Accounts
URLs and Parameters
GET http://localhost/mws/rest/accounts?proxy-user=<USER>[&custom-fields=Department][&query={"deleted":false}][&sort={"requestId":-1}]
| Parameter | Required | Valid Values | Description | Example |
|---|---|---|---|---|
| proxy-user | Yes | String | Perform action as defined MAM user. | proxy-user=amy |
| custom-fields | No | Comma-Separated String | Includes custom MAM account attributes. | custom-fields=Department |
| query | No | JSON | Query for specific results. | query={"deleted":false} |
| sort | No | JSON | Sort the results. Use 1 for ascending and -1 for descending. | sort={"requestId":-1} |
The query parameter does not support the full Mongo query syntax. Only querying for a simple,
non-nested JSON object is allowed.See Global URL Parameters for available URL parameters.Sample Response
GET http://localhost/mws/rest/accounts?proxy-user=amy&fields=name,description
{
  "totalCount": 2,
  "resultCount": 2,
  "results":   [
        {
      "id": "biology",
      "description": "Biology Dept."
    },
        {
      "id": "chemistry",
      "description": "Chemistry Dept."
    }
  ]
}
4.2.1.2 Get Single Account
URLs and Parameters
GET http://localhost/mws/rest/accounts/<id>| Parameter | Required | Type | Valid Values | Description |
|---|---|---|---|---|
| id | Yes | String | - | The unique identifier of the object. |
Sample Responses
GET http://localhost/mws/rest/accounts/chemistry?proxy-user=amy
{
  "id": "chemistry",
  "active": true,
  "organization": "",
  "description": "Chemistry Dept",
  "creationTime": "2012-04-11 06:56:11 UTC",
  "modificationTime": "2012-04-11 06:56:11 UTC",
  "deleted": false,
  "requestId": 94,
  "transactionId": 283,
  "users":   [
        {
      "id": "amy",
      "active": true,
      "admin": false
    },
        {
      "id": "bob",
      "active": true,
      "admin": false
    },
            {
      "id": "dave",
      "active": true,
      "admin": false
    }
   ]
}
4.3 Credentials
This section describes behavior of the Credential object in Moab Web Services. It contains the URLs, request bodies, and responses delivered to and from Moab Web Services.
The Credential API is new with API version 2. The supported methods
table below requires each resource to be accessed with a URL parameter
of api-version=2.See Requesting Specific API Versions for more information.
The Credential API contains the type and description of all fields in the Credential object.
Supported Methods
| Resource | GET | PUT | POST | DELETE |
|---|---|---|---|---|
| /rest/credentials/accounts | Get all account credentials | |||
| /rest/credentials/classes | Get all class credentials | |||
| /rest/credentials/groups | Get all group credentials | |||
| /rest/credentials/qoses | Get all QoS credentials | |||
| /rest/credentials/users | Get all user credentials |
4.3.1 Getting Credentials
The HTTP GET method is used to retrieve Resource Type information.Quick Reference
GET http://localhost/mws/rest/credentials/accounts
GET http://localhost/mws/rest/credentials/classes
GET http://localhost/mws/rest/credentials/groups
GET http://localhost/mws/rest/credentials/qoses
GET http://localhost/mws/rest/credentials/users
4.3.1.1 Get All Account Credentials
URLs and Parameters
GET http://localhost/mws/rest/credentials/accounts
Sample Response
GET http://localhost/mws/rest/credentials/accounts?fields=name
{
  "totalCount": 1,
  "resultCount": 1,
  "results":   [
    {"name": "account1"}
  ]
}
4.3.1.2 Get All Class Credentials
URLs and Parameters
GET http://localhost/mws/rest/credentials/classes
Sample Response
GET http://localhost/mws/rest/credentials/classes?fields=name
{
  "totalCount": 1,
  "resultCount": 1,
  "results":   [
    {"name": "class1"}
  ]
}
4.3.1.3 Get All Group Credentials
URLs and Parameters
GET http://localhost/mws/rest/credentials/groups
Sample Response
GET http://localhost/mws/rest/credentials/groups?fields=name
{
  "totalCount": 1,
  "resultCount": 1,
  "results":   [
    {"name": "group1"}
  ]
}
4.3.1.4 Get All QoS Credentials
URLs and Parameters
GET http://localhost/mws/rest/credentials/qoses
Sample Response
GET http://localhost/mws/rest/credentials/qoses?fields=name
{
  "totalCount": 1,
  "resultCount": 1,
  "results":   [
    {"name": "qos1"}
  ]
}
4.3.1.5 Get All User Credentials
URLs and Parameters
GET http://localhost/mws/rest/credentials/users
Sample Response
GET http://localhost/mws/rest/credentials/users?fields=name
{
  "totalCount": 1,
  "resultCount": 1,
  "results":   [
    {"name": "user1"}
  ]
}
4.4 Diagnostics
This section describes additional REST calls that are available for performing diagnostics on Moab Web Services.Supported Methods
| Resource | GET | PUT | POST | DELETE |
|---|---|---|---|---|
| /rest/diag/about | Get version information | |||
| /rest/diag/auth | Diagnose authentication | |||
| /rest/diag/health/summary | Get health information summary | |||
| /rest/diag/health/detail | Get health information detail | |||
| /rest/diag/ldap | Get LDAP connection information |
4.4.1 Version and Build Information
The HTTP GET method is used to retrieve version and build information.Quick Reference
GET http://localhost/mws/rest/diag/about
URLs and Parameters
GET http://localhost/mws/rest/diag/about
Sample Response
The response contains the application version, build number, build date, and revision.{
"suite":"Cloud",
"pluginCommonsVersion":"0.9.3",
"version":"7.1",
"build":"100",
"buildDate":"2012-01-01_16-00-00",
"revision":"1000"
}4.4.2 Diagnose Authentication
The HTTP GET method is used to test for proper authentication. This resource is designed to be used as a simple validation of credentials and gives no output besides the response code.Quick Reference
GET http://localhost/mws/rest/diag/auth
URLs and Parameters
GET http://localhost/mws/rest/diag/auth
Sample Response
A successful result is indicated by the200response code while a failure is indicated by a401response code.
{}4.4.3 Connection Health Information
The HTTP GET method is used to retrieve health or status information for connections to external systems or software. There are two available resources for health, one that returns simple summary information and another that returns detailed information.Quick Reference
GET http://localhost/mws/rest/diag/health
GET http://localhost/mws/rest/diag/health/detail
4.4.3.1 Get Health Summary
URLs and Parameters
GET http://localhost/mws/rest/diag/health/summary
If the MongoDB connection is down, authenticated resources are not available. While this resource does not possess much detail beyond that of simple connection information, it is still useful as it does not require authentication and therefore can be used to determine connection problems with MongoDB.
Sample Response
The response contains the connection health for Moab Workload Manager (MWM), Moab Accounting Manager (MAM), and MongoDB. Atrue response value indicates that the connection is healthy and available, and a
false response indicates that the connection is currently down. Likewise, the mongoConnected property for
MWM signifies the state of the MWM to MongoDB connection. The possible values of this state are UP, DOWN,
NOT_CONFIGURED when the MongoDB server is not configured in MWM, NOT_SUPPORTED when MWM is not compiled with
MongoDB support, and UNKNOWN when MWS cannot communicate with MWM.{
"mam": {
"connected": true
},
"mongo": {
"connected": false
},
"mwm": {
"connected": true,
"mongoConnected": "UP"
}
}4.4.3.2 Get Health Detail
URLs and Parameters
GET http://localhost/mws/rest/diag/health/detail
If the MongoDB connection is down, authenticated resources such as this are not available. In this case, using the Get Health Summary instead may be required.
Sample Response
The response contains the connection health and information for Moab Workload Manager (MWM), Moab Accounting Manager (MAM), and MongoDB. A"connected": true response value indicates that the connection is healthy and
available, and a false response indicates that the connection is currently down. Likewise, the mongoConnected property for
MWM signifies the state of the MWM to MongoDB connection. The possible values of this state are UP, DOWN,
NOT_CONFIGURED when the MongoDB server is not configured in MWM, NOT_SUPPORTED when MWM is not compiled with
MongoDB support, and UNKNOWN when MWS cannot communicate with MWM. A message is also present for all down connections
except MWM to MongoDB giving a reason for the error state.{
"mam": {
"connected": false,
"host": "localhost",
"message": "There was an error connecting to MAM at 'localhost', the secret key does not match.",
"port": 7112,
"version": null
},
"mongo": {
"connected": true,
"databaseName": "mws",
"host": "127.0.0.1",
"message": null,
"port": 27017,
"replicaSet": null,
"username": "mws",
"version":"2.0.1"
},
"mwm": {
"connected": true,
"host": "localhost",
"message": null,
"port": 42559,
"licensedFeatures": ["vm", "provision"],
"state":"RUNNING",
"mongoConnected": "DOWN",
"mongoCredentialsSet":false,
"mongoHost":"localhost",
"mongoPort":27017,
"version": "7.2"
}
}4.4.4 LDAP Information
The HTTP GET method is used to retrieve LDAP information.Quick Reference
GET http://localhost/mws/rest/diag/ldap
URLs and Parameters
GET http://localhost/mws/rest/diag/ldap
Sample Response
{
  "server": "openldapsambaserver",
  "port": 389,
  "securityType": "SSL",
  "baseDNs": ["dc=testldap,dc=ac"],
  "bindUser": "cn=admin,dc=testldap,dc=ac",
  "userObjectClass": "posixAccount",
  "userNameAttribute": "uid"
}
4.5 Events
This section describes the URLs, request bodies, and responses delivered to and from Moab Web Services for handling eventsThe Event API contains the type and description of all fields in the Event object. It also contains details regarding which fields are valid during POST actions.
Supported Methods
| Resource | GET | PUT | POST | DELETE |
|---|---|---|---|---|
| /rest/events | Get all events | Create event | ||
| /rest/events/id | Get specified event |
Configuration
Logging events to a flat file requires that you make a few changes to the configuration in the log4j section of the mws-config.groovy file so that events will be logged to the events.log file, and all other Moab Web Services logging information will be sent to the mws.log file.Causing events.log to Roll Based on a Time Window
You can specify how often the events.log file rolls. The following example illustrates the configuration changes you will need make to mws-config.groovy to cause the events.log file to roll based on a time window. (In this example, mws-config.groovy is configured so that events.log rolls daily at midnight.)Daily rolling events.log configuration in mws-config.groovy
log4j = {
  def eventAppender = new org.apache.log4j.rolling.RollingFileAppender(name: 'events', layout: pattern(conversionPattern: "%m%n"))
  def rollingPolicy = new org.apache.log4j.rolling.TimeBasedRollingPolicy(fileNamePattern: '/tmp/events.%d{yyyy-MM-dd}', activeFileName: '/tmp/events.log')
  rollingPolicy.activateOptions()
  eventAppender.setRollingPolicy(rollingPolicy)  appenders {
      appender eventAppender      rollingFile name: 'rootLog',
        file: '/tmp/mws.log',
        maxFileSize: '1GB'
  }  root {
    warn 'rootLog'
  }  trace additivity:false, events:'com.ace.mws.events.EventFlatFileWriter'
}Monthly event logs
def rollingPolicy = new org.apache.log4j.rolling.TimeBasedRollingPolicy(fileNamePattern: '/tmp/events.%d{yyyy-MM}', activeFileName: '/tmp/events.log')Hourly event logs
def rollingPolicy = new org.apache.log4j.rolling.TimeBasedRollingPolicy(fileNamePattern: '/tmp/events.%d{yyyy-MM-dd_HH:00}', activeFileName: '/tmp/events.log')Configuring events.log to Roll Based on File Size Threshold
You can also configure the events.log file to roll when the log size exceeds a specified threshold. The following example illustrates the configuration changes you will need to make to mws-config.groovy to cause the events.log file to roll on a size threshold. (In this example, mws-config.groovy is configured so that events.log rolls when its size exceeds 50 MB.)mws-config.groovy configuration that rolls events.log based on file size
log4j = {
  appenders {
      rollingFile name: 'events',
        file: '/tmp/events.log',
        maxFileSize: '50MB',
        maxBackupIndex:10      rollingFile name: 'rootLog',
        file: '/tmp/mws.log',
        maxFileSize: '1GB'
  }  root {
    warn 'rootLog'
  }  trace additivity:false, events:'com.ace.mws.events.EventFlatFileWriter'
}Additivity
The additivity attribute of the EventFlatFileWriter logger can be either "true" or "false". If you specify "true", events will be logged to the events.log file and the mws.log file. If you specify "false", events will be logged to the events.log file only. (All other Moab Web Services logging information will be logged to the mws.log file, as configured by the rootLog appender.)To log events to the mws.log file in addition to the events.log file, make this configuration: additivity:true. For example:Logging events to both events.log and mws.log
trace additivity:true, events:'com.ace.mws.events.EventFlatFileWriter'Deleting Old Events
By default, MWS will hold event data in MongoDB indefinitely. However, if disk space is limited, you may want to regularly delete old, unneeded events from MongoDB. This section contains some examples of how you can do this.Let's say that you want to delete events that are older than 90 days. You could run this script. (There are 86,400,000 milliseconds in a day, so in this example,90*86400000 corresponds to 90 days in milliseconds.)Delete events older than 90 days
$ mongo
MongoDB shell version: 2.0.1
connecting to: test
> use mws
> db.event.remove({eventTime:{$lt:new Date(new Date().getTime()-90*86400000)}})
> exitdeleteOldEvents.sh
#!/bin/bash
printf 'use mws_dev\ndb.event.remove({eventTime:{$lt:new Date(new Date().getTime()-90*86400000)}})\nexit' | mongo$crontab -e) so that old
events are automatically deleted on a certain day of the week (for example, every Sunday at 2:00 a.m.), you would add an entry like this:cron table entry to delete old events
00 02 * * 0 /root/deleteOldEvents.sh
4.5.1 Getting Events
The HTTP GET method is used to retrieve Event information. Queries for all objects and a single object are available.Quick Reference
GET http://localhost/mws/rest/events[?query={"field":"value"}&sort={"field":<1|-1>}]
GET http://localhost/mws/rest/events/<id>
4.5.1.1 Get All Events
URLs and Parameters
GET http://localhost/mws/rest/events[?query={"field":"value"}&sort={"field":<1|-1>}]| Parameter | Required | Valid Values | Description | Example |
|---|---|---|---|---|
| query | No | JSON | Query for specific results. | query={"status":"failure"} |
| sort | No | JSON | Sort the results. Use 1 for ascending and -1 for descending. | sort={"id":-1} |
Sample Response
GET http://localhost:8080/mws/rest/events
{
   "totalCount":3,
   "resultCount":3,
   "results":[
      {
         "details":{         },
         "errorMessage":{
            "errorCode":"542",
            "message":"Cannot communicate with XCAT resource manager",
            "originator":"XCAT"
         },
         "eventCategory":"failure",
         "eventTime":"2012-01-27 15:18:32 UTC",
         "eventType":"rmfailure",
         "facility":"rm",
         "primaryObject":{
            "serialization":null,
            "type":"rm",
            "id":"xcat"
         },
         "sourceComponent":"MWM",
         "status":"failure",
         "id":"4faddab8c4aa264506f8ac3d"
      },
      {
         "details":{         },
         "eventCategory":"start",
         "eventTime":"2012-01-27 15:18:31 UTC",
         "eventType":"schedcyclestart",
         "facility":"scheduler",
         "sourceComponent":"MWM",
         "status":"success",
         "id":"4faddab8c4aa264506f8ac3c"
      },
      {
         "details":{
            "alpha":"lorem ipsum dolor sit amet",
            "bravo":"2",
            "charlie":"consectetur adipisicing elit, sed do"
         },
         "eventCategory":"start",
         "eventTime":"2012-01-27 15:18:30 UTC",
         "eventType":"jobstart",
         "facility":"job",
         "initiatedBy":{
            "proxyUser":"bob",
            "user":"tomcat6"
         },
         "primaryObject":{
            "serialization":"\n         <job JobID=\"moab.849\" ReqAWDuration=\"100000\" User=\"bob\" />\n      ",
            "type":"job",
            "id":"moab.849"
         },
         "relatedObjects":[
            {
               "type":"vm",
               "id":"vm56"
            },
            {
               "type":"service",
               "id":"lamp.211"
            }
         ],
         "sourceComponent":"MWM",
         "status":"success",
         "id":"4faddab8c4aa264506f8ac3b"
      }
   ]
}
Querying Events
It is possible to query events by one or more fields based on MongoDB query syntax. The following contains examples of simple and complex event queries and event queries by date.Simple Queries
To see only events that are of type "jobsubmit":http://localhost/mws/rest/events?query={"eventType":"jobsubmit"}http://localhost/mws/rest/events?query={"eventType":"jobsubmit","status":"failure"}http://localhost/mws/rest/events?query={"facility":"job"}http://localhost/mws/rest/events?query={"eventCategory":"start"}More Complex Queries
You can query on embedded JSON objects within the event JSON. For example, to see events associated with proxyUser bob:http://localhost/mws/rest/events?query={"initiatedBy.proxyUser":"bob"}http://localhost/mws/rest/events?query={"initiatedBy.proxyUser":{"$ne":"bob"}}$in operator.
For example, to see events that relate to either alice, bob, or charlie:http://localhost/mws/rest/events?query={"initiatedBy.proxyUser":{"$in":["alice","bob","charlie"]}}Querying Events by Date
To see events created before January 27, 2012 at 12:08 a.m. UTC:http://localhost/mws/rest/events?query={"eventTime":{"$lt":"2012-01-27 12:08:00 UTC"}}http://localhost/mws/rest/events?query={"eventTime":{"$lte":"2012-01-27 12:08:00 UTC"}}http://localhost/mws/rest/events?query={"eventTime":{"$gt":"2012-01-27 12:04:00 UTC"}}http://localhost/mws/rest/events?query={"eventTime":{"$gte":"2012-01-27 12:04:00 UTC"}}http://localhost/mws/rest/events?query={"eventTime":{"$gte":"2012-01-27 12:04:00 UTC","$lte":"2012-01-27 12:08:00 UTC"}}http://localhost/mws/rest/events?query={"initiatedBy.proxyUser":"bob","eventTime":{"$gte":"2012-01-27 12:04:00 UTC","$lte":"2012-01-27 12:08:00 UTC"}}http://localhost/mws/rest/events?query={"initiatedBy.proxyUser":"bob","eventType":"jobsubmit","eventTime":{"$gte":"2012-01-27 12:04:00 UTC","$lte":"2012-01-27 12:08:00 UTC"}}Sorting
See the sorting section of Global URL ParametersLimiting the Number of Results
If you want to limit the number of results of events, you can use themax parameter. For
example, to see only 10 "vmmigrate" events:http://localhost/mws/rest/events?query={"eventType":"vmmigrate"}&sort={"eventTime":1}&max=10max with offset, as follows:http://localhost/mws/rest/events?query={"eventType":"vmcreate"}&sort={"eventTime":-1}&max=51&offset=60Retrieving a Subset of Fields
To cause only certain fields to return for each event, use thefields parameter. For example, to
show only the eventTime field for each event:http://localhost/mws/rest/events?max=3&fields=eventTime
{
  "totalCount": 187,
  "resultCount": 3,
  "results":   [
    {"eventTime": "2012-03-05 10:01:59 UTC"},
    {"eventTime": "2012-03-05 10:02:00 UTC"},
    {"eventTime": "2012-03-05 10:02:01 UTC"}
  ]
}http://localhost/mws/rest/events?fields=name,type,status
{
  "totalCount": 187,
  "resultCount": 3,
  "results":   [
        {
      "eventTime": "2012-03-05 10:01:59 UTC",
      "eventType": "jobsubmit",
      "status": "failure"
    },
        {
      "eventTime": "2012-03-05 10:02:00 UTC",
      "eventType": "jobstart",
      "status": "success"
    },
        {
      "eventTime": "2012-03-05 10:02:01 UTC",
      "eventType": "vmmigrate",
      "status": "success"
    }
  ]
}
4.5.1.2 Get Single Event
URLs and Parameters
GET http://localhost/mws/rest/events/<id>| Parameter | Required | Type | Valid Values | Description |
|---|---|---|---|---|
| id | Yes | String | - | The unique identifier of the object. |
Sample Response
JSON Response
{
  "details":   {
    "attribute": "walltime",
    "modifier": "increase",
    "value": "200000"
  },
  "eventCategory": "job",
  "eventTime": "2012-01-27 00:07:00 UTC",
  "eventType": "jobmodify",
  "facility": "baseline",
  "initiatedBy":   {
    "proxyUser": "bob",
    "user": "viewpoint"
  },
  "primaryObject":   {
    "serialization": null,
    "type": "job",
    "id": "moab.900"
  },
  "sourceComponent": "MWM",
  "status": "success",
  "id": "4fa46081c4aa5b896ac4b757"
}
4.5.2 Creating Events
The HTTP POST method is used to create an Event.Quick Reference
POST http://localhost/mws/rest/events
4.5.2.1 Create Event
URLs and Parameters
POST http://localhost/mws/rest/events
Request Body
Unlike most other URLs, the events URL accepts both JSON and XML. Be sure to set theContent-Type HTTP header to either application/json or application/xml.POST http://localhost/mws/rest/events Content-Type:application/json
[
   {
      "eventTime":"2012-01-27 15:18:30 UTC",
      "eventType":"jobstart",
      "eventCategory":"start",
      "sourceComponent":"MWM",
      "status":"success",
      "facility":"job",
      "initiatedBy":{
         "proxyUser":"bob",
         "user":"tomcat6"
      },
      "primaryObject":{
         "serialization":"<job JobID=\"moab.849\" ReqAWDuration=\"100000\" User=\"bob\" />",
         "type":"job",
         "id":"moab.849"
      },
      "relatedObjects":[
         {
            "type":"vm",
            "id":"vm56"
         },
         {
            "type":"service",
            "id":"lamp.211"
         }
      ],
      "details":{
         "alpha":"lorem ipsum dolor sit amet",
         "bravo":"2",
         "charlie":"consectetur adipisicing elit, sed do"
      }
   },
   {
      "eventTime":"2012-01-27 15:18:32 UTC",
      "eventType":"rmfailure",
      "eventCategory":"failure",
      "sourceComponent":"MWM",
      "status":"failure",
      "facility":"rm",
      "primaryObject":{
         "serialization":null,
         "type":"rm",
         "id":"xcat"
      },
      "errorMessage":{
         "errorCode":"542",
         "message":"Cannot communicate with XCAT resource manager",
         "originator":"XCAT"
      }
   },
   {
      "eventTime":"2012-01-27 15:18:31 UTC",
      "eventType":"schedcyclestart",
      "eventCategory":"start",
      "sourceComponent":"MWM",
      "status":"success",
      "facility":"scheduler"
   }
]
POST http://localhost/mws/rest/events Content-Type:application/xml
<Events>  <Event eventTime="2012-01-27T15:18:30.000-07:00" eventType="jobstart" eventCategory="start" sourceComponent="MWM" status="success" facility="job">
    <InitiatedBy user="tomcat6" proxyUser="bob"/>
    <PrimaryObject objectType="job" objectID="moab.849">
      <Serialization>
         <![CDATA[<job JobID="moab.849" ReqAWDuration="100000" User="bob" />]]>
      </Serialization>
    </PrimaryObject>
    <RelatedObjects>
      <RelatedObject objectType="vm" objectID="vm56"/>
      <RelatedObject objectType="service" objectID="lamp.211"/>
    </RelatedObjects>
    <Details>
    	<Detail name="alpha">lorem ipsum dolor sit amet</Detail>
    	<Detail name="bravo">2</Detail>
    	<Detail name="charlie">consectetur adipisicing elit, sed do</Detail>
    </Details>
  </Event>  <Event eventTime="2012-01-27T15:18:31.000-07:00" eventType="schedcyclestart" eventCategory="start" sourceComponent="MWM" status="success" facility="scheduler" />  <Event eventTime="2012-01-27T15:18:32.000-07:00" eventType="rmfailure" eventCategory="failure" sourceComponent="MWM" status="failure" facility="rm">
    <PrimaryObject objectType="rm" objectID="xcat" />
    <ErrorMessage originator="XCAT" errorCode="542">Cannot communicate with XCAT resource manager</ErrorMessage>
  </Event></Events>
Sample Response
If the request was successful, the response will be an object with an id property containing the ID of the newly created events. On failure, the response is an error message.JSON Response
[{"id":"4fadd83bc4aa366464599e1a"},{"id":"4fadd83bc4aa366464599e1b"},{"id":"4fadd83bc4aa366464599e1c"}]2012-01-27T15:18:30.000-07:00 type="jobstart" category="start" sourceComponent="MWM" status="success" facility="job" initiatedBy.user="tomcat6" initiatedBy.proxyUser="bob" primaryObject.type="job" primaryObject.id="moab.849" relatedObject.0.type="service" relatedObject.0.id="lamp.211" relatedObject.1.type="vm" relatedObject.1.id="vm56" detail.alpha="lorem ipsum dolor sit amet" detail.bravo="2" detail.charlie="consectetur adipisicing elit, sed do" primaryObject.serialization="<job JobID=\"moab.849\" ReqAWDuration=\"100000\" User=\"bob\" />" 2012-01-27T15:18:31.000-07:00 type="schedcyclestart" category="start" sourceComponent="MWM" status="success" facility="scheduler" 2012-01-27T15:18:32.000-07:00 type="rmfailure" category="failure" sourceComponent="MWM" status="failure" facility="rm" primaryObject.type="rm" primaryObject.id="xcat" error.originator="XCAT" error.code="542" error.message="Cannot communicate with XCAT resource manager"
Note that " (double quote) characters in the input have been replaced by \" characters in the output. (For other character restrictions, see the "Restrictions" section below.)
Restrictions
Special characters, such as newline, carriage return, and " (double quote) are encoded in the output of events.log to make events.log easy to parse with scripts and third party tools. For example, if the input XML contains:<ErrorMessage>RM says, "Cannot provision vm21"</ErrorMessage>
error.message="RM says, \"Cannot provision vm21\""| Character | Escape Sequence | |
|---|---|---|
| " (double quote) | \" | |
| \ (backslash) | \\ | |
| newline | \n | |
| carriage return | \r | |
| tab | \t |
- Detail names can only contain alpha-numeric characters, colons (:), underscores (_), and dashes (-).
- primaryObject.serialization, error.message, and detail values (for example detail.someName="some value") can contain any printable ASCII character. Single quotes (') and double quotes (") cannot be contained in any other field.
- A single event cannot contain more than more than 50 details. If an event has more than 50 details, the excess details will be ignored.
4.6 Funds
This section describes behavior of the Fund object and all related objects in Moab Web Services. It contains the URLs, request bodies, and responses delivered to and from Moab Web Services.The Fund API, FundBalance API, FundStatement API, and FundStatementSummary API contain the type and description of all fields in the Fund object as well as related objects and reports given in the URLs below.
Supported Methods
| Resource | GET | PUT | POST | DELETE |
|---|---|---|---|---|
| /rest/funds | Get all funds | |||
| /rest/funds/id | Get specified fund | |||
| /rest/funds/balances | Get all fund balances | |||
| /rest/funds/reports/statement | Get fund statement | |||
| /rest/funds/reports/statement/summary | Get fund statement summary |
4.6.1 Getting Funds
The HTTP GET method is used to retrieve Fund information.Quick Reference
GET http://localhost/mws/rest/funds?proxy-user=<USER>[&active=true][&custom-fields=health][&filter={"account":"chemistry"}][&filter-type=NonExclusive][&query={"priority":"2"}][&sort={"id":-1}]
GET http://localhost/mws/rest/funds/<id>?proxy-user=<USER>[&active=true][&custom-fields=health][&filter={"account":"chemistry"}][&filter-type=NonExclusive]
GET http://localhost/mws/rest/funds/balances?proxy-user=<USER>[&custom-fields=health][&filter={"account":"chemistry"}][&filter-type=NonExclusive]
GET http://localhost/mws/rest/funds/reports/statement?proxy-user=<USER>[&filter=<FILTER>][&filter-type=<FILTER-TYPE>][&start-time=<DATE-STRING>][&end-time=<DATE-STRING>][&context=<CONTEXT>]
GET http://localhost/mws/rest/funds/reports/statement/summary?proxy-user=<USER>[&filter=<FILTER>][&filter-type=<FILTER-TYPE>][&start-time=<DATE-STRING>][&end-time=<DATE-STRING>]
4.6.1.1 Get All Funds
URLs and Parameters
GET http://localhost/mws/rest/funds?proxy-user=<USER>[&active=true][&custom-fields=health][&filter={"account":"chemistry"}][&filter-type=NonExclusive][&query={"priority":"2"}][&sort={"id":-1}]
| Parameter | Required | Valid Values | Description | Example |
|---|---|---|---|---|
| proxy-user | Yes | String | Perform action as defined MAM user. | proxy-user=amy |
| active | No | Boolean | Lists only active or non-active allocations of the fund. The fund amount becomes the sum of the active/inactive allocations. | active=true |
| custom-fields | No | Comma-Separated String | Includes custom MAM fund attributes. | custom-fields=health |
| filter | No | JSON | Query funds based on defined MAM filter. | filter={"account":"chemistry"} |
| filter-type | No | String | Query funds based on defined MAM filter type. | filter-type=NonExclusive |
| query | No | JSON | Query for specific results. | query={"priority":"2","allocation.active":"false"} |
| sort | No | JSON | Sort the results. Use 1 for ascending and -1 for descending. | sort={"id":-1} |
The query parameter does not support the full Mongo query syntax. Only querying for a simple,
non-nested JSON object is allowed.See Global URL Parameters for available URL parameters.Sample Response
GET http://localhost/mws/rest/funds?proxy-user=amy&fields=id,name,allocations,constraints
{
  "totalCount": 1,
  "resultCount": 1,
  "results": [  {
    "id": 2,
    "name": 1204,
    "allocations": [    {
      "id": 2,
      "startTime": "-infinity",
      "endTime": "2012-02-02 09:34:42 UTC",
      "amount": 9060000,
      "creditLimit": 0,
      "deposited": 9060000,
      "active": true,
      "description": ""
    }],
    "fundConstraints": [    {
      "id": 2,
      "name": "CostCenter",
      "value": 1204
    }]
  }]
}
4.6.1.2 Get Single Fund
URLs and Parameters
GET http://localhost/mws/rest/funds/<id>?proxy-user=<USER>[&active=true][&custom-fields=health][&filter={"account":"chemistry"}][&filter-type=NonExclusive]
| Parameter | Required | Type | Valid Values | Description |
|---|---|---|---|---|
| id | Yes | String | - | The unique identifier of the object. |
| proxy-user | Yes | String | Perform action as defined MAM user. | proxy-user=amy |
| active | No | Boolean | Lists only active or non-active allocations of the fund. The fund amount becomes the sum of the active/inactive allocations. | active=true |
| custom-fields | No | Comma-Separated String | Includes custom MAM fund attributes. | custom-fields=health |
| filter | No | JSON | Query funds based on defined MAM filter. | filter={"account":"chemistry"} |
| filter-type | No | String | Query funds based on defined MAM filter type. | filter-type=NonExclusive |
Sample Responses
Fund sample response
{
  "id": 2,
  "name": 1204,
  "priority": 0,
  "description": "R&D for Manufacturing",
  "creationTime": "2012-02-02 09:34:42 UTC",
  "amount": 9060000,
  "deposited": 9060000,
  "creditLimit": 0,
  "allocations": [  {
    "id": 2,
    "startTime": "-infinity",
    "endTime": "infinity",
    "amount": 9060000,
    "creditLimit": 0,
    "deposited": 9060000,
    "active": true,
    "description": ""
  }],
  "fundConstraints": [  {
    "id": 2,
    "name": "CostCenter",
    "value": 1204
  }]
}
4.6.1.3 Get All Fund Balances
URLs and Parameters
GET http://localhost/mws/rest/funds/balances?proxy-user=<USER>[&custom-fields=health][&filter={"project":"chemistry"}][&filter-type=NonExclusive]
| Parameter | Required | Valid Values | Description | Example |
|---|---|---|---|---|
| proxy-user | Yes | String | Perform action as defined MAM user. | proxy-user=amy |
| custom-fields | No | Comma-Separated String | Includes custom MAM fund attributes. | custom-fields=health |
| filter | No | JSON | Query funds based on defined MAM filter. | filter={"account":"chemistry"} |
| filter-type | No | String | Query funds based on defined MAM filter type. | filter-type=NonExclusive |
Sample Response
The fund balances resource is an aggregation of fund data. See the FundBalance API page for more details.GET http://localhost/mws/rest/funds/balances?proxy-user=amy
{
  "totalCount": 2,
  "resultCount": 2,
  "results": [
    {
      "id": 2,
      "name": 1204,
      "priority": 0,
      "description": "R&D for Manufacturing",
      "creationTime": "2012-02-02 09:34:42 UTC",
      "amount": 9060000,
      "deposited": 9060000,
      "creditLimit": 0,
      "reserved": 0,
      "allocations": [
        {
          "id": 2,
          "amount": 9060000,
          "creditLimit": 0,
          "deposited": 9060000
        }
      ],
      "fundConstraints": [
        {
          "id": 2,
          "name": "CostCenter",
          "value": 1204
        }
      ],
      "balance": 9060000,
      "available": 9060000,
      "allocated": 9060000,
      "used": 0,
      "percentRemaining": 100,
      "percentUsed": 0
    },
    {
      "id": 5,
      "name": "",
      "priority": 0,
      "description": "",
      "creationTime": "2012-04-03 09:25:47 UTC",
      "amount": 901290219001,
      "deposited": 901290219021,
      "creditLimit": 30,
      "reserved": 84018308897.68,
      "allocations": [
        {
          "id": 6,
          "amount": 901290219001,
          "creditLimit": 30,
          "deposited": 901290219021
        }
      ],
      "fundConstraints": [],
      "balance": 817271910103.32,
      "available": 817271910133.32,
      "allocated": 901290219051,
      "used": 20,
      "percentRemaining": 100,
      "percentUsed": 0
    }
  ]
}
4.6.1.4 Get Fund Statement
URLs and Parameters
GET http://localhost/mws/rest/funds/reports/statement?proxy-user=<USER>[&filter=<FILTER>][&filter-type=<FILTER-TYPE>][&start-time=<DATE-STRING>][&end-time=<DATE-STRING>][&context=<CONTEXT>]
| Parameter | Required | Valid Values | Description | Example |
|---|---|---|---|---|
| proxy-user | Yes | String | Perform action as defined MAM user. | proxy-user=amy |
| filter | No | JSON | Query funds based on defined MAM filter. | filter={"account":"chemistry"} |
| filter-type | No | String | Query funds based on defined MAM filter type. | filter-type=NonExclusive |
| start-time | No | Date, -infinity, or now | Filter allocations and transaction after a start time. | start-time=2012-04-03 15:24:39 UTC |
| end-time | No | Date, -infinity, or now | Filter allocations and transactions before an end time. | end-time=2012-04-03 15:24:39 UTC |
| context | No | hpc or cloud | The context to use in Moab Accounting Manager. | context=hpc |
TheSee Global URL Parameters for available URL parameters.contextparameter overrides the default context set for MAM using themam.contextconfiguration parameter. See the Configuration page for more information on this parameter.
Sample Response
The fund statement report provides a snapshot of the current funds. See the FundStatement API for more details.GET http://localhost/mws/rest/funds/reports/statement?proxy-user=amy&fields=startBalance,endBalance
{
  "startBalance":1234.01,
  "endBalance":1000
}
4.6.1.5 Get Fund Statement Summary
URLs and Parameters
GET http://localhost/mws/rest/funds/reports/statement/summary?proxy-user=<USER>[&filter=<FILTER>][&filter-type=<FILTER-TYPE>][&start-time=<DATE-STRING>][&end-time=<DATE-STRING>]
| Parameter | Required | Valid Values | Description | Example |
|---|---|---|---|---|
| proxy-user | Yes | String | Perform action as defined MAM user. | proxy-user=amy |
| filter | No | JSON | Query funds based on defined MAM filter. | filter={"account":"chemistry"} |
| filter-type | No | String | Query funds based on defined MAM filter type. | filter-type=NonExclusive |
| start-time | No | Date, -infinity, or now | Filter allocations and transaction after a start time. | start-time=2012-04-03 15:24:39 UTC |
| end-time | No | Date, -infinity, or now | Filter allocations and transactions before an end time. | end-time=2012-04-03 15:24:39 UTC |
Sample Response
The fund statement summary is slightly different from the typical fund statement in that the transactions are provided as summaries grouped byobject and action. See the
FundStatementSummary API for more details.GET http://localhost/mws/rest/funds/reports/statement/summary?proxy-user=amy&fields=totalCredits,totalDebits,transactions.action,transactions.amount,transactions.count
{
  "totalCredits":200.02,
  "totalDebits":-100,
  "transactions":[ {
      "action":"Deposit",
      "amount":200.02,
      "count":2
    }, {
      "action":"Charge",
      "amount":-100,
      "count":1
    }
  ]
}
4.7 Images
This section describes behavior of the Image resource in Moab Web Services. An image resource is used to track the different types of operating systems and hypervisors available in the data center. It also tracks which virtual machines are available on the hypervisors. This section describes the URLs, request bodies, and responses delivered to and from Moab Web Services.The Image API contains the type and description of all fields in the Image object. It also contains details regarding which fields are valid during PUT and POST actions.
Supported Methods
| Resource | GET | PUT | POST | DELETE |
|---|---|---|---|---|
| /rest/images | Get All Images | Create Image | ||
| /rest/images/id | Get Specified Image | Modify Image | Delete Image | |
| /rest/images/name | Get Specified Image | Modify Image | Delete Image |
4.7.1 Getting Images
The HTTP GET method is used to retrieve Image information. You can query all objects or a single object.Quick Reference
GET http://localhost/mws/rest/images[?query={"field":"value"}&sort={"field":<1|-1>}]
GET http://localhost/mws/rest/images/<id>
GET http://localhost/mws/rest/images/<name>
4.7.1.1 Get All Images
URLs and Parameters
GET http://localhost/mws/rest/images[?query={"field":"value"}&sort={"field":<1|-1>}]| Parameter | Required | Valid Values | Description | Example |
|---|---|---|---|---|
| query | No | JSON | Queries for specific results. | query={"type":"stateful","osType":"linux"} |
| sort | No | JSON | Sort the results. Use 1 for ascending and -1 for descending. | sort={"name":-1} |
Sample Response
GET http://localhost/mws/rest/images?fields=id,name
{
  "totalCount": 1,
  "resultCount": 1,
  "results": [  {
    "id": "4fa197e68ca30fc605dd1cf0",
    "name": "centos5-stateful"
  }]
}
Sorting and Querying
See the sorting and querying sections of Global URL Parameters.4.7.1.2 Get Single Image
URLs and Parameters
GET http://localhost/mws/rest/images/<id>
GET http://localhost/mws/rest/images/<name>
| Parameter | Required | Type | Valid Values | Description |
|---|---|---|---|---|
| id | Yes | String | - | The unique identifier of the Image. |
| name | Yes | String | - | The name of the Image. |
You must specify either id or name, but you do not have to specify both.
Sample Response
Virtual machine image example:GET http://localhost/mws/rest/images/centos5-compute-stateful
{
  "active":true,
  "extensions":{
    "xcat":{
      "os":"centos",
      "architecture":"x86_64",
      "profile":"compute"
    }
  },
  "features":[],
  "hypervisor":false,
  "hypervisorType": null,
  "id":"4fa197e68ca30fc605dd1cf0",
  "name":"centos5-compute-stateful",
  "osType":"linux",
  "supportsPhysicalMachine":false,
  "supportsVirtualMachine":true,
  "templateName":"",
  "type":"stateful",
  "version":0,
  "virtualizedImages":[]
}GET http://localhost/mws/rest/images/esxi-4.1-stateful
{
  "active":true,
  "extensions":{
    "xcat":{
      "hvGroupName":"hvGroup",
      "vmGroupName":"vmGroup",
      "os":"esxi-4.1",
      "architecture":"x86_64",
      "profile":"hv"
    }
  },
  "features":[],
  "hypervisor":true,
  "hypervisorType":"ESX",
  "id":"4fa197e68ca30fc605dd1cf0",
  "name":"centos5-compute-stateful",
  "osType":"linux",
  "supportsPhysicalMachine":true,
  "supportsVirtualMachine":false,
  "templateName":"",
  "type":"stateful",
  "version":0,
  "virtualizedImages":[]
}
The version field contains the current version of the database entry and does not
reflect the version of the operating system. See Modify Image for more
information.
4.7.2 Creating Images
The HTTP POST method is used to submit Images.Quick Reference
POST http://localhost/mws/rest/images
4.7.2.1 Create Single Image
URLs and Parameters
POST http://localhost/mws/rest/images
Request Body
Three fields are required to submit an image: name, hypervisor, and osType. Each image must also support provisioning to either a physical machine or a virtual machine by using the supportsPhysicalMachine or supportsVirtualMachine fields.The name field must contain only letters, digits, periods, dashes, and underscores.The array of virtualized images are themselves objects that contain image IDs or names. For more information on available fields and types, see the Image API.The following is an example of the most basic image that can be created:
POST http://localhost/mws/rest/images
{
  "name": "centos5-stateful",
  "osType": "linux",
  "hypervisor": false,
  "supportsVirtualMachine":true
}xcat and must contain certain fields.
These extension keys are documented in the Image API. See the following
examples of creating images with xCAT-specific provisioning information below.Sample Response
If the request was successful, the response body is the new image that was created exactly as shown in Get Single Image. On failure, the response is an error message.Samples
The virtualizedImages field only accepts input when the image is a hypervisor and expects an array of image IDs or names, as shown in the following example:Example payload of hypervisor with 2 vms
{
  "hypervisor":true,
  "name":"esx5-stateful",
  "osType":"linux",
  "supportsPhysicalMachine":true,
  "type":"stateful",
  "hypervisorType":"ESX",
  "virtualizedImages":   [
    {"id": "4fa197e68ca30fc605dd1cf0"},
    {"name": "centos5-stateful"}
  ]
}linkedclone in order to set the templateName field.)VM Utilizing a Cloned Template
{
  "active": true,
  "hypervisor": false,
  "name": "centos5-compute-stateful",
  "osType": "linux",
  "type": "linkedclone",
  "supportsVirtualMachine":true,
  "templateName":"centos5-compute"
}xCAT Virtual Machine Image
{
  "active": true,
  "features": [],
  "hypervisor": false,
  "name": "centos5-compute-stateful",
  "osType": "linux",
  "type": "stateful",
  "supportsVirtualMachine":true,
  "extensions": {
     "xcat": {
        "os": "centos",
        "architecture": "x86_64",
        "profile": "compute"
     }
  }
}
xCAT Hypervisor Image
{
  "active": true,
  "features": [],
  "hypervisor": true,
  "name": "esxi5-base-stateless",
  "osType": "linux",
  "virtualizedImages":   [
    {"name": "centos5-compute-stateless"}
  ],
  "type": "stateless",
  "hypervisorType": "ESX",
  "supportsPhysicalMachine":true,
  "extensions": {
     "xcat": {
        "os": "esxi5",
        "architecture": "x86_64",
        "profile": "base",
        "hvType": "esx",
        "hvGroupName": "esx5hv",
        "vmGroupName": "esx5vm"
     }
  }
}
4.7.3 Modifying Images
The HTTP PUT method is used to modify Images.Quick Reference
PUT http://localhost/mws/rest/images/<id>
PUT http://localhost/mws/rest/images/<name>
4.7.3.1 Modify Single Image
URLs and Parameters
PUT http://localhost/mws/rest/images/<id>
PUT http://localhost/mws/rest/images/<name>
| Parameter | Required | Type | Valid Values | Description |
|---|---|---|---|---|
| id | Yes | String | - | The unique identifier of the Image. |
| name | Yes | String | - | The name of the Image. |
- You must specify either id or name, but you do not have to specify both.
- The name field must contain only letters, digits, periods, dashes, and underscores.
Example Request
PUT http://locahost/mws/rest/images/centos5-stateful
{
  "name": "centos5-stateful",
  "type": "stateful",
  "hypervisor": false,
  "osType": "linux",
  "virtualizedImages": []
}
The version field contains the current version of the database entry and does not reflect the version of the operating system. This field cannot be updated directly. However, if version is included in the modify request, it will be used to verify that another client did not update the object in between the time the data was retrieved and the modify request was delivered.
Sample Response
If the request was successful, the response body is the modified image as shown in Get Single Image. On failure, the response is an error message.4.7.4 Deleting Images
The HTTP DELETE method is used to delete Images.Quick Reference
DELETE http://localhost/mws/rest/images/<id>
DELETE http://localhost/mws/rest/images/<name>
4.7.4.1 Delete Single Image
URLs and Parameters
DELETE http://localhost/mws/rest/images/<id>
DELETE http://localhost/mws/rest/images/<name>
| Parameter | Required | Type | Valid Values | Description |
|---|---|---|---|---|
| id | Yes | String | - | The unique identifier of the Image. |
| name | Yes | String | - | The name of the Image. |
Only one of id or name are required.
Sample Response
JSON Response
{}4.8 Jobs
This section describes behavior of the Job object in Moab Web Services. It contains the URLs, request bodies, and responses delivered to and from Moab Web Services.
The Job API has changed with API version 2. The supported methods
table below requires each resource to be accessed with a URL parameter
of api-version=2 in order to behave as documented.In order to access documentation for previous API versions, see
Requesting Specific API Versions.
The Job API contains the type and description of all fields in the Job object. It also contains details regarding which fields are valid during PUT and POST actions.
Supported Methods
| Resource | GET | PUT | POST | DELETE |
|---|---|---|---|---|
| /rest/jobs | Get all jobs | Submit job | ||
| /rest/jobs/name | Get single job | Modify job | Cancel job |
4.8.1 Getting Job Information
The HTTP GET method is used to retrieve Job information.Quick Reference
GET http://localhost/mws/rest/jobs/<name>?api-version=24.8.1.1 Get All Jobs
URLs and Parameters
GET http://localhost/mws/rest/jobs?api-version=2
| Parameter | Required | Valid Values | Description | Example |
|---|---|---|---|---|
| query | No | JSON | Queries for specific results. | query={"isActive":true} |
| sort | No | JSON | Sort the results. Use 1 for ascending and -1 for descending. | sort={"name":-1} |
How to Get All Jobs
GET http://localhost/mws/rest/jobs?api-version=2&fields=name,flags&max=3
{
  "totalCount": 8,
  "resultCount": 3,
  "results":   [
        {
      "flags": ["GLOBALQUEUE"],
      "name": "Moab.1"
    },
        {
      "flags": ["GLOBALQUEUE"],
      "name": "Moab.2"
    },
        {
      "flags": ["GLOBALQUEUE"],
      "name": "Moab.4"
    }
  ]
}
How to Get a Subset of Jobs
Here are a few examples of how to query for jobs.Get Active Jobs
http://localhost/mws/rest/jobs?api-version=2&query={"isActive":true}
Get Completed Jobs
http://localhost/mws/rest/jobs?api-version=2&query={"isActive":false}
Get Jobs Owned by a Particular User
http://localhost/mws/rest/jobs?api-version=2&query={"credentials.user":"fred"}
Known Issues
- Some jobs are not returned if
DisplayFlags UseBlockingis set in themoab.cfgfile.
4.8.1.2 Get Single Job
URLs and Parameters
GET http://localhost/mws/rest/jobs/<name>?api-version=2| Parameter | Required | Type | Valid Values | Description |
|---|---|---|---|---|
| name | Yes | String | - | The name of the object. |
Sample Response
JSON Response
{
  "arrayIndex": null,
  "arrayMasterName": null,
  "attributes": [],
  "blocks": [  {
    "category": "jobBlock",
    "message": null,
    "type": null
  }],
  "bypassCount": 0,
  "cancelCount": 0,
  "commandFile": "/tmp/test.sh",
  "commandLineArgs": null,
  "completionCode": null,
  "cpuTime": 0,
  "credentials":   {
    "account": null,
    "group": "adaptive",
    "jobClass": null,
    "qos": "NONE",
    "qosRequested": null,
    "user": "adaptive"
  },
  "customName": null,
  "dates":   {
    "completedDate": null,
    "createdDate": "2012-10-11 17:58:16 UTC",
    "deadlineDate": "2037-10-24 12:26:40 UTC",
    "dispatchedDate": null,
    "earliestRequestedStartDate": null,
    "earliestStartDate": "2012-10-11 17:58:18 UTC",
    "eligibleDate": "2012-10-11 17:59:19 UTC",
    "lastCanceledDate": null,
    "lastChargedDate": null,
    "lastPreemptedDate": null,
    "lastUpdatedDate": "2012-10-11 17:59:19 UTC",
    "startDate": null,
    "submitDate": "2012-10-11 17:58:16 UTC",
    "terminationDate": "2037-10-24 12:26:40 UTC"
  },
  "deferCount": 0,
  "dependencies": [],
  "description": null,
  "duration": 8639999,
  "durationActive": 0,
  "durationQueued": 31,
  "durationRemaining": 0,
  "durationSuspended": 0,
  "emailNotifyAddresses": [],
  "emailNotifyTypes": [],
  "environmentRequested": false,
  "environmentVariables": {},
  "epilogScript": null,
  "flags": ["GLOBALQUEUE"],
  "holdDate": null,
  "holdReason": null,
  "holds": [],
  "initialWorkingDirectory": "/tmp",
  "isActive": true,
  "jobGroup": null,
  "masterNode": null,
  "memorySecondsDedicated": 0,
  "memorySecondsUtilized": 0,
  "messages": [],
  "migrateCount": 0,
  "minimumPreemptTime": 0,
  "mwmName": "Moab",
  "name": "Moab.15",
  "nodesExcluded": [],
  "nodesRequested": [],
  "nodesRequestedPolicy": null,
  "partitionAccessList":   [
    "msm",
    "SHARED"
  ],
  "partitionAccessListRequested":   [
    "msm",
    "SHARED"
  ],
  "preemptCount": 0,
  "priorities":   {
    "run": 0,
    "start": 1,
    "system": 0,
    "user": 0
  },
  "processorSecondsDedicated": 0,
  "processorSecondsLimit": 0,
  "processorSecondsUtilized": 0,
  "prologScript": null,
  "queueStatus": "blocked",
  "rejectPolicies": [],
  "requirements": [  {
    "architecture": null,
    "attributes": [],
    "features": [],
    "index": 0,
    "featuresRequested": [],
    "featuresRequestedMode": "AND",
    "featuresExcluded": [],
    "featuresExcludedMode": "AND",
    "metrics": {},
    "nodeAccessPolicy": null,
    "nodeAllocationPolicy": null,
    "nodeCount": 0,
    "nodes": [],
    "nodeSet": null,
    "image": null,
    "reservation": null,
    "resourcesPerTask":     {
      "processors":       {
        "dedicated": 1,
        "utilized": 0
      },
      "memory":       {
        "dedicated": 0,
        "utilized": 0
      },
      "disk":       {
        "dedicated": 0,
        "utilized": null
      },
      "swap":       {
        "dedicated": 0,
        "utilized": null
      }
    },
    "taskCount": 4,
    "tasksPerNode": 0
  }],
  "reservationRequested": null,
  "resourceFailPolicy": null,
  "resourceManagerExtension": null,
  "resourceManagers": [  {
    "isDestination": false,
    "isSource": true,
    "jobName": "Moab.15",
    "name": "internal"
  }],
  "rmStandardErrorFilePath": null,
  "rmStandardOutputFilePath": null,
  "standardErrorFilePath": null,
  "standardOutputFilePath": null,
  "startCount": 0,
  "states":   {
    "state": "Idle",
    "stateExpected": "Idle",
    "stateLastUpdatedDate": null,
    "subState": null
  },
  "submitHost": "0:0:0:0:0:0:0:1",
  "systemJobAction": null,
  "systemJobType": null,
  "targetedJobAction": null,
  "targetedJobName": null,
  "templates": [{"name": "DEFAULT"}],
  "triggers": [],
  "variables": {},
  "virtualContainers": [],
  "virtualMachines": [],
  "vmUsagePolicy": null
}
Job Arrays
If a job is the master of a job array, the response will have some additional fields set as shown in the following example. Thename field
is chosen by the Moab Workload Manager, and the customName field comes
from the job array name field.Job Array Master
{
  "name": "Moab.5",
  "customName": "myarray",
  "flags":   [
    "ARRAYMASTER",
    "GLOBALQUEUE",
    "CANCELONFIRSTFAILURE",
    "CANCELONANYSUCCESS"
  ]
}Array Sub-Job
{
  "name": "Moab.5[21]",
  "customName": "myarray",
  "arrayIndex": 21,
  "arrayMasterName": "Moab.5",
  "flags":   [
    "ARRAYJOB",
    "GLOBALQUEUE",
    "CANCELONFIRSTFAILURE",
    "CANCELONANYSUCCESS"
  ]
}
4.8.2 Submitting Jobs
The HTTP POST method is used to submit Jobs.Quick Reference
POST http://localhost/mws/rest/jobs?api-version=2[&proxy-user=<username>]Restrictions
- No more than one virtual container can be specified in the request. The virtual container must already exist.
- The
credentials.userandcredentials.groupproperties are used to submit a job as the specified user belonging to the specified group. - Job
variableshave the following restrictions: - Variable names cannot contain equals (=), semicolon (;), colon (:), plus (+), question mark (?), caret (^), backslash (\), or white space.
- Variable values cannot contain semicolon (;), colon (:), plus (+), or caret (^).
- When submitting jobs, the only supported
holdtype isUser. - The proxy-user parameter is ignored unless you set
ENABLEPROXY=TRUEin themoab.cfgfile. Example: - When the JOBNODEMATCHPOLICY is set to EXACTNODE in Moab, avoid using requirements.tasksPerNode. Use requirements.resourcesPerTask.processors.dedicated instead.
ADMINCFG[1] USERS=root,ted ENABLEPROXY=TRUE
4.8.2.1 Submit Job
URLs and Parameters
POST http://localhost/mws/rest/jobs?api-version=2[&proxy-user=<username>]| Parameter | Required | Type | Valid Values | Description |
|---|---|---|---|---|
| proxy-user | No | String | - | Perform the action as this user. |
Request Body
The request body below shows all the fields that are available during job submission. This is a very contrived example; its purpose is simply to show sample values in the correct format.JSON Request Body (specified host list)
{
  "attributes":   [
    "attr1",
    "attr2"
  ],
  "commandFile": "/tmp/test.sh",
  "commandScript": "c2xlZXAgNjAK",
  "commandLineArguments": "-x -v",
  "credentials":   {
    "account": "account",
    "group": "group",
    "jobClass": "BATCH",
    "qosRequested": "QOS1",
    "user": "saadmin"
  },
  "customName": "custom name for job",
  "dates":   {
    "earliestRequestedStartDate": "2012-11-08 13:18:47 UTC",
    "deadlineDate": "2014-02-17 14:00:00 UTC"
  },
  "dependencies":   [
        {
      "type": "set",
      "name": "vc1.varA"
    },
        {
      "type": "set",
      "name": "vc2.varB"
    },
        {
      "type": "set",
      "name": "vc3.varC"
    }
  ],
  "duration": 600,
  "emailNotifyAddresses":   [
    "[email protected]",
    "[email protected]"
  ],
  "emailNotifyTypes":   [
    "JobStart",
    "JobEnd"
  ],
  "environmentRequested": true,
  "environmentVariables":   {
    "var1": "val1",
    "var2": "val2"
  },
  "epilogScript": "/tmp/epilog.sh",
  "flags":   [
    "RESTARTABLE",
    "SUSPENDABLE"
  ],
  "holds": ["User"],
  "initialWorkingDirectory": "/tmp",
  "jobGroup": "job_group",
  "nodesExcluded":   [
    {"name": "node07"},
    {"name": "node08"}
  ],
  "nodesRequested":   [
    {"name": "node01"},
    {"name": "node02"}
  ],
  "nodesRequestedPolicy": "SUBSET",
  "partitionAccessListRequested":   [
    "p1",
    "p2"
  ],
  "priorities": {"user": 5},
  "prologScript": "/tmp/prolog.sh",
  "requirements": [  {
    "architecture": "x86_64",
    "attributes":     [
            {
        "name": "matlab",
        "comparator": "<=",
        "value": "7.1"
      },
            {
        "name": "soffice",
        "comparator": "=",
        "value": "3.1"
      }
    ],
    "featuresRequested":     [
      "a",
      "b",
      "c"
    ],
    "featuresRequestedMode": "OR",
    "featuresExcluded":     [
      "d",
      "e",
      "f"
    ],
    "featuresExcludedMode": "AND",
    "nodeAccessPolicy": "SINGLEJOB",
    "nodeAllocationPolicy": "PRIORITY",
    "nodeCount": 6,
    "image": "linux",
    "resourcesPerTask":     {
      "disk": {"dedicated": 1024},
      "memory": {"dedicated": 512},
      "processors": {"dedicated": 2},
      "swap": {"dedicated": 4096},
      "matlab": {"dedicated": 6},
      "intellij": {"dedicated": 2}
    },
    "taskCount": 4,
    "tasksPerNode": 14
  }],
  "reservationRequested": {"name": "rsv.1"},
  "resourceFailPolicy": "RETRY",
  "resourceManagerExtension": "x=PROC=4",
  "standardErrorFilePath": "/tmp/error",
  "standardOutputFilePath": "/tmp/out",
  "submitHost": "admin-node",
  "templates":   [
    {"name": "template1"},
    {"name": "template2"}
  ],
  "variables":   {
    "var1": "val1",
    "var2": "val2"
  },
  "virtualContainers": [{"name": "vc1"}],
  "vmUsagePolicy": "CREATEVM"
}
Sample Response
The response of this task is one of three possibilities:- An object with a single
messagesproperty containing a list of error messages on failure
{"messages":["Could not create job - invalid requirements"]}- An object with a
nameproperty containing the name of the newly created job
{"name":"Moab.1"}- An object with a
nameproperty and avirtualContainerslist containing the name of the newly created virtual container
{ "name": "Moab.1", "virtualContainers": [{"name": "vc1"}] }The virtual container will only be reported when a new virtual container has been created by Moab for the job.
4.8.2.2 Examples of Job Submission
This section includes some sample job submission requests.Submit job to run on node2 and node3
POST http://localhost/mws/rest/jobs?api-version=2
{
  "commandFile": "/tmp/test.sh",
  "credentials":   {
    "group": "adaptive",
    "user": "adaptive"
  },
  "initialWorkingDirectory": "/tmp",
  "nodesRequested":   [
    {"name": "node2"},
    {"name": "node3"}
  ]
}
Submit job that requires 20 processors
POST http://localhost/mws/rest/jobs?api-version=2
{
  "commandFile": "/tmp/test.sh",
  "credentials":   {
    "group": "adaptive",
    "user": "adaptive"
  },
  "initialWorkingDirectory": "/tmp",
  "requirements": [{"taskCount": 20}]
}
Submit job to run after a certain time
POST http://localhost/mws/rest/jobs?api-version=2
{
  "commandFile": "/tmp/test.sh",
  "credentials":   {
    "group": "adaptive",
    "user": "adaptive"
  },
  "dates": {"earliestRequestedStartDate": "2012-10-11 18:36:35 UTC"},
  "initialWorkingDirectory": "/tmp",
  "requirements": [{"taskCount": 20}]
}
Submit job based on msub example
Given this msub command:
msub -l nodes=3:ppn=2,walltime=1:00:00,pmem=100 script2.pbs.cmd
POST http://localhost/mws/rest/jobs?api-version=2
{
  "duration": 3600,
  "commandFile": "/home/adaptive/script2.pbs.cmd",
  "credentials":   {
    "group": "adaptive",
    "user": "adaptive"
  },
  "initialWorkingDirectory": "/home/adaptive",
  "requirements": [  {
    "resourcesPerTask": {"memory": {"dedicated": 100}},
    "taskCount": 6,
    "tasksPerNode": 2
  }]
}
- To emulate what
msubdoes, makecommandFilean absolute path, and addcredentials.user,credentials.group, andinitialWorkingDirectory.- As shown above,
nodes=3:ppn=2is equivalent to settingtaskCountto 6 andtasksPerNodeto 2.
Submit a Job Array
See the Submitting Job Arrays section for details on how to submit a job array.4.8.3 Modifying Jobs
The HTTP PUT method is used to modify Jobs.Quick Reference
PUT http://localhost/mws/rest/jobs/<name>[/<modifyAction>]?api-version=2[&proxy-user=<username>]
Restrictions
- The proxy-user parameter is ignored unless you set
ENABLEPROXY=TRUEin themoab.cfgfile. Example:
ADMINCFG[1] USERS=root,ted ENABLEPROXY=TRUE
4.8.3.1 Modify Job Attributes
URLs and Parameters
PUT http://localhost/mws/rest/jobs/<name>?api-version=2[&proxy-user=<username>]
| Parameter | Required | Type | Valid Values | Description |
|---|---|---|---|---|
| name | Yes | String | - | The name of the object. |
| proxy-user | No | String | - | Perform the action as this user. |
Request Body
The request body below shows all the fields that are available when modifying a Job, along with some sample values.JSON Request Body
{
  "credentials":   {
    "account": "account",
    "jobClass": "BATCH",
    "qosRequested": "QOS1"
  },
  "customName": "custom name for job",
  "dates": {"earliestRequestedStartDate": "2012-11-08 13:18:47 UTC"},
  "duration": 600,
  "flags":   [
    "RESTARTABLE",
    "SUSPENDABLE"
  ],
  "holds": ["User"],
  "messages":   [
    {"message": "Message one"},
    {"message": "Message two"}
  ],
  "partitionAccessListRequested":   [
    "p1",
    "p2"
  ],
  "priorities": {"user": 5},
  "reservationRequested": {"name": "rsv.1"},
  "variables":   {
    "var1": "val1",
    "var2": "val2"
  }
}
Sample Response
These messages may not match the messages returned from Moab exactly, but are given as an example of the structure of the response.
Not all messages are shown for the above request body.
JSON Response
{"messages": [
  "Account modified successfully",
  "Messages modified successfully",
  "Variables modified successfully"
]}
Restrictions
- Old messages are not removed from jobs; only new messages are added.
- Job
variableshave the restrictions documented in Submitting Jobs
4.8.3.2 Perform Actions on Job
URLs and Parameters
PUT http://localhost/mws/rest/jobs/<name>/<modifyAction>?api-version=2[&proxy-user=<username>]
| Parameter | Required | Type | Valid Values | Description |
|---|---|---|---|---|
| name | Yes | String | - | The name of the object. |
| modifyAction | Yes | String | cancel | Attempts to cancel the job. |
| checkpoint | Attempts to checkpoint the job. Note that the OS must support checkpointing for this to work. | |||
| execute | Executes the job if possible. | |||
| hold | Attempts to hold the job using the holds set in the request body. | |||
| requeue | Attempts to requeue the job. | |||
| resume | Attemps to resume the job. | |||
| suspend | Attempts to suspend the job. | |||
| unhold | Attempts to release the holds set in the request body. | |||
| proxy-user | No | String | - | Perform the action as this user. |
Performing a cancel function on a job is equivalent to deleting a job.See Global URL Parameters for available URL parameters.
Request Body
Request bodies are only required for holding or unholding jobs. All other actions do not require request bodies of any kind.JSON Request Body to Add Holds to a Job
{"holds": ["User"]}JSON Request Body to Remove Holds from a Job
{"holds": ["User"]}If no holds are specified when unholding a job, all holds will be removed. This is equivalent to specifyingholdsas a list with a single element ofAll.
Sample Response
This message may not match the message returned from Moab exactly, but is given as an example of the structure of the response.
JSON Response
{"messages": ["Job modified successfully"]}4.8.4 Deleting (Canceling) Jobs
The HTTP DELETE method is used to cancel Jobs.Quick Reference
DELETE http://localhost/mws/rest/jobs/<name>?api-version=2[&proxy-user=<username>]
Restrictions
- The proxy-user parameter is ignored unless you set
ENABLEPROXY=TRUEin themoab.cfgfile. Example:
ADMINCFG[1] USERS=root,ted ENABLEPROXY=TRUE
4.8.4.1 Cancel Job
URLs and Parameters
DELETE http://localhost/mws/rest/jobs/<name>?api-version=2[&proxy-user=<username>]
| Parameter | Required | Type | Valid Values | Description |
|---|---|---|---|---|
| name | Yes | String | - | The name of the object. |
| proxy-user | No | String | - | Perform the action as this user. |
Sample Response
JSON Response for successful DELETE
{}
Additional information about the DELETE can be found in the HTTP response header X-MWS-Message.
4.9 Job Arrays
This section describes behavior of the Job Array object in Moab Web Services. It contains the URLs, request bodies, and responses delivered to and from Moab Web Services.The JobArray API contains the type and description of all fields in the Job Array object.
Supported Methods
| Resource | GET | PUT | POST | DELETE |
|---|---|---|---|---|
| /rest/job-arrays | Submit new job array |
4.9.1 Submitting Job Arrays
The HTTP POST method is used to submit Job Arrays.Quick Reference
POST http://localhost/mws/rest/job-arrays?api-version=2[&proxy-user=<username>]
While the Job Array resource only gives access to create job arrays, job arrays are retrieved using the operations
in the Getting Job Information section.
Restrictions
All restrictions present for Submitting Jobs are present for job arrays. In addition, job arrays are only supported if theENABLEJOBARRAYS parameter is set to TRUE in the moab.cfg file. Example:
ENABLEJOBARRAYS TRUE
4.9.1.1 Submit Job Array
URLs and Parameters
POST http://localhost/mws/rest/job-arrays?api-version=2[&proxy-user=<username>]| Parameter | Required | Type | Valid Values | Description |
|---|---|---|---|---|
| proxy-user | No | String | - | Perform the action as this user. |
Request Body
To submit a job array, only two fields are required:jobPrototype and one of indexValues or indexRanges. Both
index ranges and values may be specified if desired.The request body below shows all the fields that are available during job array submission, although the jobPrototype
shown is a simple example and does not utilize all fields of a job submission.
The jobPrototype field has the same properties as a typical job submission. Examples of this can be
seen in the Submitting Jobs section.
JSON Request Body
{
  "name": "myarray",
  "indexRanges": [  {
    "startIndex": 11,
    "endIndex": 25,
    "increment": 2
  }],
  "indexValues":   [ 2, 4, 6, 8, 10 ],
  "slotLimit": 2,
  "cancellationPolicy":   {
    "firstJob": "FAILURE",
    "anyJob": "SUCCESS"
  },
  "jobPrototype":   {
    "commandFile": "/tmp/test.sh",
    "initialWorkingDirectory": "/tmp",
    "requirements": [{"taskCount": 4}]
  }
}
Sample Response
The response of this task is the same as submitting a job.4.10 Job Templates
This section describes behavior of the Job Template object in Moab Web Services. It contains the URLs, request bodies, and responses delivered to and from Moab Web Services.The Job Template API contains the type and description of all fields in the Job Template object. It also contains details regarding which fields are valid during PUT and POST actions.
Supported Methods
| Resource | GET | PUT | POST | DELETE |
|---|---|---|---|---|
| /rest/job-templates | Get all job templates | |||
| /rest/job-templates/id | Get specified job template |
4.10.1 Getting Job Templates
The HTTP GET method is used to retrieve Job Template information. Queries for all objects and a single object are available.Quick Reference
GET http://localhost/mws/rest/job-templates/<id>4.10.1.1 Get All Job Templates
URLs and Parameters
GET http://localhost/mws/rest/job-templates
Sample Response
GET http://localhost/mws/rest/job-templates?fields=id
{
  "totalCount": 14,
  "resultCount": 14,
  "results":   [
    {"id": "DEFAULT"},
    {"id": "genericVM"},
    {"id": "genericVM-setup"},
    {"id": "genericVM-destroy"},
    {"id": "genericVM-migrate"},
    {"id": "genericPM"},
    {"id": "genericPM-setup"},
    {"id": "genericPM-destroy"},
    {"id": "OSStorage"},
    {"id": "OSStorage-setup"},
    {"id": "OSStorage-destroy"},
    {"id": "extraStorage"},
    {"id": "extraStorage-setup"},
    {"id": "extraStorage-destroy"}
  ]
}
4.10.1.2 Get Single Job Template
URLs and Parameters
GET http://localhost/mws/rest/job-templates/<id>| Parameter | Required | Type | Valid Values | Description |
|---|---|---|---|---|
| id | Yes | String | - | The unique identifier of the object. |
Sample Response
JSON Response
{
  "account": "account",
  "args": "arg1 arg2",
  "commandFile": "/tmp/script",
  "description": "description",
  "genericSystemJob": true,
  "id": "genericVM",
  "inheritResources": false,
  "jobDependencies": [  {
    "name": "genericVM-setup",
    "type": "JOBSUCCESSFULCOMPLETE"
  }],
  "jobFlags": ["VMTRACKING"],
  "jobTemplateFlags": ["SELECT"],
  "jobTemplateRequirements": [  {
    "architecture": "x86_64",
    "diskRequirement": 500,
    "genericResources": {"tape": 3},
    "nodeAccessPolicy": "SINGLEJOB",
    "operatingSystem": "Ubuntu 10.04.3",
    "requiredDiskPerTask": 200,
    "requiredFeatures": ["dvd"],
    "requiredMemoryPerTask": 1024,
    "requiredProcessorsPerTask": 2,
    "requiredSwapPerTask": 512,
    "taskCount": 4
  }],
  "priority": 20,
  "qos": "qos",
  "queue": "queue",
  "durationRequested": 600,
  "select": true,
  "trigger": null,
  "version": 0,
  "vmUsagePolicy": "REQUIREPM"
}
4.11 Metric Types
This section describes behavior of the Metric Type object in Moab Web Services. It contains the URLs, request bodies, and responses delivered to and from Moab Web Services.The MetricType API contains the type and description of all fields in the Metric Type object.
Supported Methods
| Resource | GET | PUT | POST | DELETE |
|---|---|---|---|---|
| /rest/metric-types | Get all metric types |
4.11.1 Getting Metric Types
The HTTP GET method is used to retrieve Metric Type information.Quick Reference
GET http://localhost/mws/rest/metric-types
4.11.1.1 Get All Metric Types
URLs and Parameters
GET http://localhost/mws/rest/metric-types
Sample Response
GET http://localhost/mws/rest/metric-types?fields=id
{
  "totalCount": 9,
  "resultCount": 9,
  "results":   [
    {"id": "vmcount"},
    {"id": "watts"},
    {"id": "pwatts"},
    {"id": "temp"},
    {"id": "cpu"},
    {"id": "mem"},
    {"id": "io"},
    {"id": "ccores"},
    {"id": "threads"}
  ]
}
4.12 Nodes
This section describes behavior of the Node object in Moab Web Services. It contains the URLs, request bodies, and responses delivered to and from Moab Web Services.
The Node API has changed with API version 2. The supported methods table below requires
each resource to be accessed with a URL parameter of api-version=2 in order to behave as documented.In order to access documentation for previous API versions, see Requesting Specific API Versions.
The Node API contains the type and description of all fields in the Node object. It also contains details regarding which fields are valid during PUT and POST actions.
Supported Methods
| Resource | GET | PUT | POST | DELETE |
|---|---|---|---|---|
| /rest/nodes | Get all nodes | |||
| /rest/nodes/name | Get specified node | Modify node |
4.12.1 Getting Nodes
The HTTP GET method is used to retrieve Node information.Quick Reference
GET http://localhost/mws/rest/nodes/<name>?api-version=24.12.1.1 Get All Nodes
URLs and Parameters
GET http://localhost/mws/rest/nodes?api-version=2
| Parameter | Required | Valid Values | Description | Example |
|---|---|---|---|---|
| query | No | JSON | Queries for specific results. | query={"type":"compute"} |
| sort | No | JSON | Sort the results. Use 1 for ascending and -1 for descending. | sort={"name":-1} |
This query will not return theDEFAULTorGLOBALnodes from Moab Workload Manager. However, the Get Single Node task may be used to retrieve them individually if desired.
Sample Response
GET http://localhost/mws/rest/nodes?api-version=2&fields=name
{
  "totalCount": 3,
  "resultCount": 3,
  "results":   [
    {"name": "node1"},
    {"name": "node2"},
    {"name": "node3"}
  ]
}
4.12.1.2 Get Single Node
URLs and Parameters
GET http://localhost/mws/rest/nodes/<name>?api-version=2| Parameter | Required | Type | Valid Values | Description |
|---|---|---|---|---|
| name | Yes | String | - | The name of the object. |
Sample Response
JSON Response
{
  "name": "hv2",
  "architecture": null,
  "classes": ["class1"],
  "featuresReported": [],
  "index": 2,
  "ipAddress": "10.0.0.4",
  "isHypervisor": true,
  "lastUpdatedDate": "2012-10-11 17:42:24 UTC",
  "migrationDisabled": false,
  "partition": "msm",
  "processorSpeed": null,
  "profilingEnabled": false,
  "rack": null,
  "resourceManagerMessages":   {
    "torque": null,
    "mws": null
  },
  "slot": null,
  "type": "compute",
  "messages": [  {
    "count": 11,
    "createdDate": "2012-10-24 04:06:04 UTC",
    "expireDate": "2037-10-24 12:26:40 UTC",
    "message": "This is a message"
  }],
  "metrics":   {
    "watts": 200,
    "pwatts": 200,
    "temp": 103,
    "vmcount": 4
  },
  "variables": {},
  "states":   {
    "powerState": "On",
    "powerStateExpected": null,
    "state": "Idle",
    "stateExpected": "Idle",
    "stateLastUpdatedDate": "2012-10-11 17:15:01 UTC",
    "subState": null,
    "subStateLast": null,
    "subStateLastUpdatedDate": null
  },
  "operatingSystem":   {
    "hypervisorType": "KVM",
    "image": "hyper",
    "imageExpected": null,
    "imageLastUpdatedDate": null,
    "imagesAvailable": ["hyper"],
    "virtualMachineImages":     [
      "stateless1",
      "stateless2"
    ]
  },
  "resources":   {
    "processors":     {
      "configured": 8,
      "real": 8,
      "dedicated": 0,
      "available": 8,
      "utilized": -1
    },
    "memory":     {
      "configured": 1048576,
      "real": 1048576,
      "dedicated": 0,
      "available": 1048576,
      "utilized": 0
    },
    "disk":     {
      "configured": 1048576,
      "real": 1048576,
      "dedicated": 0,
      "available": 1048576,
      "utilized": 0
    },
    "swap":     {
      "configured": 4096,
      "real": 4096,
      "dedicated": 0,
      "available": 4096,
      "utilized": 0
    }
  },
  "resourceManagers": [  {
    "name": "msm",
    "isMaster": true,
    "stateReported": "Active"
  }],
  "jobs": [],
  "reservations":   [
        {
      "name": "system.5",
      "type": "user"
    },
        {
      "name": "system.17",
      "type": "user"
    }
  ],
  "virtualContainers": [],
  "virtualMachines":   [
    {"name": "vm3"},
    {"name": "vm4"}
  ],
  "triggers": []
}
4.12.2 Modifying Nodes
The HTTP PUT method is used to modify Nodes.Quick Reference
PUT http://localhost/mws/rest/nodes/<name>?api-version=2[&proxy-user=<username>]
Restrictions
- The proxy-user parameter is ignored unless you set
ENABLEPROXY=TRUEin themoab.cfgfile. Example:
ADMINCFG[1] USERS=root,ted ENABLEPROXY=TRUE
4.12.2.1 Modify Node
URLs and Parameters
PUT http://localhost/mws/rest/nodes/<name>?api-version=2[&proxy-user=<username>]
| Parameter | Required | Type | Valid Values | Description |
|---|---|---|---|---|
| name | Yes | String | - | The name of the object. |
| proxy-user | No | String | - | Perform the action as this user. |
Request Body
The request body below shows all the fields that are available when modifying a Node, along with some sample values.Sample JSON Request Body to Modify a Node
{
  "messages":   [
    {"message": "Message one"},
    {"message": "Message two"}
  ],
  "metrics": {"pwatts": 211},
  "operatingSystem": {"image": "esx4.1"},
  "partition": "part1",
  "states":   {
    "powerState": "On",
    "state": "Running"
  },
  "variables":   {
    "key": "value",
    "arbitrary text key": "more value"
  }
}
Sample Response
This message may not match the message returned from Moab exactly, but is given as an example of the structure of the response.
JSON Response
{"messages":[
  "Successfully modified os to 'linux'",
  "Successfully powered node off"
]}
4.13 Pending Actions
This section describes behavior of the Pending Action object in Moab Web Services. It contains the URLs, request bodies, and responses delivered to and from Moab Web Services.The Pending Action API contains the type and description of all fields in the Pending Action object. It also contains details regarding which fields are valid during PUT and POST actions.
Supported Methods
| Resource | GET | PUT | POST | DELETE |
|---|---|---|---|---|
| /rest/pending-actions | Get all pending actions |
4.13.1 Getting Pending Actions
The HTTP GET method is used to retrieve Pending Action information.Quick Reference
GET http://localhost/mws/rest/pending-actions
4.13.1.1 Get All Pending Actions
URLs and Parameters
GET http://localhost/mws/rest/pending-actions
Sample Response
GET http://localhost/mws/rest/pending-actions
{
  "totalCount": 1,
  "resultCount": 1,
  "results": [  {
    "failureDetails": "",
    "hosts": ["hv3"],
    "id": "vmcreate-27",
    "maxDurationInSeconds": 3600,
    "migrationDestination": "",
    "migrationSource": "",
    "motivation": "requested by root",
    "pendingActionState": "RUNNING",
    "pendingActionType": "VMCREATE",
    "requester": "root",
    "serviceId": "Rhel55Vm.200",
    "startTime": "2011-11-15 21:57:55 UTC",
    "substate": "installing",
    "targetOS": "",
    "topLevelServiceId": "Lamp.132",
    "vmId": "vm8"
  }]
}
Generic vs Non-Generic Types
If generic job templates are used in Moab, MWS may be configured to translate pending actions with the generic type to the proper type such asVMCREATE. This is done in the configuration file.
The Quickstart Guide provides the default mappings
for this feature, as well as an example of adding a custom mapping from
a custom template name to the correct type.The default mappings are shown in the table below. The available pending
action types may be seen on the
PendingActionType API
page.| Template Name | Mapped Type |
|---|---|
| genericVM-setup | VMCREATE |
| genericVM-migrate | VMMIGRATE |
| genericVM-destroy | VMDESTROY |
| OSStorage-setup | VMSTORAGE |
| OSStorage-destroy | VMSTORAGEDESTROY |
| extraStorage-setup | STORAGE |
| extraStorage-destroy | STORAGEDESTROY |
| genericPM-setup | OSPROVISION |
When generic mappings are used, MWS will match the first template mapping that the pending action ID ends with. For example, an ID ofTo enable mapping for a custom template name such asMoab.1.genericVM-setupwill map the type toVMCREATE.
myCustomVM-setup,
simply add the following line to the MWS configuration file. The value of
the pending action type is case insensitive.
mws.pendingActions.mappings["myCustomVM-setup"] = "vmcreate"
mws.pendingActions.displayGeneric
setting as shown below. A false value will prevent generic pending
actions from being displayed, while a true value will display all
pending actions. By default this value is true.
mws.pendingActions.displayGeneric = false4.14 Permissions
This section describes behavior of the Permissions object in Moab Web Services. It contains the URLs, request bodies, and responses delivered to and from Moab Web Services.The Permission API contains the type and description of fields that all Permissions have in common.
Supported Methods
| Resource | GET | PUT | POST | DELETE |
|---|---|---|---|---|
| /rest/permissions | Get all Permissions | Create Permission | ||
| /rest/permissions/id | Get specified Permissions | Delete Permission | ||
| /rest/permissions/users/id | Get users Permissions |
4.14.1 Getting Permissions
The HTTP GET method is used to retrieve Permission information. You can query all objects or a single object.Quick Reference
GET http://localhost/mws/rest/permissions
GET http://localhost/mws/rest/permissions/<id>
4.14.1.1 Get All Permissions
URLs and Parameters
GET http://localhost/mws/rest/permissions[?query={"field":"value"}&sort={"field":<1|-1>}]| Parameter | Required | Valid Values | Description | Example |
|---|---|---|---|---|
| query | No | JSON | Queries for specific results. | query={"type":"CUSTOM"} |
| sort | No | JSON | Sort the results. Use 1 for ascending and -1 for descending. | sort={"name":-1} |
Sample Response
GET http://localhost/mws/rest/permissions?fields=resource,action,description
{
	"totalCount": 1,
	"resultCount": 1,
	"results": [{
		"resource" : "chart",
		"action" : "read",
		"description" : "The permission to view all charts."
		} ]
}
Sorting and Querying
See the sorting and querying sections of Global URL Parameters.4.14.1.2 Get a User's Permissions
URLs and Parameters
GET http://localhost/mws/rest/permissions/users/<name>| Parameter | Required | Type | Valid Values | Description |
|---|---|---|---|---|
| name | Yes | String | - | The name of the user |
Sample Response
GET http://localhost/mws/rest/permissions/users/bob
[
	  {
	  "action": "read",
	  "description": "The permission to read all charts",
	  "id": "5033b842e4b09cc61bedb818",
	  "label": "",
	  "resource": "chart",
	  "resourceFilter": null,
	  "type": "custom",
	  "version": 1
	},
	  {
	  "action": "read",
	  "description": "The permission to read all pages",
	  "id": "5033b8a5e4b09cc61bedb82d",
	  "label": "",
	  "resource": "page",
	  "resourceFilter": null,
	  "type": "custom",
	  "version": 1
	},
	  {
	  "action": "update",
	  "description": "The permission to update all pages",
	  "id": "5033b8a5e4b09cc61bedb82f",
	  "label": "",
	  "resource": "page",
	  "resourceFilter": null,
	  "type": "custom",
	  "version": 1
	}
]
4.14.1.3 Get Single Permission
URLs and Parameters
GET http://localhost/mws/rest/permissions/<id>| Parameter | Required | Type | Valid Values | Description |
|---|---|---|---|---|
| id | Yes | String | - | The unique identifier of the Permission. |
Sample Response
GET http://localhost/mws/rest/permissions/
{
	"action" : "create",
	"description" : "The permission to create all charts.",
	"id" : "50296335e4b0011b0f8394ec",
	"label" : "Create Chart",
	"resource" : "chart",
	"resourceFilter" : null,
	"type" : "custom",
	"version" : 0
}
4.14.2 Creating Permissions
The HTTP POST method is used to create Permissions.Quick Reference
POST http://localhost/mws/rest/permissions
4.14.2.1 Create Single Permission
URLs and Parameters
POST http://localhost/mws/rest/permissions
Request Body
The following is an example request body to create a permission:
- The resource, action, and type are required on each Permission.
- Api permissions are permissions with the type 'api' and are the only permissions enforced by MWS.
- Api permissions must map to a valid resource. For example 'services' is valid because there is a resource /mws/rest/services.
- Api permissions must have create, read, update, or delete as the action.
POST http://localhost/mws/rest/permissions
{
			"resource" : "Chart",
			"action" : "read",
			"type" : "custom",
			"label" : "Read all charts",
			"description" : "The permissions to view all charts."
}
Sample Response
If the request was successful, the response body is the new permission that was created exactly as shown in Get Single Permission. On failure, the response is an error message.4.14.3 Deleting Permissions
The HTTP DELETE method is used to delete Permissions.Quick Reference
DELETE http://localhost/mws/rest/permissions/<id>4.14.3.1 Delete Single Permission
URLs and Parameters
DELETE http://localhost/mws/rest/permission/<id>| Parameter | Required | Type | Valid Values | Description |
|---|---|---|---|---|
| id | Yes | String | - | The unique identifier of the Permission. |
Sample Response
JSON Response
{}4.15 Plugins
This section describes behavior of the Plugin object in Moab Web Services. It contains the URLs, request bodies, and responses delivered to and from Moab Web Services.The PluginInstance API page contains the type and description of all fields in the Plugin object. It also contains details regarding which fields are valid during PUT and POST actions.
Supported Methods
| Resource | GET | PUT | POST | DELETE |
|---|---|---|---|---|
| /rest/plugins | Get all plugins | Create new plugin | ||
| /rest/plugins/id | Get specified plugin | Modify plugin | Delete plugin | |
| /rest/plugins/id/poll | Trigger Plugin Poll | |||
| /rest/plugins/id/services/serviceName | Access Web Service | Access Web Service | Access Web Service | Access Web Service |
4.15.1 Getting Plugins
The HTTP GET method is used to retrieve Plugin information. Queries for all objects and a single object are available.Quick Reference
GET http://localhost/mws/rest/plugins
GET http://localhost/mws/rest/plugins/<id>
4.15.1.1 Get All Plugins
URLs and Parameters
GET http://localhost/mws/rest/plugins
Sample Response
GET http://localhost/mws/rest/plugins?fields=id
{
  "totalCount": 3,
  "resultCount": 3,
  "results":   [
    {"id": "plugin1"},
    {"id": "plugin2"},
    {"id": "plugin3"}
  ]
}
4.15.1.2 Get Single Plugin
URLs and Parameters
GET http://localhost/mws/rest/plugins/<id>| Parameter | Required | Type | Valid Values | Description |
|---|---|---|---|---|
| id | Yes | String | - | The unique identifier of the object. |
Sample Response
JSON Response
{
  "id":"plugin1",
  "pluginType":"Native",
  "pollInterval":30,
  "autoStart":true,
  "config":{
    "getJobs":"exec:///opt/moab/tools/workload.query.pl"
  },
  "state":"STARTED",
  "nextPollDate":"2011-12-02 17:28:52 UTC",
  "lastPollDate":"2011-12-02 17:28:22 UTC"
}
4.15.2 Creating Plugins
The HTTP POST method is used to create Plugins.Quick Reference
POST http://localhost/mws/rest/plugins
4.15.2.1 Create Plugin
URLs and Parameters
POST http://localhost/mws/rest/plugins
Request Body
When creating a plugin, theid and pluginType fields are required. The request body below shows all
fields that are available when creating a Plugin, along with some sample values.JSON Request Body
{
  "id":"plugin1",
  "pluginType":"Native",
  "pollInterval":30,
  "autoStart":true,
  "config":{
    "getJobs":"exec:///opt/moab/tools/workload.query.pl"
  }
}
Sample Response
JSON Response for successful POST
{"id": "plugin1"}Restrictions
While it is possible to create a plugin with arbitrary nested configuration, such as:… "config":{ "nestedObject":{ "property1":"value1", "property2":"value2" }, "nestedList:["listItem1", "listItem2"] }
4.15.3 Modifying Plugins
The HTTP PUT method is used to modify Plugins. Additionally, the POST method may be used to trigger an immediate poll of a Plugin.Quick Reference
PUT http://localhost/mws/rest/plugins/<id>
POST http://localhost/mws/rest/plugins/<id>/poll
4.15.3.1 Modify Plugin
URLs and Parameters
PUT http://localhost/mws/rest/plugins/<id>| Parameter | Required | Type | Valid Values | Description |
|---|---|---|---|---|
| id | Yes | String | - | The unique identifier of the object. |
Request Body
The request body below shows all the fields that are available when modifying a Plugin, along with some sample values.JSON Request Body for Plugin Modification
{
  "state":"STARTED",
  "pollInterval":30,
  "autoStart":true,
  "config":{
    "getJobs":"exec:///opt/moab/tools/workload.query.pl"
  },
  "state":"STARTED"
}
Sample Response
JSON Response
{"messages":["Plugin plugin1 updated", "Started Plugin 'plugin1'"]}4.15.3.2 Trigger Plugin Poll
URLs and Parameters
POST http://localhost/mws/rest/plugins/<id>/poll| Parameter | Required | Type | Valid Values | Description |
|---|---|---|---|---|
| id | Yes | String | - | The unique identifier of the object. |
Trigger Poll
This resource call will trigger an immediate poll of the specified plugin. It is equivalent to the same operation on the Monitoring and Lifecycle Controls page.Request Body
No request body is required.Sample Response
JSON Response
{"messages":["Polled Plugin with ID 'myPlugin'"]}4.15.4 Deleting Plugins
The HTTP DELETE method is used to delete Plugins.Quick Reference
DELETE http://localhost/mws/rest/plugins/<id>4.15.4.1 Delete Plugin
URLs and Parameters
DELETE http://localhost/mws/rest/plugins/<id>| Parameter | Required | Type | Valid Values | Description |
|---|---|---|---|---|
| id | Yes | String | - | The unique identifier of the object. |
Sample Response
JSON Response for successful DELETE
{}
Additional information about a successful DELETE can be found in the HTTP response header X-MWS-Message.
JSON Response for an unsuccessful DELETE
{"messages":["Plugin plugin1 could not be deleted", "Error message describing the problem"]}4.15.5 Accessing Plugin Web Services
All HTTP methods can be used to access Plugin Web Services. However, some services only support specific methods. Check the specific plugin type documentation for more information.Quick Reference
GET http://localhost/mws/rest/plugins/<id>/services/<serviceName>
POST http://localhost/mws/rest/plugins/<id>/services/<serviceName>
PUT http://localhost/mws/rest/plugins/<id>/services/<serviceName>
DELETE http://localhost/mws/rest/plugins/<id>/services/<serviceName>
4.15.5.1 Access a Plugin Web Service
URLs and Parameters
GET http://localhost/mws/rest/plugins/<id>/services/<serviceName>
POST http://localhost/mws/rest/plugins/<id>/services/<serviceName>
| Parameter | Required | Type | Valid Values | Description |
|---|---|---|---|---|
| id | Yes | String | - | The unique identifier of the object. |
| serviceName | Yes | String | - | The name of the web service, either in CamelCase or hyphenated. |
Web Service IDs
Translation is done to map CamelCase web service names to hyphenated names in the URL. For example, a web service method namednotifyEvent on a plugin with a name of notifications may be
called with the following URLs:// CamelCase /rest/plugins/notifications/services/notifyEvent// Hyphenated /rest/plugins/notifications/services/notify-event
HTTP Method and Request Body
Because plugin Custom Web Services do not need to distinguish which HTTP method is used, it is recommended to use GET and POST when making requests to access web services unless documented otherwise. The request body and output may vary for each web service called. See the plugin type documentation for the requested plugin for available web services, request parameters, and expected output.4.16 Plugin Types
This section describes behavior of the Plugin Type object in Moab Web Services. It contains the URLs, request bodies, and responses delivered to and from Moab Web Services.The PluginType API page contains the type and description of all fields in the Plugin Type object. It also contains details regarding which fields are valid during PUT and POST actions.
Supported Methods
| Resource | GET | PUT | POST | DELETE |
|---|---|---|---|---|
| /rest/plugin-types | Get all plugin types | Create or update plugin type | ||
| /rest/plugin-types/id | Get specified plugin type |
4.16.1 Getting Plugin Types
The HTTP GET method is used to retrieve Plugin Type information. Queries for all objects and a single object are available.Quick Reference
GET http://localhost/mws/rest/plugin-types/<id>4.16.1.1 Get All Plugin Types
URLs and Parameters
GET http://localhost/mws/rest/plugin-types
Sample Response
GET http://localhost/mws/rest/plugin-types?fields=id
{
  "totalCount": 2,
  "resultCount": 2,
  "results":   [
    {"id": "vCenter"},
    {"id": "Native"}
  ]
}
4.16.1.2 Get Single Plugin Type
URLs and Parameters
GET http://localhost/mws/rest/plugin-types/<id>| Parameter | Required | Type | Valid Values | Description |
|---|---|---|---|---|
| id | Yes | String | - | The unique identifier of the object. |
Sample Response
JSON Response
{
  "author": "Adaptive Computing Enterprises, Inc.",
  "commonsVersion": "0.9.3 > *",
  "description": "Polls a VMware® vCenter™ Server for information on the hypervisors and virtual machines it manages.",
  "documentationLink": "",
  "email": "",
  "id": "VCenter",
  "initialPlugins": { },
  "instances": [
    {"id":"vcenter"}
  ],
  "issueManagementLink": "",
  "license": "APACHE",
  "mwsVersion": "7.1.2 > *",
  "pollMethod": true,
  "scmLink": "",
  "title": "VCenter",
  "version": "1.0",
  "webServices": [ ],
  "website": "http://www.adaptivecomputing.com"
}
4.16.2 Creating or Updating Plugin Types
The HTTP PUT method is used to create or update Plugin Types. TheContent-Type HTTP
header is used to determine if the request contains a single class file as plaintext or
the binary data of a JAR file. Each request is explained in the following sections.Quick Reference
PUT http://localhost/mws/rest/plugin-types[?reload-plugins=false]
There is a known issue with dynamically updating plugin types with typed field injection. See the Add or Update Plugin Types section for more information.
4.16.2.1 Update Plugin Type (File)
URLs and Parameters
PUT http://localhost/mws/rest/plugin-types[?reload-plugins=false]
| Parameter | Required | Valid Values | Description |
|---|---|---|---|
| reload-plugins | No | true or false | Reloads all plugins of this type on successful update. Defaults to true. |
Request Body
This function is idempotent, meaning it will create the Plugin Type if it does not exist or update it if it does. The request body is the actual contents of the class file to upload. This web service is an exception to most as it requires a content type ofapplication/x-groovy or text/plain.If theapplication/x-groovyortext/plaincontent types are not used in the request, it will be interpreted as JSON, resulting in a failure.
Plaintext upload
package testimport com.adaptc.mws.plugins.*class UploadPlugin {
	static author = "Adaptive Computing"
	static description = "A sample plugin class"
	String id	public void configure() throws InvalidPluginConfigurationException {
		def myConfig = config
		def errors = []
		if (!myConfig.arbitraryKey)
			errors << "Missing arbitraryKey!"
		if (errors)
			throw new InvalidPluginConfigurationException(errors)
	}	public def customService(Map params) {
		return params
	}
}
If using the curl library to perform plugin type uploading, the equivalent of the command-line
option --data-binary must be used to send the request body. Otherwise compilation errors may be encountered
when uploading the plugin type.Sample Response
The response of this task is the same as the Get All Plugin Types task. The reason that the return of this task is a list is to accommodate the possibility of uploading multiple plugin types in a single JAR file as explained in the next section.4.16.2.2 Update Plugin Type (JAR)
URLs and Parameters
PUT http://localhost/mws/rest/plugin-types?jar-filename=<filename.jar>[&reload-plugins=false]| Parameter | Required | Valid Values | Description |
|---|---|---|---|
| jar-filename | Yes | String | The filename of the JAR file that is being uploaded. |
| reload-plugins | No | true or false | Reloads all plugins of this type on successful update. Defaults to true. |
Request Body
This function is idempotent, meaning it will create the Plugin Types if they do not exist or update them if they do. The request body is the binary contents of the JAR file to upload. This web service is an exception to most as it requires a content type ofapplication/x-jar.
If the application/x-jar content type is not used in the request, it will be interpreted as JSON,
resulting in a failure.
If using the curl library to perform plugin type uploading, the equivalent of the command-line
option --data-binary must be used to send the request body. Otherwise compilation errors may be encountered
when uploading the plugin type.Sample Response
The response of this task is the same as the Get All Plugin Types task. Note that when using a JAR file, multiple plugin types may be uploaded in the same request.4.17 Policies
This section describes behavior of the Policies object in Moab Web Services. It contains the URLs, request bodies, and responses delivered to and from Moab Web Services.The Policy API contains the type and description of fields that all Policies have in common.
Supported Policies
| Name | Id |
|---|---|
| Auto VM Migration | auto-vm-migration |
| Hypervisor Allocation Overcommit | hv-allocation-overcommit |
| Node Allocation | node-allocation |
| Migration Exclusion List | migration-exclusion-list |
Supported Methods
| Resource | GET | PUT | POST | DELETE |
|---|---|---|---|---|
| /rest/policies | Get all policies | |||
| /rest/policies/id | Get specified policy | Modify specified policy |
4.17.1 Getting Policies
The HTTP GET method is used to retrieve Policies information.Quick Reference
GET http://localhost/mws/rest/policies
4.17.1.1 Get All Policies
URLs and Parameters
GET http://localhost/mws/rest/policies
| Parameter | Required | Valid Values | Description | Example |
|---|---|---|---|---|
| query | No | JSON | Query for specific results. | query={"state":"DISABLED","conflicted":"false"} |
| sort | No | JSON | Sort the results. Use 1 for ascending and -1 for descending. | sort={"id":-1} |
Sample Response
GET http://localhost/mws/rest/policies?fields=id,state,conflicted
{
  "totalCount": 2,
  "resultCount": 2,
  "results": [  {
    "conflicted": false,
    "state": "DISABLED",
    "id": "auto-vm-migration"
  },{
    "conflicted": false,
    "state": "DISABLED",
    "id": "hv-allocation-overcommit"
  },{
    "conflicted": false,
    "state": "DISABLED",
    "id": "node-allocation"
  },{
    "conflicted": false,
    "state": "DISABLED",
    "id": "migration-exclusion-list"
  }]
}
4.17.1.2 Get Single Policy
URLs and Parameters
GET http://localhost/mws/rest/policies/<id>| Parameter | Required | Type | Valid Values | Description |
|---|---|---|---|---|
| id | Yes | String | - | The unique identifier of the object. |
Sample Responses
Auto VM Migration
{
  "conflicted": false,
  "description": "Configure thresholds to control how and when virtual machines are moved from one hypervisor to another.",
  "id": "auto-vm-migration",
  "name": "Automatic Virtual Machine Migration",
  "potentialConflicts": [],
  "priority": 1,
  "state": "DISABLED",
  "tags": [],
  "types": [],
  "version": 0,
  "genericMetricThresholds":{
  	"GMETRIC1":1.3
  },
  "processorUtilizationThreshold":0.5,
  "memoryUtilizationThreshold":0.4,
  "migrationAlgorithmType": "NONE"
}
Hypervisor Allocation Overcommit
{
  "conflicted": false,
  "description": "Controls how hypervisors are overallocated with regards to processors and memory.",
  "id": "hv-allocation-overcommit",
  "name": "Hypervisor Allocation Overcommit",
  "potentialConflicts": [],
  "priority": 2,
  "state": "DISABLED",
  "tags": [],
  "types": [],
  "version": 0,
  "processorAllocationLimit":29.5,
  "memoryAllocationLimit":1.2
}
Node Allocation
{
  "conflicted": false,
  "description": "Controls how nodes are selected for workload placement.",
  "id": "node-allocation",
  "name": "Node Allocation",
  "potentialConflicts": [],
  "priority": 3,
  "state": "DISABLED",
  "tags": [],
  "types": [],
  "version": 0,
  "nodeAllocationAlgorithm": "CustomPriority",
  "customPriorityFunction": "100*RSVAFFINITY - GMETRIC[numvms]"
}
Migration Exclusion List
{
    "conflicted": false,
    "description": "Controls which machines are excluded from automatic live migration operations.",
    "hvExclusionList": ["blade05", "blade02"],
    "name": "Migration Exclusion List",
    "potentialConflicts": [],
    "priority": 100,
    "state": "DISABLED",
    "tags": [],
    "types": [],
    "version": 1,
    "vmExclusionList": ["vm1", "vm5"],
    "id": "migration-exclusion-list"
}
4.17.2 Modifying Policies
The HTTP PUT method is used to modify Policies.Quick Reference
PUT http://localhost/mws/rest/policies/<id>4.17.2.1 Modify Policy
URLs and Parameters
PUT http://localhost/mws/rest/policies/<id>[?change-mode=set]| Parameter | Required | Type | Valid Values | Description |
|---|---|---|---|---|
| id | Yes | String | - | The unique identifier of the object. |
Additional URL parameters
URL parameters for modifying a Migration Exclusion Lists Policy.| Migration Exclusion Lists Parameter | Required | Valid Values | Description |
|---|---|---|---|
| change-mode | No | set(Default) | Replace the existing exclusion list(s) with the given one. |
| add | Add the given VMs/HVs to the existing exclusion list(s). | ||
| remove | Remove the given VMs/HVs from the existing exclusion list(s). |
Request Body
In general, the fields shown in the Policy API are not available for modification. However, thestate field may be modified to a valid
Policy State. All other fields listed in the specific
API pages may be modified unless documented otherwise.The request body below shows all the fields that are available when
modifying a Auto VM Migration Policy, along with some sample values.JSON Request Body for Auto VM Migration Policy
{
    "genericMetricThresholds": {
        "GENERICTHRESHOLD": 5
    },
    "memoryUtilizationThreshold": 0.5,
    "processorUtilizationThreshold": 0.4
}JSON Request Body for Auto VM Migration Policy
{
      "nodeAllocationAlgorithm" : "CustomPriority",
      "customPriorityFunction" : "100*RSVAFFINITY - GMETRIC[numvms]"
}JSON Request Body for Migration Exclusion Lists Policy
{
   "vmExclusionList" : ["vm1","vm3","vm5"],
   "hvExclusionList" : ["hv2","hv3","hv6"]
}
Sample Response
JSON Response
{
    "messages": ["Policy auto-vm-migration updated"]
}
Samples
Enable the Auto VM Migration Policy and set values.PUT http://localhost/mws/rest/policies/auto-vm-migration
{
  "state": "enabled",
  "migrationAlgorithmType": "overcommit",
  "processorUtilizationThreshold": 0.5,
  "memoryUtilizationThreshold": 0.4
}
As noted in the Auto VM Migration API documentation, if thestateis set to ENABLED, then themigrationAlgorithmTypemust not be set to NONE.
Restrictions
All Policies
- Fields cannot be modified while the policy is disabled. Enable the policy to modify the field.
Auto VM Migration
- Arbitrary metrics can be added to genericMetricThresholds, but they cannot be removed once added.
- The migrationAlgorithmType field cannot be modified while the policy is disabled. Enable the policy to modify the field.
- Moab is configured with a default limit of 10 generic metrics. If this limit is reached, such as when arbitrary metrics are added to genericMetricThresholds, the metric will not be reported.
- To increase this limit, set the
MAXGMETRICproperty in the Moab configuration file.
4.18 Principals
This section describes behavior of the Principal object in Moab Web Services. It contains the URLs, request bodies, and responses delivered to and from Moab Web Services.The Principal API contains the type and description of all fields in the Principal object. It also contains details regarding which fields are valid during PUT and POST actions.
Supported Methods
| Resource | GET | PUT | POST | DELETE |
|---|---|---|---|---|
| /rest/principals | Get All Principals | Create Principal | ||
| /rest/principals/id | Get Specified Principal | Modify Principal | Delete Principal | |
| /rest/principals/name | Get Specified Principal | Modify Principal | Delete Principal |
4.18.1 Getting Principals
The HTTP GET method is used to retrieve Principal information. You can query all objects or a single object.Quick Reference
GET http://localhost/mws/rest/principals[?query={"field":"value"}&sort={"field":<1|-1>}]
GET http://localhost/mws/rest/principals/<id>
GET http://localhost/mws/rest/principals/<name>
4.18.1.1 Get All Principals
URLs and Parameters
GET http://localhost/mws/rest/principals[?query={"field":"value"}&sort={"field":<1|-1>}]| Parameter | Required | Valid Values | Description | Example |
|---|---|---|---|---|
| query | No | JSON | Queries for specific results. | query={"name":"Acme Principal"} |
| sort | No | JSON | Sort the results. Use 1 for ascending and -1 for descending. | sort={"name":-1} |
Sample Response
GET http://localhost/mws/rest/principals?fields=name,description
{
		"totalCount": 2,
		"resultCount": 2,
		"results":	 [
			{
				"groups": [	{
					"name": "CN=Engineering,CN=Users,DC=corp,DC=cloud,DC=dev",
					"type": "LDAPGROUP"
				}],
				"name": "Engineering-Principal"
			},
			{
				"groups": [	{
					"name": "CN=Marketing,CN=Users,DC=corp,DC=cloud,DC=dev",
					"type": "LDAPGROUP"
				}],
				"name": "Marketing-Principal"
			}
		]
	}
Sorting and Querying
See the sorting and querying sections of Global URL Parameters.4.18.1.2 Get Single Principal
URLs and Parameters
GET http://localhost/mws/rest/principals/<id>
GET http://localhost/mws/rest/principals/<name>
| Parameter | Required | Type | Valid Values | Description |
|---|---|---|---|---|
| id | Yes | String | - | The unique identifier of the Principal. |
| name | Yes | String | - | The name of the Principal. |
You must specify either id or name, but you do not have to specify both.
Sample Response
GET http://localhost/mws/rest/principals/principal8
{
	  "attachedRoles": [  {
		"description": "This is a role for normal users in the Acme BU Group.",
		"id": "5033b8eae4b09cc61bedb895",
		"name": "Acme-User-Role",
		"permissions":	 [
				{
			"action": "read",
			"description": "The permission to read all nodes",
			"id": "5033b842e4b09cc61bedb818",
			"label": "",
			"resource": "nodes",
			"resourceFilter": null,
			"type": "api",
			"version": 1
		  },
		],
		"version": 2
	  }],
	  "description": "Principal 8",
	  "groups": [  {
		"name": "CN=Engineering,CN=Users,DC=corp,DC=cloud,DC=dev",
		"type": "LDAPGROUP"
	  }],
	  "id": "5033d33fe4b018b28745fecd",
	  "name": "principal8",
	  "users":   [
		{
		  "name": "jhammon",
		  "type": "LDAP"
		},
		{
		  "name": "bjones",
		  "type": "LDAP"
		}
	  ],
	"version": 0
}
4.18.2 Creating Principals
The HTTP POST method is used to submit Principals.Quick Reference
POST http://localhost/mws/rest/principals
4.18.2.1 Create Single Principal
URLs and Parameters
POST http://localhost/mws/rest/principals
Request Body
The following is an example request body to create a principal:
- The name field is required and must contain only letters, digits, periods, dashes, and underscores.
- The attachedRoles field expects an array of Role IDs or names:
POST http://localhost/mws/rest/principals
{
	"name" : "Acme-Principal",
	"attachedRoles" : [{"name":"Acme-User-Role"}],
	"description" : "A cool principal",
	"groups" : [{"name": "CN=Engineering,CN=Users,DC=corp,DC=cloud,DC=dev", "type":"LDAPGROUP"}],
	"users" : [{
		"name" : "john",
		"type" : "LDAP"
	} ]
}
Sample Response
If the request was successful, the response body is the new principal that was created, exactly as shown in Get Single Principal. On failure, the response is an error message.4.18.3 Modifying Principals
The HTTP PUT method is used to modify Principals.Quick Reference
PUT http://localhost/mws/rest/principals/<id>
PUT http://localhost/mws/rest/principals/<name>
4.18.3.1 Modify Single Principal
URLs and Parameters
PUT http://localhost/mws/rest/principal/<id>
PUT http://localhost/mws/rest/principal/<name>
| Parameter | Required | Type | Valid Values | Description |
|---|---|---|---|---|
| id | Yes | String | - | The unique identifier of the Principal. |
| name | Yes | String | - | The name of the Principal. |
| change-mode | Yes | String | add | Add the given objects (ldapGroups, ldapOUs, etc) to the objects that already exist. |
| remove | Delete the given objects from the objects that already exist. | |||
| set | Add the given objects (ldapGroups, ldapOUs, etc) and remove the objects that already exist. |
- The change-mode set is the default if no change-mode parameter is given.
- You must specify either id or name, but you do not have to specify both.
- The name field must contain only letters, digits, periods, dashes, and underscores.
- The attachedRoles field expects an array of Role IDs or names:
Example Request
PUT http://locahost/mws/rest/principals/Acme-Principal"
{
	"groups" : [ {
		"name" : "CN=Marketing,CN=Users,DC=mycompany,DC=com",
		"type" : "LDAPGROUP"
	},{
		"name" : "CN=Sales,CN=Users,DC=mycompany,DC=com",
		"type" : "LDAPGROUP"
	}],
	"users" : [ {
		"name" : "jhammon",
		"type" : "LDAP"
	}]
}
The version field contains the current version of the database entry. This field cannot be updated directly. However, if version is included in the modify request, it will be used to verify that another client did not update the object between the time that the data was retrieved and the modify request was delivered.
Sample Response
If the request was successful, the response body is the modified principal as shown in Get Single Principal. On failure, the response is an error message.4.18.4 Deleting Principals
The HTTP DELETE method is used to delete Principals.Quick Reference
DELETE http://localhost/mws/rest/principals/<id>
DELETE http://localhost/mws/rest/principals/<name>
4.18.4.1 Delete Single Principal
URLs and Parameters
DELETE http://localhost/mws/rest/principal/<id>
DELETE http://localhost/mws/rest/principal/<name>
| Parameter | Required | Type | Valid Values | Description |
|---|---|---|---|---|
| id | Yes | String | - | The unique identifier of the Principal. |
| name | Yes | String | - | The name of the Principal. |
Only one of id or name are required.
Sample Response
JSON Response
{}4.19 Quotes
This section describes behavior of the Quotes object in Moab Web Services. It contains the URLs, request bodies, and responses delivered to and from Moab Web Services.The Quote API contains the type and description of fields that all Quotes have in common.
Supported Methods
| Resource | GET | PUT | POST | DELETE |
|---|---|---|---|---|
| /rest/quotes/standard/quote | Quoting resources |
4.19.1 Quoting Resources
Quick Reference
POST http://localhost/mws/rest/quotes/standard/quote?object-type=<OBJECTTYPE>&proxy-user=<USER>&charge-duration=<CHARGEDURATION>
4.19.1.1 Quote Single Job or Service
URLs and Parameters
POST http://localhost/mws/rest/quotes/standard/quote?object-type=<OBJECTTYPE>&proxy-user=<USER>&charge-duration=<CHARGEDURATION>
| Parameter | Required | Type | Valid Values | Description |
|---|---|---|---|---|
| proxy-user | Yes | String | Perform action as defined MAM user. | proxy-user=amy |
| charge-duration | Yes | Integer | The charge duration of the job in seconds. | charge-duration=6400 |
| object-type | Yes | String | The object to quote. It can be job or service. | object-type=job |
| itemize | No | Boolean | Returns the composite charge information in the response data. | itemize=true |
| rate | No | JSONArray | Uses the specified charge rates in the quote. The specified rates override the standard and quote rates. If the guarantee field is set to true, these charge rates will be saved and used when this quote is referenced in a charge action. | rate=[{"type":"VBR","name":"Memory","rate":1},{"type":"VBR","name":"Processors","rate":1}] |
| guarantee | No | Boolean | Guarantees the quote and returns a quote id to secure the current charge rates. This results in the creation of a quote record and a permanent usage record. This parameter is mutually exclusive with the cost-only parameter. | guarantee=true |
| grace-duration | No | Integer | The guaranteed quote grace period in seconds. If the quote duration is specified but not the quote end time, the quote endtime will be calculated as the quote start time plus the quote duration plus the grace duration. | grace-duration=6400 |
| cost-only | No | Integer | Returns the cost, ignoring all balance and validity checks. This parameter is mutually exclusive with the guarantee parameter. | cost-only=true |
| description | No | String | The guaranteed quote description. | description="ABC Coupon Rate" |
| start-time | No | Date | The guaranteed quote start time in the format yyyy-MM-dd HH:mm:ss z, -Infinity, Infinity, or Now. | start-time="2012-04-09 13:49:40 UTC" |
| end-time | No | Date | The guaranteed quote end time in the format yyyy-MM-dd HH:mm:ss z, -Infinity, Infinity, or Now. | end-time="2012-04-09 14:49:40 UTC" |
Request Body
The request body below shows all of the fields in a Job that could affect the quote.POST http://localhost/mws/rest/quotes/standard/quote?object-type=job
{
  "id": "Moab.1",
  "user": "amy",
  "group": "group",
  "rmName": "machine1",
  "templateList": [
  "genericVm"
  ],
  "account": "biology",
  "qosRequested": "QOS1",
  "variables": {
    "imageName": "centos5.5-stateless",
    "topLevelServiceId": "myService.1",
    "serviceId": "vmService.1",
    "vmid": "VmService.1",
    "pmid": "VmService.1"
  },
  "requirements": [
  {
      "requiredProcessorsPerTask": 2,
      "genericResources": {
  	     "gold": 100,
  	     "os": 500
      },
      "requiredNodeCountMinimum": 1,
      "requiredMemoryPerTask": 1024,
      "requiredClass": "batch"
  }
  ]
}POST http://localhost/mws/rest/quotes/standard/quote?object-type=service
{
     "name":"service.1",
     "user": "amy",
     "account": "chemistry"
     "attributes":{
        "moab":{
           "job":{
              "resources":{
                 "procs":1,
                 "mem":2048,
                 "OS":500,
                 "gold":100
              },
              "variables":{
                 "Var1": 1524
              },
              "image":"centos5.5-stateless",
              "template":"genericVM",
           }
        }
     }
  }
Sample Responses
If the quote is not guaranteed
JSON Response
{
    "instance": "Moab.1",
    "amount": 600
}
If the quote is guaranteed
JSON Response
{
    "id": 1,
    "usageRecord": 2,
    "instance": "Moab.1",
    "amount": 600
}
If the quote is guaranteed and itemized
JSON Response
{
  "details":   [
        {
      "name": "Processors",
      "value": "2",
      "duration": 300,
      "rate": 1,
      "scalingFactor": 1,
      "amount": 600,
      "details": "2 [Processors] * 1 [ChargeRate{VBR}{Processors}] * 300 [Duration]"
    },
        {
      "name": "Memory",
      "value": "1024",
      "duration": 300,
      "rate": 1,
      "scalingFactor": 1,
      "amount": 307200,
      "details": "1024 [Memory] * 1 [ChargeRate{VBR}{Memory}] * 300 [Duration]"
    }
  ],
  "id": 20,
  "instance": "Moab.1",
  "usageRecord": 20,
  "amount": 307800
}
If the quote is on a service
JSON Response
{
  "services":   [
        {
      "details":       [
                {
          "name": "Processors",
          "value": "22",
          "duration": 30,
          "rate": 1,
          "scalingFactor": 1,
          "amount": 660,
          "details": "22 [Processors] * 1 [ChargeRate{VBR}{Processors}] * 30 [Duration]"
        },
                {
          "name": "Memory",
          "value": "32343242",
          "duration": 30,
          "rate": 1,
          "scalingFactor": 1,
          "amount": 970297260,
          "details": "32343242 [Memory] * 1 [ChargeRate{VBR}{Memory}] * 30 [Duration]"
        }
      ],
      "id": 120,
      "instance": "myVmWorkflow",
      "usageRecord": 157,
      "amount": 970297920
    },
        {
      "details": [      {
        "name": "Storage",
        "value": "2500",
        "duration": 30,
        "rate": 1.157E-7,
        "scalingFactor": 1,
        "amount": 0,
        "details": "2500 [Storage] * 1.157e-07 [ChargeRate{VBR}{Storage}] * 30 [Duration]"
      }],
      "id": 122,
      "instance": "myExtraStorageWorkflow",
      "usageRecord": 159,
      "amount": 0
    },
        {
      "details":       [
                {
          "name": "Processors",
          "value": "0",
          "duration": 30,
          "rate": 1,
          "scalingFactor": 1,
          "amount": 0,
          "details": "0 [Processors] * 1 [ChargeRate{VBR}{Processors}] * 30 [Duration]"
        },
                {
          "name": "Memory",
          "value": "0",
          "duration": 30,
          "rate": 1,
          "scalingFactor": 1,
          "amount": 0,
          "details": "0 [Memory] * 1 [ChargeRate{VBR}{Memory}] * 30 [Duration]"
        }
      ],
      "id": 123,
      "instance": "myPmWorkflow",
      "usageRecord": 160,
      "amount": 0
    }
  ],
  "amount": 970297920
}
Restrictions
- The details field is only available with MAM version 7.1.0 or later.
4.20 Reports
This section describes behavior of the reporting framework in Moab Web Services. It contains the URLs, request bodies, and responses delivered to and from Moab Web Services.The Report, Sample, and Datapoint API contains the type and description of all fields in the Report, Sample, and Datapoint objects. They also contains details regarding which fields are valid during PUT and POST actions.
Supported Methods
| Resource | GET | PUT | POST | DELETE |
|---|---|---|---|---|
| /rest/reports | Get all reports | Create Reports | Deleting Reports | |
| /rest/reports/name | Get single report with data | |||
| /rest/reports/id | Get single report with data | |||
| /rest/reports/name/datapoints | Get datapoints for report | |||
| /rest/reports/id/datapoints | Get datapoints for report | |||
| /rest/reports/name/samples | Get samples for report | Create sample(s) for report | ||
| /rest/reports/id/samples | Get samples for report | Create sample(s) for report |
4.20.1 Getting Reports
The HTTP GET method is used to retrieve Report information. Queries for all reports with no attached data and a single report with associated data are available.Quick Reference
GET http://localhost/mws/rest/reports[?query={"field":"value"}&sort={"field":<1|-1>}]
GET http://localhost/mws/rest/reports/<id>
GET http://localhost/mws/rest/reports/<name>
4.20.1.1 Get All Reports (No Data Included)
URLs and Parameters
GET http://localhost/mws/rest/reports[?query={"field":"value"}&sort={"field":<1|-1>}]| Parameter | Required | Valid Values | Description | Example |
|---|---|---|---|---|
| query | No | JSON | Queries for specific results. | query={"reportSize":4} |
| sort | No | JSON | Sort the results. Use 1 for ascending and -1 for descending. | sort={"name":-1} |
Sample Response
JSON Response
{
  "totalCount": 1,
  "resultCount": 1,
  "results": [  {
    "id": "3efe5c670be86ba8560397ff",
    "name": "cpu-util"
	…
  }]
}
No datapoints are returned when querying for all reports. To view the consolidated datapoints, the Get Single Report API call must be used.
Samples
GET http://localhost/mws/rest/reports?fields=id,name
{
  "totalCount": 3,
  "resultCount": 3,
  "results":   [
        {
      "id": "3efe5c670be86ba8560397ff",
      "name": "cpu-util"
    },
        {
      "id": "3efe5c670be86ba856039800",
      "name": "cpu-temp"
    },
        {
      "id": "3efe5c670be86ba856039801",
      "name": "cpu-load"
    }
  ]
}
4.20.1.2 Get Single Report (Includes Data)
URLs and Parameters
GET http://localhost/mws/rest/reports/<id>
GET http://localhost/mws/rest/reports/<name>
| Parameter | Required | Type | Valid Values | Description |
|---|---|---|---|---|
| id | Yes | String | - | The unique identifier of the report. |
| name | Yes | String | - | The name of the report. |
Only one of id or name are required.
Sample Response
In the example below, the first datapoint has anull data element, which means that the minimumSampleSize
configured for the report was not met when consolidating the datapoint. The second datapoint contains
actual data.JSON Response
{
  "consolidationFunction": "average",
  "datapointDuration": 15,
  "datapoints":   [
        {
      "endDate": "2011-12-02 17:28:22 UTC",
      "startDate": "2011-12-02 17:28:22 UTC",
      "firstSampleDate": null,
      "lastSampleDate": null,
      "data": null
    },
        {
      "endDate": "2011-12-02 17:28:23 UTC",
      "startDate": "2011-12-02 17:28:37 UTC",
      "firstSampleDate": "2011-12-02 17:28:23 UTC",
      "lastSampleDate": "2011-12-02 17:28:30 UTC",
      "data":       {
        "utilization": 99.89,
        "time": 27.433333333333337
      }
    }
  ],
  "description": "Example of CPU utilization reporting",
  "id": "3efe5c670be86ba8560397ff",
  "keepSamples": false,
  "minimumSampleSize": 1,
  "name": "cpu-util",
  "reportSize": 2
}
4.20.1.3 Get Datapoints For Single Report
URLs and Parameters
GET http://localhost/mws/rest/reports/<id>/datapoints[?query={"field":"value"}&sort={"field":<1|-1>}]
GET http://localhost/mws/rest/reports/<name>/datapoints[?query={"field":"value"}&sort={"field":<1|-1>}]
| Parameter | Required | Type | Valid Values | Description |
|---|---|---|---|---|
| id | Yes | String | - | The unique identifier of the report. |
| name | Yes | String | - | The name of the report. |
| query | No | JSON | Queries for specific results. | query={"data.test":true} |
| sort | No | JSON | Sort the results. Use 1 for ascending and -1 for descending. | sort={"startDate":-1} |
Only one of id or name are required.
Sample Response
This function is exactly the same as requesting a single report with only the datapoints returned. No report metadata (i.e. description, minimumSampleSize, etc.) is returned.JSON Response
{
  "resultCount":1,
  "totalCount":1,
  "results":[
        {
      "endDate": "2011-12-02 17:28:22 UTC",
      "startDate": "2011-12-02 17:28:22 UTC",
      "firstSampleDate": null,
      "lastSampleDate": null,
      "data": null
    },
        {
      "endDate": "2011-12-02 17:28:37 UTC",
      "startDate": "2011-12-02 17:28:37 UTC",
      "firstSampleDate": "2011-12-02 17:28:23 UTC",
      "lastSampleDate": "2011-12-02 17:28:23 UTC",
      "data":       {
        "utilization": 99.89,
        "time": 27.433333333333337
      }
    }
  ]
}
4.20.2 Getting Samples For Reports
The HTTP GET method is used to retrieve Sample information.Quick Reference
GET http://localhost/mws/rest/reports/<id>/samples[?query={"field":"value"}&sort={"field":<1|-1>}]
GET http://localhost/mws/rest/reports/<name>/samples[?query={"field":"value"}&sort={"field":<1|-1>}]
4.20.2.1 Get Samples For Report
URLs and Parameters
GET http://localhost/mws/rest/reports/<id>/samples[?query={"field":"value"}&sort={"field":<1|-1>}]
GET http://localhost/mws/rest/reports/<name>/samples[?query={"field":"value"}&sort={"field":<1|-1>}]
| Parameter | Required | Type | Valid Values | Description |
|---|---|---|---|---|
| id | Yes | String | - | The unique identifier of the report. |
| name | Yes | String | - | The name of the report. |
| query | No | JSON | Queries for specific results. | query={"agent":"cpu-monitor"} |
| sort | No | JSON | Sort the results. Use 1 for ascending and -1 for descending. | sort={"agent":-1} |
Only one of id or name are required.
Sample Response
JSON Response
{
  "totalCount": 1,
  "resultCount": 1,
  "results": [  {
	"timestamp": "2011-12-02 17:28:37 UTC"
	"data":{
		"cpu1":2.3,
		"cpu2":1.2,
		"cpu3":0.0,
		"cpu4":12.1
	},
	…
  }]
}
4.20.3 Creating Reports
The HTTP POST method is used to create Reports. Operations are available to create reports with or without historical datapoints.Quick Reference
POST http://localhost/mws/rest/reports
4.20.3.1 Create Report
URLs and Parameters
POST http://localhost/mws/rest/reports
Request Body
To create a report, several fields are required as documented in the Report API.The request body below shows all the fields that are available during report creation.JSON Request Body
{
	"name":"cpu-util",
	"description":"An example report on cpu utilization",
	"consolidationFunction":"average",
	"datapointDuration":15,
	"minimumSampleSize":1,
	"reportSize":2,
	"keepSamples":true,
	"datapoints":[
		{
			"startDate":"2011-12-01 19:16:57 UTC",
			"endDate":"2011-12-01 19:16:57 UTC",
			"data":{
				"time":30,
				"util":99.98
			}
		}
	]
}
Sample Response
{
	"messages":["Report cpu-util created"],
	"id":"3efe5c670be86ba8560397ff",
	"name":"cpu-util"
}
Samples
POST http://localhost/mws/rest/reports (Minimal report without datapoints)
{
	"name":"cpu-util",
	"datapointDuration":15,
	"reportSize":2
}
4.20.4 Creating Samples
The HTTP POST method is used to create Samples for Reports.Quick Reference
POST http://localhost/mws/rest/reports
4.20.4.1 Create Samples For Report
URLs and Parameters
GET http://localhost/mws/rest/reports/<id>/samples
GET http://localhost/mws/rest/reports/<name>/samples
| Parameter | Required | Type | Valid Values | Description |
|---|---|---|---|---|
| id | Yes | String | - | The unique identifier of the report. |
| name | Yes | String | - | The name of the report. |
Only one of id or name are required.
Request Body
To create samples for a report, simply send data and an optional timestamp to the URL above.The request body below shows all the fields that are available during sample creation. Note that thedata field can contain arbitrary JSON.JSON Request Body
{
	"timestamp":"2011-12-01 19:16:57 UTC",
	"agent":"my agent",
	"data":{
		"cpu1":2.3,
		"cpu2":1.2,
		"cpu3":0.0,
		"cpu4":12.1
	}
}
Sample Response
{"messages":["1 sample(s) created for report cpu-util"]}4.20.5 Deleting Reports
The HTTP DELETE method is used to delete Reports.Quick Reference
DELETE http://localhost/mws/rest/reports/<id>
DELETE http://localhost/mws/rest/reports/<name>
4.20.5.1 Delete Report
URLs and Parameters
DELETE http://localhost/mws/rest/reports/<id>
DELETE http://localhost/mws/rest/reports/<name>
| Parameter | Required | Type | Valid Values | Description |
|---|---|---|---|---|
| id | Yes | String | - | The unique identifier of the report. |
| name | Yes | String | - | The name of the report. |
Only one of id or name are required.
Sample Response
JSON Response
{"messages":["Report cpu-util deleted"]}4.21 Reservations
This section describes behavior of the Reservation object in Moab Web Services. It contains the URLs, request bodies, and responses delivered to and from Moab Web Services.The Reservation API contains the type and description of all fields in the Reservation object. It also contains details regarding which fields are valid during PUT and POST actions.
Supported Methods
| Resource | GET | PUT | POST | DELETE |
|---|---|---|---|---|
| /rest/reservations | Get all reservations | Create reservation | ||
| /rest/reservations/id | Get specified reservation | Modify reservation | Release reservation |
4.21.1 Getting Reservations
The HTTP GET method is used to retrieve Reservation information. Queries for all objects and a single object are available.Quick Reference
GET http://localhost/mws/rest/reservations/<id>Restrictions
- Only admin or user reservations are returned with this call.
4.21.1.1 Get All Reservations
URLs and Parameters
GET http://localhost/mws/rest/reservations
Sample Response
GET http://localhost/mws/rest/reservations?fields=id
{
  "totalCount": 3,
  "resultCount": 3,
  "results":   [
    {"id": "system.1"},
    {"id": "system.2"},
    {"id": "system.3"}
  ]
}
4.21.1.2 Get Single Reservation
URLs and Parameters
GET http://localhost/mws/rest/reservations/<id>| Parameter | Required | Type | Valid Values | Description |
|---|---|---|---|---|
| id | Yes | String | - | The unique identifier of the object. |
Sample Response
JSON Response
{
  "accountingAccount": "",
  "accountingGroup": "",
  "accountingQOS": "",
  "accountingUser": "root",
  "aclRules": [  {
    "affinity": "NEUTRAL",
    "comparator": "LEXIGRAPHIC_EQUAL",
    "type": "RESERVATION_ID",
    "value": "system.43"
  }],
  "allocatedNodeCount": 1,
  "allocatedProcessorCount": 8,
  "allocatedTaskCount": 1,
  "allocatedNodes": [
  	{"id":"node001"}
  ],
  "comments": "",
  "creationDate": null,
  "duration": 200000000,
  "endDate": "2018-03-17 16:49:10 UTC",
  "excludeJobs":   [
    "job1",
    "job2"
  ],
  "expireDate": null,
  "flags":   [
    "REQFULL",
    "ISACTIVE",
    "ISCLOSED"
  ],
  "globalId": "",
  "hostListExpression": "",
  "id": "system.43",
  "idPrefix": "",
  "isActive": true,
  "isTracked": false,
  "label": "",
  "maxTasks": 0,
  "messages": [],
  "owner":   {
    "name": "adaptive",
    "type": "USER"
  },
  "partitionId": "switchB",
  "profile": "",
  "requirements":   {
    "architecture": "",
    "featureList":     [
      "feature1",
      "feature2"
    ],
    "featureMode": "",
    "memory": 0,
    "nodeCount": 0,
    "nodeIds": ["node001:1"],
    "os": "",
    "taskCount": 1
  },
  "reservationGroup": "",
  "resources": {"PROCS": 0},
  "startDate": "2011-11-14 20:15:50 UTC",
  "statistics":   {
    "caps": 0,
    "cips": 2659.52,
    "taps": 0,
    "tips": 0
  },
  "subType": "Other",
  "taskCount": 0,
  "trigger": null,
  "triggerIds": [],
  "uniqueIndex": "",
  "variables": {}
}
4.21.2 Creating Reservations
The HTTP POST method is used to create Reservations.Quick Reference
POST http://localhost/mws/rest/reservations
4.21.2.1 Create Reservation
URLs and Parameters
POST http://localhost/mws/rest/reservations
Request Body
The request body below shows all the fields that are available when creating a Reservation, along with some sample values.JSON Request Body
{
  "accountingAccount": "",
  "accountingGroup": "",
  "accountingQOS": "",
  "accountingUser": "root",
  "aclRules": [  {
    "affinity": "POSITIVE",
    "comparator": "LEXIGRAPHIC_EQUAL",
    "type": "GROUP",
    "value": "staff"
  }],
  "comments": "",
  "duration": 200000000,
  "endDate": "2018-03-17 16:49:10 UTC",
  "excludeJobs":   [
    "job1",
    "job2"
  ],
  "flags":   [
    "SPACEFLEX",
    "ACLOVERLAP",
    "SINGLEUSE"
  ],
  "hostListExpression": "",
  "idPrefix": "",
  "label": "myreservation",
  "owner":   {
    "name": "adaptive",
    "type": "USER"
  },
  "partitionId": "",
  "profile": "",
  "requirements":   {
    "architecture": "",
    "featureList":     [
      "feature1",
      "feature2"
    ],
    "memory": 0,
    "os": "",
    "taskCount": 1
  },
  "reservationGroup": "",
  "resources":   {
    "PROCS": 2,
    "MEM": 1024,
    "DISK": 1024,
    "SWAP": 1024,
    "other1": 17,
    "other2": 42
  },
  "startDate": "2011-11-14 20:15:50 UTC",
  "subType": "Other",
  "trigger": {
    "eventType":"START",
    "actionType":"EXEC",
    "action":"date"
  },
  "variables":   {
    "var1": "val1",
    "var2": "val2"
  }
}
Create reservation if no conflicting reservations are found.
This is equivalent to mrsvctl -c -h node01 -E.JSON Request Body
{
  "flags":   [
    "DEDICATEDRESOURCE"
  ],
  "hostListExpression": "node01"
}
Sample Response
JSON Response for successful POST
{"id": "system.44"}4.21.3 Modifying Reservations
The HTTP PUT method is used to modify Reservations.Quick Reference
PUT http://localhost/mws/rest/reservations/<id>?change-mode=<add|remove|set>
4.21.3.1 Modify Reservation
URLs and Parameters
PUT http://localhost/mws/rest/reservations/<id>?change-mode=<add|remove|set>
| Parameter | Required | Type | Valid Values | Description |
|---|---|---|---|---|
| id | Yes | String | - | The unique identifier of the object. |
| change-mode | Yes | String | add | Add the given variables to the variables that already exist. |
| remove | Delete the given variables from the variables that already exist. | |||
| set | Replace all existing variables with the given variables. |
Request Body
The request body below shows all the fields that are available when modifying a Reservation, along with some sample values.JSON Request Body for Reservation Modify
{
  "variables":   {
    "var1": "val1",
    "var2": "val2"
  }
}
Sample Response
This message may not match the message returned from Moab exactly, but is given as an example of the structure of the response.
JSON Response
{"messages":["reservation 'system.43' attribute 'Variable' changed."]}Restrictions
- You can change the ACL Rules on a reservation, but not using this resource. See Create or Update ACLs.
4.21.4 Releasing Reservations
The HTTP DELETE method is used to release Reservations.Quick Reference
DELETE http://localhost/mws/rest/reservations/<id>4.21.4.1 Release Reservation
URLs and Parameters
DELETE http://localhost/mws/rest/reservations/<id>| Parameter | Required | Type | Valid Values | Description |
|---|---|---|---|---|
| id | Yes | String | - | The unique identifier of the object. |
Sample Response
JSON Response for successful DELETE
{}4.22 Resource Types
This section describes behavior of the Resource Type object in Moab Web Services. It contains the URLs, request bodies, and responses delivered to and from Moab Web Services.The ResourceType API contains the type and description of all fields in the Resource Type object.
Supported Methods
| Resource | GET | PUT | POST | DELETE |
|---|---|---|---|---|
| /rest/resource-types | Get all resource types |
4.22.1 Getting Resource Types
The HTTP GET method is used to retrieve Resource Type information.Quick Reference
GET http://localhost/mws/rest/resource-types
4.22.1.1 Get All Resource Types
URLs and Parameters
GET http://localhost/mws/rest/resource-types
Sample Response
GET http://localhost/mws/rest/resource-types?fields=id
{
  "totalCount": 1,
  "resultCount": 1,
  "results":   [
    {"id": "throttle_migrate"}
  ]
}
4.23 Roles
This section describes behavior of the Role resource in Moab Web Services. The role resource is used to control access to MWS resources based on the proxy-user. Each role is attached to a principal and contains a list of proxy-user permissions that the group can use in MWS. This section describes the URLs, request bodies, and responses delivered to and from Moab Web Services.The Role API contains the type and description of all fields in the Role object. It also contains details regarding which fields are valid during PUT and POST actions.
Supported Methods
| Resource | GET | PUT | POST | DELETE |
|---|---|---|---|---|
| /rest/roles | Get All Roles | Create Role | ||
| /rest/roles/id | Get Specified Role | Modify Role | Delete Role | |
| /rest/roles/name | Get Specified Role | Modify Role | Delete Role |
4.23.1 Getting Roles
The HTTP GET method is used to retrieve Role information. You can query all objects or a single object.Quick Reference
GET http://localhost/mws/rest/roles[?query={"field":"value"}&sort={"field":<1|-1>}]
GET http://localhost/mws/rest/roles/<id>
GET http://localhost/mws/rest/roles/<name>
4.23.1.1 Get All Roles
URLs and Parameters
GET http://localhost/mws/rest/roles[?query={"field":"value"}&sort={"field":<1|-1>}]| Parameter | Required | Valid Values | Description | Example |
|---|---|---|---|---|
| query | No | JSON | Queries for specific results. | query={"name":"Acme-User-Role"} |
| sort | No | JSON | Sort the results. Use 1 for ascending and -1 for descending. | sort={"name":-1} |
Sample Response
GET http://localhost/mws/rest/roles?fields=id,name
{
  "totalCount": 1,
  "resultCount": 1,
  "results": [  {
    "id": "4fa197e68ca30fc605dd1cf0",
    "name": "Acme-User-Role"
  }]
}
Sorting and Querying
See the sorting and querying sections of Global URL Parameters.4.23.1.2 Get Single Role
URLs and Parameters
GET http://localhost/mws/rest/roles/<id>
GET http://localhost/mws/rest/roles/<name>
| Parameter | Required | Type | Valid Values | Description |
|---|---|---|---|---|
| id | Yes | String | - | The unique identifier of the Role. |
| name | Yes | String | - | The name of the Role. |
You must specify either id or name, but you do not have to specify both.
Sample Response
GET http://localhost/mws/rest/roles/Acme-User-Role
{
	"description" : "This is a role for normal users in the Acme BU Group.",
	"id" : "5022e695e4b073f54e47c28d",
	"name" : "Acme-User-Role",
	"permissions" : [ {
		"action" : "create",
		"description" : "The permission to create all charts.",
		"id" : "5022e695e4b073f54e47c28e",
		"label" : "Create Chart",
		"resource" : "chart",
		"resourceFilter" : null,
		"type" : "custom",
		"version" : 0
	}, {
		"action" : "read",
		"description" : "The permission to view all charts.",
		"id" : "5022e695e4b073f54e47c28f",
		"label" : "View Chart",
		"resource" : "chart",
		"resourceFilter" : null,
		"type" : "custom",
		"version" : 0
	}, {
		"action" : "update",
		"description" : "The permission to modify the africa chart.",
		"id" : "5022e695e4b073f54e47c290",
		"label" : "Modify Africa Chart",
		"resource" : "chart",
		"resourceFilter" : {
			"name" : "africa"
		},
		"type" : "custom",
		"version" : 0
	}, {
		"action" : "read",
		"description" : "The permissions to view John's services.",
		"id" : "5022e695e4b073f54e47c291",
		"label" : "Read John's services",
		"resource" : "services",
		"resourceFilter" : {
			"user":"john"
		},
		"type" : "api",
		"version" : 0
	} ],
	"version" : 2
}
4.23.2 Creating Roles
The HTTP POST method is used to submit Roles.Quick Reference
POST http://localhost/mws/rest/roles
4.23.2.1 Create Single Role
URLs and Parameters
POST http://localhost/mws/rest/roles
Request Body
The name field is required and must contain only letters, digits, periods, dashes, and underscores.The following is an example of a request body to create a role:
POST http://localhost/mws/rest/roles
{
	"name" : "Acme-User-Role",
	"description" : "This is a role for normal users in the Acme BU Group.",
	"permissions" :
	[
		{
		"id" : "4fa197e68ca30fc605dd1cf0"
		},
		{
		"id" : "4fa197e68ca30fc605dd1df2"
		}
	]
}
Sample Response
If the request was successful, the response body is the new role that was created, exactly as shown in Get Single Role. On failure, the response is an error message.Samples
The permissions field only expects an array of permission IDs, as shown in the following example:Example payload of role with 2 permissions
{
	"name" : "Acme-User-Role",
	"description" : "This is a role for normal users in the Acme BU Group.",
	"permissions" :
	[
		{
		"id" : "4fa197e68ca30fc605dd1cf0"
		}
	]
}
4.23.3 Modifying Roles
The HTTP PUT method is used to modify Roles.Quick Reference
PUT http://localhost/mws/rest/roles/<id>
PUT http://localhost/mws/rest/roles/<name>
4.23.3.1 Modify Single Role
URLs and Parameters
PUT http://localhost/mws/rest/role/<id>
PUT http://localhost/mws/rest/role/<name>
| Parameter | Required | Type | Valid Values | Description |
|---|---|---|---|---|
| id | Yes | String | - | The unique identifier of the Role. |
| name | Yes | String | - | The name of the Role. |
| change-mode | No | String | add | Adds the given permissions to the permissions that already exist. |
| remove | Deletes the given permissions from the permissions that already exist. | |||
| set | Adds the given permissions and deletes the permissions that already exist. |
See Global URL Parameters for available URL parameters.
- If you do not specify a change-mode value, the system automatically assumes set as the default.
- You must specify either id or name, but you do not have to specify both.
- The name field must contain only letters, digits, periods, dashes, and underscores.
Example Request
PUT http://locahost/mws/rest/role/Acme-User-Role?change-mode=add
{
	"permissions":[{"id":"4fa197e68ca30fc605dd1cf0"} ]
}
Sample Response
If the request was successful, the response body is the modified role as shown in Get Single Role. On failure, the response is an error message.4.23.4 Deleting Roles
The HTTP DELETE method is used to delete Roles.Quick Reference
DELETE http://localhost/mws/rest/roles/<id>
DELETE http://localhost/mws/rest/roles/<name>
4.23.4.1 Delete Single Role
URLs and Parameters
DELETE http://localhost/mws/rest/role/<id> DELETE http://localhost/mws/rest/role/<name>
| Parameter | Required | Type | Valid Values | Description |
|---|---|---|---|---|
| id | Yes | String | - | The unique identifier of the Role. |
| name | Yes | String | - | The name of the Role. |
You must specify either id or name, but you do not have to specify both.
Sample Response
JSON Response
{}4.24 Services
This section describes the behavior of a Service (an interdependent collection of workflows). It is possible for a Service to be composed of multiple Services. This section describes the URLs, request bodys, and responses delivered to and from Moab Web Services for each approach.The Service API contains the type and description of all fields in the Service object. It also contains details regarding which fields are valid during PUT and POST actions.
Supported Methods
| Resource | GET | PUT | POST | DELETE |
|---|---|---|---|---|
| /rest/services | Get all Services | Create Service | ||
| /rest/services/id | Get specified Service | Modify Service | Delete Service |
4.24.1 Getting Service Information
The HTTP GET method is used to retrieve Service information. Queries for all objects and a single object are available.Quick Reference
GET http://localhost/mws/rest/services[?query={"field":"value"}&sort={"field":<1|-1>}[&[show-recursive-vc|show-vc]=true]]
GET http://localhost/mws/rest/services/<id>[?[show-recursive-vc|show-vc]=true]
GET http://localhost/mws/rest/services/<name>[?[show-recursive-vc|show-vc]=true]4.24.1.1 Get All Services
URLs and Parameters
GET http://localhost/mws/rest/services[?query={"field":"value"}&sort={"field":<1|-1>}[&[show-recursive-vc|show-vc]=true]]| Parameter | Required | Valid Values | Description | Example |
|---|---|---|---|---|
| query | No | JSON | Query for specific results. | query={"type":"storage","label":"exlabel"} |
| sort | No | JSON | Sort the results. Use 1 for ascending and -1 for descending. | sort={"account":-1} |
| show-recursive-vc | No | true | Show extended details about the service's virtual container including nested virtual containers and nested jobs. | show-recursive-vc=true |
| show-vc | No | true | Show details about the service's virtual container. | show-vc=true |
Sample Response
GET http://localhost:8080/mws/rest/services?query={user:"bob"}
{
"totalCount": 9,
"resultCount": 3,
"results": [
{
"dateCreated": "2011-12-07 16:03:40 UTC",
"lastUpdated": "2011-12-07 16:03:40 UTC", "name": "bobService.1",
"version": 1,
"type": "container",
"label": null,
"user": "bob",
"account": "bamboo",
"startDateRequested": "2012-14-10 20:51:07 UTC",
"startDateScheduled" : "2012-14-10 20:51:07 UTC",
"status": "A custom status message",
"statusCode": 0,
"includedServices": [
"machine0.1",
"OSStoremachine0.1"
],
"parent": null,
"serviceTemplate": {
"id": "4fbd42cfc4aa4c444cc54112",
"name": "CentosVmPlusStorage"
},
"attributes": {"moab": {
"vc": {"id": "vc56"},
"dependencies": [ {
"service": "machine0.1",
"dependency": ["OSStoremachine0.1"]
}]
}},
"id": "4edff0cc6852f709fa777826"
},
{
"dateCreated": "2011-12-07 16:03:40 UTC",
"lastUpdated": "2011-12-07 16:03:40 UTC",
"name": "machine0.1",
"version": 1,
"type": "vm",
"label": "bobs machine",
"user": "bob",
"account": "bamboo",
"startDateRequested": "2012-14-10 20:51:07 UTC",
"startDateScheduled" : "2012-14-10 20:51:07 UTC",
"status": "A custom status message",
"statusCode": 0,
"includedServices": [],
"parent": "bobService.1",
"serviceTemplate": {
"id": "4fbd42cfc4aa4c444cc54113",
"name": "CentosVm"
},
"attributes": {"moab": {
"vc": {"id": "vc57"},
"job": {
"id": "Moab.24",
"template": "genericVM",
"image": "centos5.5-stateless",
"features": ["vlan3"],
"variables": {"QOS": "High"},
"resources": {
"mem": 2,
"procs": 2,
"disk": 2
}
}
}},
"id": "4edff0cc6852f709fa777827"
},
{
"dateCreated": "2011-12-07 16:03:40 UTC",
"lastUpdated": "2011-12-07 16:03:40 UTC",
"name": "OSStoremachine0.1",
"version": 1,
"type": "storage",
"label": null,
"user": "bob",
"account": "bamboo",
"startDateRequested": "2012-14-10 20:51:07 UTC",
"startDateScheduled" : "2012-14-10 20:51:07 UTC",
"status": "A custom status message",
"statusCode": 0,
"includedServices": [],
"parent": "bobService.1",
"serviceTemplate": {
"id": "4fbd42cfc4aa4c444cc54114",
"name": "OpSysStorage"
},
"attributes": {"moab": {
"vc": {"id": "vc58"},
"job": {
"id": "Moab.23",
"template": "OSStorage",
"resources": {"OS": 200}
}
}},
"id": "4edff0cc6852f709fa777828"
}
]
}Querying Services
It is possible to query services by one or more fields based on MongoDB query syntax.Simple Queries
To see only services that are associated with the user "bob" you can use a query such as the following:http://localhost/mws/rest/services?query={"user":"bob"}http://localhost/mws/rest/services?query={"type":"vm"}http://localhost/mws/rest/services?query={"user":"bob","type":"vm"}http://localhost/mws/rest/services?query={"user":{"$ne":"bob"}}More Complex Queries
When the field values of the desired services are a finite set, you can use the$in operator.
For example, to see services that belong to either bob, alice, or charlie, you can do the following:http://localhost/mws/rest/services?query={"user":{"$in":["alice","bob","charlie"]}}http://localhost/mws/rest/services?query={"attributes.moab.job.resources.procs":3}Conditional Operators
You can perform<, <=, >, >= comparisons using the $lt, $lte, $gt, $gte operators.| Operator | Comparison | |
|---|---|---|
| $lt | < | |
| $lte | <= | |
| $gt | > | |
| $gte | >= |
< 2 processors:http://localhost/mws/rest/services?query={"attributes.moab.job.resources.procs":{"$lt":2}}>= 1024 memory:http://localhost/mws/rest/services?query={"attributes.moab.job.resources.mem":{"$gte":1024}}Querying Services by Date
To see all services created after February 8, 2012 at 1:00 PM Mountain Standard Time (MST):http://localhost/mws/rest/services?query={"dateCreated":{"$gt":"2012-02-08 13:00:00 MST"}}http://localhost/mws/rest/services?query={"dateCreated":{"$lte":"2012-02-08 13:00:00 PST"}}http://localhost/mws/rest/services?query={"dateCreated":{"$lte":"2012-02-08 13:00:00 EST","$gte":"2012-02-08 12:00:00 EST"}}Querying Services by Containing Service
Services can contain other services. When a service is contained within another service, you can find out what its container is by looking at the parent field. A service that is not contained in any other service is called a top level service. If you want to see only top level services you need to query for services with a null parent.In MongoDB syntax you query for services whose parent field have a$type of 10 (with 10
representing null). The following query shows all of bob's top level services:http://localhost/mws/rest/services?query={"user":"bob","parent":{"$type":10}}http://localhost/mws/rest/services?query={"user":"bob","parent":"bobService.1"}Sorting
See the sorting section of Global URL ParametersLimiting the Number of Results
If you want to limit the number of results of services you can use themax parameter. For
example, to see only 10 of bob's services:http://localhost/mws/rest/services?query={"user":"bob"}&sort={"name":1}&max=10max with offset as follows:http://localhost/mws/rest/services?query={"user":"bob"}&sort={"name":1}&max=10&offset=90Retrieving a Subset of Fields
To cause only certain fields to return for each service, use thefields parameter. For example, to
show only the name field for each service:http://localhost/mws/rest/services?fields=name
{
"totalCount": 9,
"resultCount": 3,
"results": [
{"name": "aliceService.1"},
{"name": "machine0.1"},
{"name": "OSStoremachine0.1"}
]
}http://localhost/mws/rest/services?fields=name,type,user
{
"totalCount": 9,
"resultCount": 3,
"results": [
{
"name": "aliceService.1",
"type": "container",
"user": "alice"
},
{
"name": "machine0.1",
"type": "vm",
"user": "alice"
},
{
"name": "OSStoremachine0.1",
"type": "storage",
"user": "alice"
}
]
}4.24.1.2 Get Single Service
URLs and Parameters
GET http://localhost/mws/rest/services/<id>[?[show-recursive-vc|show-vc]=true] GET http://localhost/mws/rest/services/<name>[?[show-recursive-vc|show-vc]=true]
| Parameter | Required | Valid Values | Description | Example |
|---|---|---|---|---|
| id | Yes | String | The unique identifier of the service. | |
| name | Yes | String | The name of the service. | |
| show-recursive-vc | No | true | Show extended details about the service's virtual container including nested virtual containers and nested jobs. | show-recursive-vc=true |
| show-vc | No | true | Show details about the service's virtual container. | show-vc=true |
| Parameter | Required | Type | Valid Values | Description |
|---|
Only one of id or name are required.
Samples
GET http://localhost/mws/rest/services/bobService.1?
{
"dateCreated": "2011-12-07 16:03:40 UTC",
"lastUpdated": "2011-12-07 16:03:40 UTC",
"name": "bobService.1",
"version": 1,
"type": "container",
"label": null,
"user": "bob",
"account": "bamboo",
"startDateRequested": "2012-14-10 20:51:07 UTC",
"startDateScheduled" : "2012-14-10 20:51:07 UTC",
"durationRequested": 86400,
"status": "A custom status message",
"statusCode": 0,
"includedServices": [
"machine0.1",
"OSStoremachine0.1"
],
"parent": null,
"serviceTemplate": {
"id": "4fbd42cfc4aa4c444cc54112",
"name": "CentosVmPlusStorage"
},
"attributes": {"moab": {
"vc": {"id": "vc56"},
"dependencies": [ {
"service": "machine0.1",
"dependency": ["OSStoremachine0.1"]
}]
}},
"id": "4edff0cc6852f709fa777826"
}4.24.2 Creating Services
The HTTP POST method is used to create a Service.Quick Reference
POST http://localhost/mws/rest/services
4.24.2.1 Create Service From Service Template
URLs and Parameters
POST http://localhost/mws/rest/services[?proxy-user=bob]
| Parameter | Required | Valid Values | Description | Example |
|---|---|---|---|---|
| proxy-user | No | String | The name of the user creating the service. | proxy-user=bob |
Simple Case
To create a service from the template named "Rhel54VmPlusStorage":POST http://localhost/mws/rest/services
{
"user": "steve",
"account": "cloud",
"startDateRequested": "2011-11-08 13:18:47 MST",
"durationRequested": 86400,
"data": [
{
"name": "MyRhel54VmPlusStorage",
"serviceTemplate": "Rhel54VmPlusStorage",
}
]
}POST http://localhost/mws/rest/services
{
"user": "steve",
"account": "cloud",
"data": [
{
"name": "MyRhel54VmPlusStorage",
"serviceTemplate": {
"name":"Rhel54VmPlusStorage"
}
}
]
}POST http://localhost/mws/rest/services
{
"user": "steve",
"account": "cloud",
"data": [
{
"name": "MyRhel54VmPlusStorage",
"serviceTemplate": {
"id":"4fbd2d90c4aa4996400bsa5m"
}
}
]
}Extending a Service Template
If you want to create a service from a service template, but wish to extend the service template with some additional variables or generic resources, you can use the extends field. Extending a service template is also helpful when you wish to override certain values, such as the amount of memory or processors the service requires.To extend a service template, you will need to determine the extends path for the service you wish to override. The extends path is the name of the top level service, followed by one or more localNames as described in the includedServices field. All but the last <localName> are nested containers inside the top level container. For example:<top level service name>::<localName>[:<localName>]+
Rhel54VmPlusStorage Service Template
{
"name":"Rhel54VmPlusStorage",
"type":"container",
…
"includedServices":[
{
"localName":"sc1",
"serviceTemplate":"SubContainer1"
}
]
}MyRhel54VmPlusStorage::sc1
SubContainer1 Service Template
{
"name":"SubContainer1",
"type":"container",
…
"includedServices":[
{
"localName":"sc2",
"serviceTemplate":"SubContainer2"
}
]
}MyRhel54VmPlusStorage::sc1:sc2
SubContainer1 Service Template
{
"name":"SubContainer2",
"type":"container",
…
"includedServices":[
{
"localName":"rvm",
"serviceTemplate":"Rhel54Vm"
},
{
"localName":"oss",
"serviceTemplate":"OpSysStorage"
}
]
}MyRhel54VmPlusStorage::sc1:sc2:rvm MyRhel54VmPlusStorage::sc1:sc2:oss
POST http://localhost/mws/rest/services
{
"user": "steve",
"account": "cloud",
"data": [
{
"name": "MyRhel54VmPlusStorage",
"serviceTemplate": "Rhel54VmPlusStorage",
"attributes": {
"sharedData":{ "extraAttribute":"some attribute not in the Rhel54VmPlusStorage template" }
}
},
{
"name": "MyRhel54Vm",
"extends": "MyRhel54VmPlusStorage::sc1:sc2:rvm",
"attributes": {
"moab": {"job": {"variables": {"extraVar": "An additional variable not in the Rhel54Vm template"}}},
"sharedData":{ "extraAttribute":"some attribute not in the Rhel54Vm template" }
} },
{
"name": "MyOsStorage",
"extends": "MyRhel54VmPlusStorage::sc1:sc2:oss",
"attributes": {
"moab": {"job": {"variables": {"extraVar2": "An additional variable not in the OpSysStorage template"}}},
"sharedData":{ "extraAttribute":"some attribute not in the OpSysStorage template" }
}
}
]
}Extending Services and Dependencies in a Container Service
To add a services to a container service that were not in the container's service template you first define the new services in the service request. Then you extend the includedServices field of the container with the newly defined services. This will add the new services to any that are already in the container as defined in the service template. It is only possible to add services to a container. It is not possible to remove services from a container that were defined in the container's service template.For example, say the CentosVmPlusStorage service template contains an OpSysStorage service template and a CentosVm service template.CentosVmPlusStorage Service Template
{
"name":"CentosVmPlusStorage",
"type":"container",
…
"includedServices":[
{
"localName":"oss",
"serviceTemplate":"OpSysStorage"
},
{
"localName":"cvm",
"serviceTemplate":"CentosVm"
}
]
}POST http://localhost/mws/rest/services
{
"user":"bob",
"account":"cloud",
"data":[
{
"name":"BobsCentosVmPlusStorage",
"serviceTemplate":"CentosVmPlusStorage",
"includedServices":[
"NewStorageToAdd1",
"NewStorageToAdd2"
]
},
{
"name":"NewStorageToAdd1",
"serviceTemplate":"ExtraStorage"
},
{
"name":"NewStorageToAdd2",
"serviceTemplate":"ExtraStorage"
}
]
}POST http://localhost/mws/rest/services
{
"user":"bob",
"account":"cloud",
"data":[
{
"name":"BobsCentosVmPlusStorage",
"serviceTemplate":"CentosVmPlusStorage",
"includedServices":[
"NewStorageToAdd1",
"NewStorageToAdd2"
],
"attributes":{
"moab":{
"dependencies":[
{
"service":"BobsCentosVm",
"dependency":[
"NewStorageToAdd1",
"NewStorageToAdd2"
]
}
]
}
}
},
{
"name":"BobsCentosVm",
"extends":"CentosVmPlusStorage:cvm"
},
{
"name":"NewStorageToAdd1",
"serviceTemplate":"ExtraStorage"
},
{
"name":"NewStorageToAdd2",
"serviceTemplate":"ExtraStorage"
}
]
}Extendable Fields
You can only extend certain fields. Below is a table of fields that can be extended:| Extendable Fields | Notes |
|---|---|
| attributes.moab.dependencies | Dependencies can be added but not removed. Only applicable to containers. |
| attributes.moab.job.features | Features can be added but not removed. |
| attributes.moab.job.requestedHosts | Hosts can be added but not removed. |
| attributes.moab.job.resources | Including procs, mem, disk, and any generic resource. |
| attributes.moab.job.variables | Can either change the value of variables in the template or add new variables. |
| attributes.sharedData | A place for arbitrary, site-specific data. |
| image | |
| includedServices | Services can be added but not removed. Only applicable to containers. |
| label |
Sample Response
If the request was successful, the response includes the unique ID of the new Service. On failure, the response is an error message.JSON Response
{"name":"MyRhel54VmPlusStorage.1"}4.24.2.2 Create Custom Service
URLs and Parameters
POST http://localhost/mws/rest/services[?proxy-user=bob]
| Parameter | Required | Valid Values | Description | Example |
|---|---|---|---|---|
| proxy-user | No | String | The name of the user creating the service. | proxy-user=bob |
Request Body
The payload below shows all the fields that are available during service submission.POST http://localhost/mws/rest/services
{
"user":"adaptive",
"account":"cloud",
"startDateRequested": "2011-11-08 13:18:47 MST",
"durationRequested": 86400,
"data":[
{
"name":"myNewService",
"type":"container",
"label":"My New Service",
"includedServices":[
"myVmContainer",
"myNetworkStorageWorkflow",
"myPmContainer"
],
"attributes":{
"moab":{
"dependencies":[
{
"dependency":[
"myNetworkStorageWorkflow"
],
"service":"myVmWorkflow"
}
]
},
"sharedData":{
"extraAttribute":"Some arbitrary value",
"extraAttribute2":"Another arbitrary value"
}
}
},
{
"name":"myVmContainer",
"type":"container",
"includedServices":[
"myVmWorkflow",
"myOsStorageWorkflow"
],
"attributes":{
"moab":{
"dependencies":[
{
"dependency":[
"myOsStorageWorkflow"
],
"service":"myVmWorkflow"
}
]
}
}
},
{
"name":"myVmWorkflow",
"type":"vm",
"includedServices":[ ],
"attributes":{
"moab":{
"job":{
"resources":{
"procs":2,
"mem":2048,
"disk":80
},
"variables":{
"QOS":"Premium"
},
"image":"centos5.5-stateless",
"template":"genericVM",
"requestedHosts":["i16"],
"features":["vlan3"]
}
}
}
},
{
"name":"myOsStorageWorkflow",
"type":"storage",
"includedServices":[ ],
"attributes":{
"moab":{
"job":{
"template":"OSStorage",
"resources":{
"OS":2500
}
}
}
}
},
{
"name":"myNetworkStorageWorkflow",
"type":"storage",
"includedServices":[ ],
"attributes":{
"moab":{
"job":{
"template":"extraStorage",
"resources":{
"gold":500
},
"variables":{
"mount":"/path/to/mount"
}
}
}
}
},
{
"name":"myPmContainer",
"type":"container",
"includedServices":[
"myPmWorkflow"
]
},
{
"name":"myPmWorkflow",
"type":"pm",
"includedServices":[ ],
"attributes":{
"moab":{
"job":{
"resources":{
"procs":2,
"mem":2048,
"disk":100
},
"variables":{
"QOS":"Premium"
},
"image":"centos5.5-stateless",
"template":"genericPM"
}
}
}
}
]
}Sample Response
If the request was successful, the response includes the unique ID of the new Service. On failure, the response is an error message.JSON Response
{"name":"myNewService.1"}4.24.3 Modifying Services
The HTTP PUT method is used to modify Services.Quick Reference
PUT http://localhost/mws/rest/services/<id> PUT http://localhost/mws/rest/services/<name>
4.24.3.1 Modify Service
URLs and Parameters
PUT http://localhost/mws/rest/services/<id> PUT http://localhost/mws/rest/services/<name>
| Parameter | Required | Type | Valid Values | Description |
|---|---|---|---|---|
| id | Yes | String | - | The unique identifier of the Service. |
| name | Yes | String | - | The name of the Service . |
Only one of id or name are required.
Example Request
Only theattributes, status, and statusCode fields may be modified in services.
Note that the status field must be a valid string, and the statusCode field
must be a valid number (long). Any arbitrary string and number may be used to represent
the current state of the service through status and statusCode respectively.PUT http://localhost:8080/mws/rest/services/myStorageService
{
"status": "Done provisioning!",
"statusCode": 200,
"attributes": {
"mount": "/mnt/myMount",
"size": "2500",
"sharedData":{
"extraAttribute":"Some arbitrary value",
"extraAttribute2":"Another arbitrary value"
}
}
}
The moab element of attributes cannot be modified. An error will be returned
if this is attempted.
Sample Response
JSON Response
{
"name": "myStorageService",
"dateCreated": "2012-02-01 14:54:52 UTC",
"lastUpdated": "2012-02-01 14:54:52 UTC",
"type": "storage",
"label": null,
"user": "john",
"account": "corp",
"status": "Done provisioning!",
"statusCode": 200,
"includedServices": [],
"parent": "myVmWithStorage",
"attributes": {
"moab": {
"vc ": {
"id": "vc3"
},
"job": {
"id": "Moab.1",
"template": "extraStorage",
"resources": {
"gold": 2500
}
}
},
"sharedData":{
"extraAttribute":"Some arbitrary value",
"extraAttribute2":"Another arbitrary value"
},
"mount": "/mnt/myMount",
"size": "2500"
},
"id": "4f29b4abe4b03c2f8e3a1a40"
}4.24.4 Deleting Services
The HTTP DELETE method is used to delete Services.Quick Reference
DELETE http://localhost/mws/rest/services/<id> DELETE http://localhost/mws/rest/services/<name>
4.24.4.1 Delete Service
URLs and Parameters
DELETE http://localhost/mws/rest/services/<id>[?proxy-user=bob] DELETE http://localhost/mws/rest/services/<name>[?proxy-user=bob]
| Parameter | Required | Type | Valid Values | Description |
|---|---|---|---|---|
| force-delete | No | Boolean | - | If true MWS will not check service dependencies before deleting it. |
| id | Yes | String | - | The unique identifier of the Service. |
| name | Yes | String | - | The name of the Service. |
| proxy-user | No | String | The name of the user deleting the service. | proxy-user=bob |
Only one of id or name are required.
Sample Response
JSON Response
{}4.25 Service Templates
This section describes the behavior of the Service Template object in Moab Web Services. It contains the URLs, request bodies, and responses delivered to and from Moab Web Services.The Service Template API contains the type and description of all fields in the ServiceTemplate object. It also contains details regarding which fields are valid during PUT and POST actions.
See Create Service From Service Template to create Services from Service Templates.
The Service Template name has the following constraints:
- It must contain only letters, digits, spaces, and these special characters: underscore, comma, hyphen, period, question mark, at sign, tilde, pound sign, square brackets, angle brackets, vertical bar, equals sign, ampersand, parentheses, asterisk, curly braces, grave accent, and dollar sign.
- It cannot have the same form as a MongoDB ID (24 characters of 0-9 and a-f)
- It must be unique in the database.
Supported Methods
| Resource | GET | PUT | POST | DELETE |
|---|---|---|---|---|
| /rest/service-templates | Get all Service Templates | Create ServiceTemplate | ||
| /rest/service-templates/id or name | Get specified Service Template | Modify ServiceTemplate | Cancel Service Template |
4.25.1 Getting Service Templates
The HTTP GET method is used to retrieve Service Template information. Queries for all objects and a single object are available.Quick Reference
GET http://localhost/mws/rest/service-templates[?query={"field":"value"}&sort={"field":<1|-1>}]
GET http://localhost/mws/rest/service-templates/<id>
GET http://localhost/mws/rest/service-templates/<name>4.25.1.1 Get All Service Templates
URLs and Parameters
GET http://localhost/mws/rest/service-templates[?query={"field":"value"}&sort={"field":<1|-1>}]| Parameter | Required | Valid Values | Description | Example |
|---|---|---|---|---|
| query | No | JSON | Query for specific results. | query={"type":"vm","createdBy":"name"} |
| sort | No | JSON | Sort the results. Use 1 for ascending and -1 for descending. | sort={"name":1} |
Sample Response
JSON Response
{
"totalCount": 4,
"resultCount": 4,
"results": [
{
"attributes": {
"moab": {"job": {
"resources": {"OS": 100},
"template": "OSStorage",
"variables": {"var1": "variable to be attached to tracking job"}
}},
"sharedData": {
"custom1": "Custom data to be attached to service",
"custom2": "More custom data to be attached to service"
}
},
"createdBy": "bob",
"includedServices": [],
"label": "Operating System Storage",
"modified": null,
"name": "OpSysStorage",
"tags": [
"tag1",
"tag2",
"tag3"
],
"type": "storage",
"version": 0,
"id": "50d4da1ac4aaceecaf386452"
},
{
"attributes": {
"moab": {"job": {
"resources": {"gold": 100},
"template": "extraStorage",
"variables": {"var1": "variable to be attached to tracking job"}
}},
"sharedData": {
"custom1": "Custom data to be attached to service",
"custom2": "More custom data to be attached to service"
}
},
"createdBy": "bob",
"includedServices": [],
"label": "Network Storage",
"modified": null,
"name": "NetworkStorage",
"tags": [
"tag1",
"tag2",
"tag3"
],
"type": "storage",
"version": 0,
"id": "50d4da1ac4aaceecaf386453"
},
{
"attributes": {
"moab": {"job": {
"image": "centos5.5-stateless",
"resources": {
"procs": 1,
"mem": 1024,
"disk": 20480
},
"template": "genericVM",
"variables": {"var1": "variable to be attached to tracking job"}
}},
"sharedData": {
"custom1": "Custom data to be attached to service",
"custom2": "More custom data to be attached to service"
}
},
"createdBy": "bob",
"includedServices": [],
"label": "Centos 5.5 VM",
"modified": null,
"name": "Centos55Vm",
"tags": [
"tag1",
"tag2",
"tag3"
],
"type": "vm",
"version": 0,
"id": "50d4da1ac4aaceecaf386454"
},
{
"attributes": {
"moab": {"dependencies": [ {
"dependency": [
"oss",
"ns"
],
"localName": "cvm"
}]},
"sharedData": {
"custom1": "Custom data to be attached to service",
"custom2": "More custom data to be attached to service"
}
},
"createdBy": "bob",
"includedServices": [
{
"localName": "cvm",
"serviceTemplate": "Centos55Vm"
},
{
"localName": "oss",
"serviceTemplate": "OpSysStorage"
},
{
"localName": "ns",
"serviceTemplate": "NetworkStorage"
}
],
"label": "Centos 5.5 VM Plus OS and Network Storage",
"modified": null,
"name": "Centos55VmPlusStorage",
"tags": [
"tag1",
"tag2",
"tag3"
],
"type": "container",
"version": 0,
"id": "50d4da1ac4aaceecaf386455"
}
]
}Querying Service Templates
It is possible to query service templates by one or more fields based on the MongoDB query syntax.Simple Queries
To see only service templates that are associated with the user "bob", use a query like the following:http://localhost/mws/rest/service-templates?query={"user":"bob"}http://localhost/mws/rest/service-templates?query={"type":"vm"}http://localhost/mws/rest/service-templates?query={"user":"bob","type":"vm"}http://localhost/mws/rest/service-templates?query={"user":{"$ne":"bob"}}More Complex Queries
When the field values of the desired service templates are a finite set, use the$in operator.
For example, to see service templates that belong to either bob, alice, or charlie, do the following:http://localhost/mws/rest/service-templates?query={"user":{"$in":["alice","bob","charlie"]}}http://localhost/mws/rest/service-templates?query={"attributes.moab.job.resources.procs":3}Conditional Operators
You can perform<, <=, >, >= comparisons using the $lt, $lte, $gt, $gte operators.| Operator | Comparison | |
|---|---|---|
| $lt | < | |
| $lte | <= | |
| $gt | > | |
| $gte | >= |
http://localhost/mws/rest/service-templates?query={"attributes.moab.job.resources.procs":{"$lt":2}}http://localhost/mws/rest/service-templates?query={"attributes.moab.job.resources.mem":{"$gte":1024}}Querying Service Templates by Date
To see all service templates modified after July 4, 2011 at 10:30:00 PM Mountain Standard Time (MST):http://localhost/mws/rest/service-templates?query={"modified":{"$gt":"2011-07-04 22:30:00 MST"}}http://localhost/mws/rest/service-templates?query={"modified":{"$lt":"2011-07-06 00:00:00 PST"}}http://localhost/mws/rest/service-templates?query={"modified":{"$gte":"2011-07-05 00:00:00 EST","$lte":"2011-07-05 23:59:00 EST"}}Sorting
See the sorting section in Global URL Parameters.Limiting the Number of Results
To limit the size of the result set, use themax parameter. For
example, to see only 10 of bob's services:http://localhost/mws/rest/service-templates?query={"user":"bob"}&sort={"name":1}&max=10max with offset as follows:http://localhost/mws/rest/service-templates?query={"user":"bob"}&sort={"name":1}&max=10&offset=90Retrieving a Subset of Fields
To retrieve only certain fields, use thefields parameter. For example,
to show only the name field for each service:http://localhost/mws/rest/service-templates?fields=name
{
"totalCount": 9,
"resultCount": 3,
"results": [
{"name": "aliceService.1"},
{"name": "machine0.1"},
{"name": "OSStoremachine0.1"}
]
}http://localhost/mws/rest/service-templates?fields=name,type,user
{
"totalCount": 9,
"resultCount": 3,
"results": [
{
"name": "aliceService.1",
"type": "container",
"user": "alice"
},
{
"name": "machine0.1",
"type": "vm",
"user": "alice"
},
{
"name": "OSStoremachine0.1",
"type": "storage",
"user": "alice"
}
]
}4.25.1.2 Get Single Service Template
URLs and Parameters
GET http://localhost/mws/rest/service-templates/<id> GET http://localhost/mws/rest/service-templates/<name>
| Parameter | Required | Valid Values | Description |
|---|---|---|---|
| id | Yes | String (24 character alphanumeric) | The unique identifier of the service template. |
| name | Yes | String | The name of the service template. |
Only one of id or name is required.
Response
GET http://localhost/mws/rest/service-templates/Centos55Vm
{
"attributes": {
"moab": {"job": {
"image": "centos5.5-stateless",
"resources": {
"procs": 1,
"mem": 1024,
"disk": 20480
},
"template": "genericVM",
"variables": {"var1": "variable to be attached to tracking job"}
}},
"sharedData": {
"custom1": "Custom data to be attached to service",
"custom2": "More custom data to be attached to service"
}
},
"createdBy": "bob",
"id": "50d4da1ac4aaceecaf386454",
"includedServices": [],
"label": "Centos 5.5 VM",
"modified": null,
"name": "Centos55Vm",
"tags": [
"tag1",
"tag2",
"tag3"
],
"type": "vm",
"version": 0
}GET http://localhost/mws/rest/service-templates/OpSysStorage
{
"attributes": {
"moab": {"job": {
"resources": {"OS": 100},
"template": "OSStorage",
"variables": {"var1": "variable to be attached to tracking job"}
}},
"sharedData": {
"custom1": "Custom data to be attached to service",
"custom2": "More custom data to be attached to service"
}
},
"createdBy": "bob",
"id": "50d4da1ac4aaceecaf386452",
"includedServices": [],
"label": "Operating System Storage",
"modified": null,
"name": "OpSysStorage",
"tags": [
"tag1",
"tag2",
"tag3"
],
"type": "storage",
"version": 0
}GET http://localhost/mws/rest/service-templates/NetworkStorage
{
"attributes": {
"moab": {"job": {
"resources": {"gold": 100},
"template": "extraStorage",
"variables": {"var1": "variable to be attached to tracking job"}
}},
"sharedData": {
"custom1": "Custom data to be attached to service",
"custom2": "More custom data to be attached to service"
}
},
"createdBy": "bob",
"id": "50d4da1ac4aaceecaf386453",
"includedServices": [],
"label": "Network Storage",
"modified": null,
"name": "NetworkStorage",
"tags": [
"tag1",
"tag2",
"tag3"
],
"type": "storage",
"version": 0
}GET http://localhost/mws/rest/service-templates/Centos55VmPlusStorage
{
"attributes": {
"moab": {"dependencies": [ {
"dependency": [
"oss",
"ns"
],
"localName": "cvm"
}]},
"sharedData": {
"custom1": "Custom data to be attached to service",
"custom2": "More custom data to be attached to service"
}
},
"createdBy": "bob",
"id": "50d4da1ac4aaceecaf386455",
"includedServices": [
{
"localName": "cvm",
"serviceTemplate": "Centos55Vm"
},
{
"localName": "oss",
"serviceTemplate": "OpSysStorage"
},
{
"localName": "ns",
"serviceTemplate": "NetworkStorage"
}
],
"label": "Centos 5.5 VM Plus OS and Network Storage",
"modified": null,
"name": "Centos55VmPlusStorage",
"tags": [
"tag1",
"tag2",
"tag3"
],
"type": "container",
"version": 0
}4.25.2 Creating Service Templates
The HTTP POST method is used to create Service Templates.Quick Reference
POST http://localhost/mws/rest/service-templates
4.25.2.1 Create Service Template
URLs and Parameters
POST http://localhost/mws/rest/service-templates
Request Body
The request body below shows some of the fields that are available when creating a Service Template, along with some sample values.JSON Request Body
{
"name":"Centos55Vm",
"label":"Centos 5.5 VM",
"type":"vm",
"createdBy":"bob",
"tags":["tag1","tag2","tag3"],
"attributes":{
"moab":{
"job":{
"image":"centos5.5-stateless",
"resources":{
"procs":1,
"mem":1024,
"disk":20480
},
"template":"genericVM",
"variables":{
"var1":"variable to be attached to tracking job",
}
}
},
"sharedData":{
"custom1":"Custom data to be attached to service",
"custom2":"More custom data to be attached to service"
}
}
}OS Storage JSON Payload
{
"name":"OpSysStorage",
"label":"Operating System Storage",
"type":"storage",
"createdBy":"bob",
"tags":["tag1","tag2","tag3"],
"attributes":{
"moab":{
"job":{
"resources":{
"OS":100
},
"template":"OSStorage",
"variables":{
"var1":"variable to be attached to tracking job"
}
}
},
"sharedData":{
"custom1":"Custom data to be attached to service",
"custom2":"More custom data to be attached to service"
}
}
}Extra Storage JSON Payload
{
"name":"NetworkStorage",
"label":"Network Storage",
"type":"storage",
"createdBy":"bob",
"tags":["tag1","tag2","tag3"],
"attributes":{
"moab":{
"job":{
"resources":{
"gold":100
},
"template":"extraStorage",
"variables":{
"var1":"variable to be attached to tracking job"
}
}
},
"sharedData":{
"custom1":"Custom data to be attached to service",
"custom2":"More custom data to be attached to service"
}
}
}Container JSON Payload
{
"name":"Centos55VmPlusStorage",
"label":"Centos 5.5 VM Plus OS and Network Storage",
"type":"container",
"createdBy":"bob",
"tags":["tag1","tag2","tag3"],
"includedServices":[
{
"localName":"cvm",
"serviceTemplate":"Centos55Vm"
},
{
"localName":"oss",
"serviceTemplate":"OpSysStorage"
},
{
"localName":"ns",
"serviceTemplate":"NetworkStorage"
},
],
"attributes":{
"moab":{
"dependencies":[
{
"dependency":[
"oss","ns"
],
"localName":"cvm"
}
]
},
"sharedData":{
"custom1":"Custom data to be attached to service",
"custom2":"More custom data to be attached to service"
}
}
}includedServices is a key-value pair of the internal service name and the serviceTemplate. The service name is unique for each service container.
Sample Response
JSON Response for successful POST
{"id":"4f06111184ae2bbfa31fa4c7"}If the Service Template name is not unique:
JSON Response
{
"messages": [
"Service template Rhel54Vm could not be created",
"Request has a non-unique service template name 'Rhel54Vm'",
"Please correct the request and try again"
]
}If the Service Template included service local name is not unique to this service template:
JSON Response
{
"messages": [
"Service template CentOS5 could not be created",
"Service template request has a non-unique included service template local name ([SQLServ05])",
"Please correct the request and try again"
]
}
}If the Service Template depends on a non-existent included service:
JSON Response
{
"messages": [
"Service template NSStor34 could not be created",
"Service template requires service template(s) [NewRhel54Vm] which do not exist",
"Please correct the request and try again"
]
}If the Service Template depends on more than one non-existent included service:
JSON Response
{
"messages": [
"Service template NSStor34 could not be created",
"Service template requires service template(s) [NewRhel54Vm, Storage003] which do not exist",
"Please correct the request and try again"
]
}If the Service Template name contains a colon:
JSON Response
{
{
"messages": [
"Service template Rhel54Vm:C could not be created",
"Request contains a colon (:) in the service template name 'Rhel54Vm:C'",
"Please correct the request and try again"
]
}If the Service Template name has the same format as a MongoDB ID (Service Template ID):
JSON Response
{
"messages": [
"Service template 4f2049a684ae6e1d4f09bd71 could not be created",
"Request has a MongoDB Object ID format for the service template name '4f2049a684ae6e1d4f09bd71'",
"Please correct the request and try again"
]
}4.25.3 Modifying Service Templates
The HTTP PUT method is used to modify Service Templates.The modified field is not automatically updated. It will need to be changed
by the user.Quick Reference
PUT http://localhost/mws/rest/service-templates/<id> PUT http://localhost/mws/rest/service-templates/<name>
4.25.3.1 Modify Service Template
URLs and Parameters
PUT http://localhost/mws/rest/service-templates/<id> PUT http://localhost/mws/rest/service-templates/<name>
| Parameter | Required | Valid Values | Description |
|---|---|---|---|
| id | Yes | String (24 character alphanumeric) | The unique identifier of the service template. |
| name | Yes | String | The name of the service template. |
Only one of id or name is required.
Request Body
This is similar to create, except you change the request body to what you need modified.The request body below shows some of the fields that are available when modifying a Service Template, along with some sample values.PUT http://localhost/mws/rest/service-templates/Centos55Vm
{
"label":"Centos 5.5 VM (updated)",
"createdBy":"newUser",
"tags":["newTag","newTag2"],
"attributes":{
"moab":{
"job":{
"image":"centos5.5-stateful",
"resources":{
"procs":2,
"mem":2048,
"disk":22480
},
"template":"genericVM",
"variables":{
"newVar":"variable to be attached to tracking job",
}
}
},
"sharedData":{
"custom3":"Custom data to be attached to service",
"custom4":"More custom data to be attached to service"
}
}
}Sample Response
JSON Response for successful PUT
{
"attributes":{
"moab":{
"job":{
"image":"centos5.5-stateful",
"resources":{
"procs":2,
"mem":2048,
"disk":22480
},
"template":"genericVM",
"variables":{
"newVar":"variable to be attached to tracking job"
}
}
},
"sharedData":{
"custom3":"Custom data to be attached to service",
"custom4":"More custom data to be attached to service"
}
},
"createdBy":"newUser",
"id":"50d4de6bc4aa6ca84bbe9be4",
"includedServices":[
],
"label":"Centos 5.5 VM (updated)",
"modified":"2012-12-21 15:12:01 MST",
"name":"Centos55Vm",
"tags":[
"newTag",
"newTag2"
],
"type":"vm",
"version":0
}If the Service Template depends on a non-existent included service:
JSON Response
{
"messages": [
"Service template NewR could not be updated",
"Service template requires service template(s) [RhOs045] which do not exist",
"Please correct the request and try again"
]
}If the Service Template depends on more than one non-existent included service:
JSON Response
{
"messages": [
"Service template NewR could not be updated",
"Service template requires service template(s) [Stor45, Stor12] which do not exist",
"Please correct the request and try again"
]
}An attempt to modify the Service Template name to an existing template name:
JSON Response
{
"messages": [
"Service template NewR could not be updated",
"Request has a non-unique service template name 'Stor44'"
]
}4.25.4 Deleting (Canceling) Service Templates
The HTTP DELETE method is used to delete Service Templates.Quick Reference
DELETE http://localhost/mws/rest/service-templates/<id> DELETE http://localhost/mws/rest/service-templates/<name>
4.25.4.1 Cancel Service Template
URLs and Parameters
DELETE http://localhost/mws/rest/service-templates/<id|name>| Parameter | Required | Valid Values | Description |
|---|---|---|---|
| id | Yes | String (24 character alphanumeric) | The unique identifier of the service template. |
| name | Yes | String | The name of the service template. |
Only one of id or name is required.
Response
A successful deletion
JSON Response
{}If the Service Template ID does not exist
JSON Response
{
"messages": [
"Service template not found with ID '4f2049a684ae6e1d4f09bd71'"
]
}If the Service Template name does not exist
JSON Response
{
"messages": [
"Service template not found with ID 'Stor44'"
]
}If other Service Templates depend on the one being deleted
JSON Response
{
"messages": [
"Service template Cent5 could not be deleted",
"Service template 'Cent5' cannot be deleted because Service template '[Cent5]' depends on it "
]
}4.26 Standing Reservations
This section describes behavior of the Standing Reservation object in Moab Web Services. It contains the URLs, request bodies, and responses delivered to and from Moab Web Services.The Standing Reservation API contains the type and description of all fields in the Standing Reservation object. It also contains details regarding which fields are valid during PUT and POST actions.
Supported Methods
| Resource | GET | PUT | POST | DELETE |
|---|---|---|---|---|
| /rest/standing-reservations | Get all standing reservations | |||
| /rest/standing-reservations/id | Get specified standing reservation |
4.26.1 Getting Standing Reservations
The HTTP GET method is used to retrieve Standing Reservation information. Queries for all objects and a single object are available.Quick Reference
GET http://localhost/mws/rest/standing-reservations/<id>4.26.1.1 Get All Standing Reservations
URLs and Parameters
GET http://localhost/mws/rest/standing-reservations
Sample Response
GET http://localhost/mws/rest/standing-reservations?fields=id
{
"totalCount": 3,
"resultCount": 3,
"results": [
{"id": "sr1"},
{"id": "sr2"},
{"id": "sr3"}
]
}4.26.1.2 Get Single Standing Reservation
URLs and Parameters
GET http://localhost/mws/rest/standing-reservations/<id>| Parameter | Required | Type | Valid Values | Description |
|---|---|---|---|---|
| id | Yes | String | - | The unique identifier of the object. |
Sample Response
JSON Response
{
"access": "DEDICATED",
"accounts": ["account1"],
"aclRules": [ {
"affinity": "POSITIVE",
"comparator": "EQUAL",
"type": "USER",
"value": "adaptive",
}],
"chargeAccount": "account2",
"chargeUser": "user2",
"classes": ["class1"],
"clusters": ["cluster1"],
"comment": "comment",
"days": ["Monday"],
"depth": 2,
"disabled": false,
"endOffset": 86415,
"flags": ["ALLOWJOBOVERLAP"],
"groups": ["group1"],
"hosts": ["host1"],
"id": "fast",
"jobAttributes": ["TEMPLATESAPPLIED"],
"maxJob": 2,
"maxTime": 0,
"messages": ["message1"],
"nodeFeatures": ["feature1"],
"os": "Ubuntu 10.04.3",
"owner": {
"name": "root",
"type": "USER"
},
"partition": "ALL",
"period": "DAY",
"procLimit": {
"qualifier": "<=",
"value": 5
},
"psLimit": {
"qualifier": "<=",
"value": 60
},
"qoses": ["qos1"],
"reservationAccessList": [],
"reservationGroup": "group2",
"resources": {
"PROCS": -1,
"tapes": 1
},
"rollbackOffset": 43200,
"startOffset": 347040,
"taskCount": 0,
"tasksPerNode": 0,
"timeLimit": -1,
"triggers": [],
"type": "type1",
"users": ["user1"]
}4.27 Usage Records
This section describes behavior of the Usage Record object in Moab Web Services. It contains the URLs, request bodies, and responses delivered to and from Moab Web Services.The Usage Record API contains the type and description of all fields in the UsageRecord object.
Supported Methods
| Resource | GET | PUT | POST | DELETE |
|---|---|---|---|---|
| /rest/usage-records | Get all usage-records | |||
| /rest/usage-records/id | Get specified usage-record |
4.27.1 Getting Usage Records
The HTTP GET method is used to retrieve Usage Record information.Quick Reference
GET http://localhost/mws/rest/usage-records?proxy-user=<USER>[&custom-fields=QualityOfService][&query={"id":"2"}][&sort={"Stage":-1}] GET http://localhost/mws/rest/usage-records/<id>?proxy-user=<USER>[&custom-fields=QualityOfService]
4.27.1.1 Get All Usage Records
URLs and Parameters
GET http://localhost/mws/rest/usage-records?proxy-user=<USER>[&custom-fields=QualityOfService][&query={"id":"2"}][&sort={"stage":-1}]
| Parameter | Required | Valid Values | Description | Example |
|---|---|---|---|---|
| proxy-user | Yes | String | Perform action as defined MAM user. | proxy-user=amy |
| custom-fields | No | Comma-Separated String | Includes custom MAM usage-record attributes. | custom-fields=QualityOfService |
| query | No | JSON | Query for specific results. | query={"priority":"2","allocation.active":"false"} |
| sort | No | JSON | Sort the results. Use 1 for ascending and -1 for descending. | sort={"stage":-1} |
The query parameter does not support the full Mongo query syntax. Only querying for a simple,
non-nested JSON object is allowed.See Global URL Parameters for available URL parameters.Sample Response
GET http://localhost/mws/rest/usage-records?proxy-user=amy&custom-fields=qualityOfService&fields=id,qualityOfService,type,instance
{
"totalCount": 8,
"resultCount": 2,
"results": [
{
"id": 1,
"qualityOfService": "premium",
"type": "Job",
"instance": "job.123"
},
{
"qualityOfService": "premium",
"id": 2,
"type": "Job",
"instance": "job.1234"
}
]
}4.27.1.2 Get Single Usage Record
URLs and Parameters
GET http://localhost/mws/rest/usage-records/<id>?proxy-user=<USER>[&custom-fields=QualityOfService]
| Parameter | Required | Type | Valid Values | Description |
|---|---|---|---|---|
| id | Yes | String | - | The unique identifier of the object. |
| proxy-user | Yes | String | Perform action as defined MAM user. | proxy-user=amy |
| custom-fields | No | Comma-Separated String | Includes custom MAM usage-record attributes. | custom-fields=QualityOfService |
Sample Responses
GET http://localhost/mws/rest/usage-records/1?proxy-user=amy&custom-fields=qualityOfService
{
"id": 1,
"qualityOfService": "premium",
"type": "Job",
"instance": "job.123",
"charge": 0,
"stage": "Create",
"quote": "",
"user": "doug",
}4.28 Virtual Containers
This section describes behavior of the Virtual Container object in Moab Web Services. It contains the URLs, request bodies, and responses delivered to and from Moab Web Services.The Virtual Container API contains the type and description of all fields in the Virtual Container object. It also contains details regarding which fields are valid during PUT and POST actions.
Supported Methods
| Resource | GET | PUT | POST | DELETE |
|---|---|---|---|---|
| /rest/vcs | Get all Virtual Containers | Create Virtual Container | ||
| /rest/vcs/id | Get specified Virtual Container | Modify Virtual Container | Destroy Virtual Container |
4.28.1 Getting Virtual Containers
The HTTP GET method is used to retrieve Virtual Container information. Queries for all objects and a single object are available.Quick Reference
GET http://localhost/mws/rest/vcs/<id>4.28.1.1 Get All Virtual Containers
URLs and Parameters
GET http://localhost/mws/rest/vcs
Sample Response
GET http://localhost/mws/rest/vcs?fields=id
{
"totalCount": 5,
"resultCount": 5,
"results": [
{"id": "vc3"},
{"id": "vc1"},
{"id": "vc4"},
{"id": "vc5"},
{"id": "vc2"}
]
}4.28.1.2 Get Single Virtual Container
URLs and Parameters
GET http://localhost/mws/rest/vcs/<id>| Parameter | Required | Type | Valid Values | Description |
|---|---|---|---|---|
| id | Yes | String | - | The unique identifier of the object. |
Sample Response
JSON Response
{
"aclRules": [ {
"affinity": "POSITIVE",
"comparator": "LEXIGRAPHIC_EQUAL",
"type": "USER",
"value": "root"
}],
"createDate": "2011-11-15 14:01:40 UTC",
"creator": "root",
"description": "vc2",
"flags": ["DESTROYWHENEMPTY"],
"id": "vc2",
"jobs": [
{"id":"Moab.1"}
],
"nodes": [
{"id":"node1"}
],
"owner": {
"name": "root",
"type": "USER"
},
"reservations": [
{"id":"system.1"}
],
"variables": {
"a": "b",
"c": "d"
},
"virtualContainers": [
{"id":"vc3"}
],
"virtualMachines": [
{"id":"vm1"}
]
}4.28.2 Creating Virtual Containers
The HTTP POST method is used to create Virtual Containers.Quick Reference
POST http://localhost/mws/rest/vcs[?proxy-user=<username>]Restrictions
- The proxy-user parameter is ignored unless you set
ENABLEPROXY=TRUEin themoab.cfgfile. Example:
ADMINCFG[1] USERS=root,ted ENABLEPROXY=TRUE
4.28.2.1 Create Virtual Container
URLs and Parameters
POST http://localhost/mws/rest/vcs[?proxy-user=<username>]| Parameter | Required | Type | Valid Values | Description |
|---|---|---|---|---|
| proxy-user | No | String | - | Perform the action as this user. |
Request Body
The request body below shows all the fields that are available when creating a Virtual Container, along with some sample values.JSON Request Body
{
"description": "ted's vc",
"owner": {
"name": "ted",
"type": "USER"
},
"requiredStartDate": "2012-11-08 13:18:47 MST",
"flags": ["HOLDJOBS"],
"virtualContainers": [
{"id": "vc93"},
{"id": "vc94"}
],
}Sample Response
JSON Response for successful POST
{"id": "vc8"}Restrictions
- When creating a Virtual Container, the
creatorfield is set to the value ofproxy-user(if set) orowner.name(if set), withproxy-usertaking precedence. However, setting thecreatorfield works only if you setENABLEPROXY=TRUEin themoab.cfgfile. Example:
ADMINCFG[1] USERS=root,ted ENABLEPROXY=TRUE
- You can set the
creatorfield as shown above, but you can never change it.
4.28.3 Modifying Virtual Containers
The HTTP PUT method is used to modify Virtual Containers.Quick Reference
PUT http://localhost/mws/rest/vcs/<id>?change-mode=<add|remove|set>[&proxy-user=<username>]
Restrictions
- The proxy-user parameter is ignored unless you set
ENABLEPROXY=TRUEin themoab.cfgfile. Example:
ADMINCFG[1] USERS=root,ted ENABLEPROXY=TRUE
4.28.3.1 Modify Virtual Container
URLs and Parameters
PUT http://localhost/mws/rest/vcs/<id>?change-mode=<add|remove|set>[&proxy-user=<username>]
| Parameter | Required | Type | Valid Values | Description |
|---|---|---|---|---|
| id | Yes | String | - | The unique identifier of the object. |
| change-mode | Yes | String | add | Add the given objects (jobs, VMs, etc) to the objects that already exist. |
| remove | Delete the given objects from the objects that already exist. | |||
| set | Modify the attributes of the virtual container itself and not the associated objects. | |||
| proxy-user | No | String | - | Perform the action as this user. |
Request Body
Here are three examples of Virtual Container updates: add objects, remove objects, and update attributes. In each case, the examples below show all the fields that are available, along with some sample values.Add objects with /rest/vcs/vc1?change-mode=add
{
"jobs": [
{"id": "Moab.37"},
{"id": "Moab.38"}
],
"nodes": [
{"id": "node1"},
{"id": "node2"}
],
"reservations": [
{"id": "system.48"},
{"id": "system.49"}
],
"virtualContainers": [
{"id": "vc93"},
{"id": "vc94"}
],
"virtualMachines": [
{"id": "vm2"},
{"id": "vm4"}
]
}Remove objects with /rest/vcs/vc1?change-mode=remove
{
"jobs": [
{"id": "Moab.37"},
{"id": "Moab.38"}
],
"nodes": [
{"id": "node1"},
{"id": "node2"}
],
"reservations": [
{"id": "system.48"},
{"id": "system.49"}
],
"virtualContainers": [
{"id": "vc93"},
{"id": "vc94"}
],
"virtualMachines": [
{"id": "vm2"},
{"id": "vm4"}
]
}Modify VC attributes with /rest/vcs/vc1?change-mode=set
{
"description": "This is a new description.",
"flags": ["HOLDJOBS"],
"owner": {
"name": "ted",
"type": "USER"
},
"variables": {
"a": "b",
"c": "d"
}
}Sample Responses
These messages may not match the messages returned from Moab exactly, but they are given as examples of the structure of the responses.
JSON response for adding objects
{
"messages":[
"job '147' added to VC 'vc3'",
"job 'Moab.1' added to VC 'vc3'"
]
}JSON response for removing objects
{
"messages":[
"job '147' removed from VC 'vc3'",
"job 'Moab.1' removed from VC 'vc3'"
]
}JSON response for updating attributes
{"messages":["VC 'vc3' successfully modified"]}Restrictions
- You can change the ACL Rules on a Virtual Container, but not using this resource. See Create or Update ACLs.
4.28.4 Destroying Virtual Containers
The HTTP DELETE method is used to destroy Virtual Containers.Quick Reference
DELETE http://localhost/mws/rest/vcs/<id>[?proxy-user=<username>]
Restrictions
- The proxy-user parameter is ignored unless you set
ENABLEPROXY=TRUEin themoab.cfgfile. Example:
ADMINCFG[1] USERS=root,ted ENABLEPROXY=TRUE
4.28.4.1 Destroy Virtual Container
URLs and Parameters
DELETE http://localhost/mws/rest/vcs/<id>[?proxy-user=<username>]
| Parameter | Required | Type | Valid Values | Description |
|---|---|---|---|---|
| id | Yes | String | - | The unique identifier of the object. |
| proxy-user | No | String | - | Perform the action as this user. |
Sample Response
JSON Response for successful DELETE
{}4.29 Virtual Machines
This section describes behavior of the Virtual Machine object in Moab Web Services. It contains the URLs, request bodies, and responses delivered to and from Moab Web Services.
The Virtual Machine API has changed with API version 2. The supported methods table below requires
each resource to be accessed with a URL parameter of api-version=2 in order to behave as documented.In order to access documentation for previous API versions, see Requesting Specific API Versions.
The Virtual Machine API contains the type and description of all fields in the Virtual Machine object. It also contains details regarding which fields are valid during PUT actions.
Supported Methods
| Resource | GET | PUT | POST | DELETE |
|---|---|---|---|---|
| /rest/vms | Get all VMs | |||
| /rest/vms/name | Get specified VM | Modify VM | Destroy VM |
4.29.1 Getting Virtual Machines
The HTTP GET method is used to retrieve Virtual Machine information.Quick Reference
GET http://localhost/mws/rest/vms/<name>?api-version=24.29.1.1 Get All Virtual Machines
URLs and Parameters
GET http://localhost/mws/rest/vms?api-version=2
| Parameter | Required | Valid Values | Description | Example |
|---|---|---|---|---|
| query | No | JSON | Queries for specific results. | query={"migrationDisabled":true} |
| sort | No | JSON | Sort the results. Use 1 for ascending and -1 for descending. | sort={"name":-1} |
Sample Response
GET http://localhost/mws/rest/vms?api-version=2&fields=name
{
"totalCount": 3,
"resultCount": 3,
"results": [
{"name": "vm1"},
{"name": "vm2"},
{"name": "vm3"}
]
}4.29.1.2 Get Single Virtual Machine
URLs and Parameters
GET http://localhost/mws/rest/vms/<name>?api-version=2| Parameter | Required | Type | Valid Values | Description |
|---|---|---|---|---|
| name | Yes | String | - | The name of the object. |
Sample Response
JSON Response
{
"name": "vm3",
"description": null,
"host": {"name": "hv2"},
"hostnames": [],
"ipAddress": "10.0.0.5",
"migrationDisabled": false,
"lastUpdatedDate": "2012-10-11 17:46:32 UTC",
"startDate": "2012-09-25 18:12:23 UTC",
"trackingJob": null,
"metrics": {"watts": 200},
"variables": {},
"resourceManagers": [ {
"name": "msm",
"isMaster": true,
"stateReported": "Active"
}],
"operatingSystem": {
"image": "stateless1",
"imageExpected": null,
"imageLastUpdatedDate": null,
"imagesAvailable": []
},
"states": {
"powerState": "On",
"powerStateExpected": null,
"powerStateLastUpdatedDate": null,
"state": "Idle",
"stateLastUpdatedDate": "2012-10-11 17:15:01 UTC",
"subState": null,
"subStateLast": null,
"subStateLastUpdatedDate": null
},
"resources": {
"processors": {
"configured": 1,
"dedicated": 0,
"available": 1
},
"memory": {
"configured": 512,
"dedicated": 0,
"available": 512
},
"disk": {
"configured": 1024,
"dedicated": 0,
"available": 1024
},
"swap": {
"configured": 0,
"dedicated": 0,
"available": 0
}
},
"triggers": [],
"virtualContainers": []
}4.29.2 Modifying Virtual Machines
The HTTP PUT method is used to modify Virtual Machines.Quick Reference
PUT http://localhost/mws/rest/vms/<name>?api-version=2[&proxy-user=<username>]
Restrictions
- The proxy-user parameter is ignored unless you set
ENABLEPROXY=TRUEin themoab.cfgfile. Example:
ADMINCFG[1] USERS=root,ted ENABLEPROXY=TRUE
4.29.2.1 Modify Virtual Machine
URLs and Parameters
PUT http://localhost/mws/rest/vms/<name>?api-version=2[&proxy-user=<username>]
| Parameter | Required | Type | Valid Values | Description |
|---|---|---|---|---|
| name | Yes | String | - | The name of the object. |
| proxy-user | No | String | - | Perform the action as this user. |
Request Body
The request body below shows all the fields that are available when modifying a Virtual Machine, along with some sample values.JSON Request Body for VM Modify
{
"metrics": {"pwatts": 211},
"migrationDisabled": true,
"operatingSystem": {"image": "esx4.1"},
"states": {
"powerState": "On",
"state": "Running"
},
"triggers": [{"name": "trigger_id"}],
"variables": {
"key": "value",
"arbitrary text key": "more value"
}
}Sample Response
This message may not match the message returned from Moab exactly, but is given as an example of the structure of the response.
JSON Response
{"messages":["successfully updated VM variables"]}4.29.2.2 Migrate Virtual Machine
URLs and Parameters
PUT http://localhost/mws/rest/vms/<name>?api-version=2[&proxy-user=<username>]
| Parameter | Required | Type | Valid Values | Description |
|---|---|---|---|---|
| name | Yes | String | - | The name of the object. |
| proxy-user | No | String | - | Perform the action as this user. |
Request Body
The request body below shows how to migrate a Virtual Machine to a host (hypervisor) with name "hv2".JSON Request Body for VM Migrate to a specific host
{"host": {"name": "hv2"}}JSON Request Body for VM Migrate to any available host
{"host": {"name": "ANY"}}Sample Response
The HTTP response code for this operation is 202 Accepted. See the responses section for more information.
JSON Response
{"jobId": "vm-migrate1"}Restrictions
- If a migration is requested by setting the host as shown in the above examples, any other properties in the same request body will be ignored.
4.29.3 Destroying Virtual Machines
The HTTP DELETE method is used to destroy Virtual Machines.Quick Reference
DELETE http://localhost/mws/rest/vms/<name>?api-version=2[&proxy-user=<username>]
Restrictions
- The proxy-user parameter is ignored unless you set
ENABLEPROXY=TRUEin themoab.cfgfile. Example:
ADMINCFG[1] USERS=root,ted ENABLEPROXY=TRUE
4.29.3.1 Destroy Virtual Machine
URLs and Parameters
DELETE http://localhost/mws/rest/vms/<name>?api-version=2[&proxy-user=<username>]
| Parameter | Required | Type | Valid Values | Description |
|---|---|---|---|---|
| name | Yes | String | - | The name of the object. |
| proxy-user | No | String | - | Perform the action as this user. |
Sample Response
JSON Response for successful DELETE
{"jobId": "vmdestroy-26"}The jobId in the response identifies the job that will destroy the virtual machine.
5 Reporting Framework
The reporting framework is a set of tools to make time-based reports from numerical data. The following sections will (1) provide an overview of the framework and the concepts related to it, and (2) work through an example report (CPU Utilization) with details regarding which web services to use and with what data.The REST API reference is located in the Report Resource section.5.1 Overview
5.1.1 Concepts
The reporting framework uses 3 core concepts: reports, datapoints, and samples.- Report - A report is a time-based view of numerical data.
- Datapoint - A datapoint is a consolidated set of data for a certain time period.
- Sample - A sample is a snapshot of a certain set of data at a particular point in time.
2400/12040MB
By recording the memory utilization and time constantly for 1 minute, you could gather the following data:
Each of the rows in the table above represent a sample of data. By averaging the rows we can consolidate them into one or more datapoints:
Time Memory Utilization 3:53:55 PM 2400/12040 MB 3:54:13 PM 2410/12040 MB 3:54:27 PM 2406/12040 MB 3:54:39 PM 2402/12040 MB 3:54:50 PM 2409/12040 MB
Start time End Time Memory Utilization 3:53:30 PM 3:54:00 PM 2400/12040 MB 3:54:00 PM 3:54:30 PM 2408/12040 MB 3:54:30 PM 3:55:00 PM 2406/12040 MB
Note that each datapoint covers exactly the same amount of time, and averages all samples within that period of time.A report, then, is simply a list of datapoints with some additional configuration information:
Datapoints:
Field Value Name Memory Utilization Report Datapoint Duration 30 seconds Report Size 3 datapoints
Start time End Time Memory Utilization 3:53:30 PM 3:54:00 PM 2400/12040 MB 3:54:00 PM 3:54:30 PM 2408/12040 MB 3:54:30 PM 3:55:00 PM 2406/12040 MB
5.1.2 Capabilities
While storing simple information like memory utilization is nice, the reporting framework is built to automatically handle much more complex information.Consolidating Samples
Samples are JSON documents which are pushed into the report using the samples API. Samples are then stored until the consolidation operation creates a datapoint out of them. The table below shows how different data types are handled in this operation:| Type | Consolidation Function Handling |
|---|---|
| Numbers | Numerical data is averaged |
| Strings | Strings are aggregated into an array |
| Objects | The consolidation function recursively consolidates sub-objects |
| Lists | Lists are combined into a single flat list containing all elements |
| Mixed | If samples have different types of data for the same field, the values are aggregated into an array. |
| Null | These values will be ignored unless all values for a sample field are set to null, resulting in a null result. |
If the mixed data types contains at least one number, it will be treated as numerical data. The non-numerical data will be ignored and the result will be averaged.Below is an example of how the consolidation function works:
Samples:Resulting Datapoint after consolidation:
Time NumberEx StringEx ListEx MixedEx MixedNumberEx 3:53:55 PM 2400 "str1" ["elem1"] "str1" "str1" 3:54:13 PM 2410 "str2" ["elem2", "elem3"] ["elem1"] ["elem1"] 3:54:27 PM 2405 "str3" ["elem4"] null 5
Time NumberEx StringEx ListEx MixedEx MixedNumberEx 3:55:00 PM 2405 ["str1", "str2", "str3"] ["elem1", "elem2", "elem3", "elem4"] ["str1", "elem1"] 5
Minimum Number of Samples
If your dataset is highly variable (i.e. values contained in samples are not very close together), converting a single sample into a datapoint may provide misleading information. It may be better to have a datapoint with an "Unknown" value. This can be accomplished by setting the minimum number of samples for a datapoint in the report.TheminimumSampleSize field in the Report API explains that if the specified size of
samples is not met when the consolidation function is performed, the datapoint is considered "null" and no data is available
for it. When this occurs, the sample data is discarded and the data field of the datapoint is set to "null".For information on how to set this option, see the REST API Report Resource section in the documentation.Report Size
Reports have a predetermined number of datapoints, or size, which sets a limit on the amount of data that can be stored. After the report size has been reached, as newly created datapoints are pushed into the report, the oldest datapoints will automatically be deleted. This is to aid in managing the storage capacity of the server hosting MWS.On report creation, a Mongo collection will be initialized that is the maximum size of a single entry (currently 16 MB) multiplied by the report size. Be careful in setting a large report size as this will quickly allocate the entire disk if many reports with large report sizes are created.
5.2 Example Report (CPU Utilization)
To understand how the behavior and usage of the reporting framework, a sample report covering CPU Utilization will be shown in this section. It will not cover how to gather or display data for reports, but will cover some basic operations that are available with Moab Web Services to facilitate reporting.5.2.1 Creating A Report
Before any data is sent to Moab Web Services, a report must first be created. A JSON request body with a HTTP method of POST must be used to do this.POST /rest/reports
{
"name":"cpu-util",
"description":"An example report for cpu utilization",
"consolidationFunction":"average",
"datapointDuration":600,
"reportSize":288
}/rest/reports/cpu-util. The
datapointDuration of 600 signifies that the datapoint consolidation should occur once every 10 minutes, while the reportSize
(i.e. number of the datapoints) shows that the report will retain up to 2 days worth of the latest datapoints.GET /rest/reports/cpu-util
{
"consolidationFunction": "average",
"datapointDuration": 600,
"datapoints": [],
"description": "An example report for cpu utilization",
"id": "aef6f6a3a0bz7bf6449537c9d",
"keepSamples": false,
"minimumSampleSize": 1,
"name": "cpu-util",
"reportSize": 288,
"version": 0
}5.2.2 Adding Samples
Until samples are added and associated with the report, datapoint consolidation will generate datapoints with adata
field equal to null. Once samples are added, however, they will be averaged and inserted into the next datapoint.Create samples for the cpu-util by sending a POST request as follows:POST /rest/reports/cpu-util/samples
[
{
"agent": "cpu-monitor",
"timestamp":"2012-01-01 12:00:00 UTC",
"data": {
"minutes1": 0.5,
"minutes5": 0,
"minutes15": 0
}
},
{
"agent": "cpu-monitor",
"timestamp":"2012-01-01 12:01:00 UTC",
"data": {
"minutes1": 1,
"minutes5": 0.5,
"minutes15": 0.05
}
},
{
"agent": "cpu-monitor",
"timestamp":"2012-01-01 12:02:00 UTC",
"data": {
"minutes1": 1,
"minutes5": 0.5,
"minutes15": 0.1
}
},
{
"agent": "cpu-monitor",
"timestamp":"2012-01-01 12:03:00 UTC",
"data": {
"minutes1": 0.75,
"minutes5": 1,
"minutes15": 0.25
}
},
{
"agent": "cpu-monitor",
"timestamp":"2012-01-01 12:04:00 UTC",
"data": {
"minutes1": 0,
"minutes5": 1,
"minutes15": 0.85
}
}
]5.2.3 Consolidating Data
A consolidation function must run to generate datapoints from the given samples. This scheduled consolidation will occur at intervals ofdatapointDuration seconds. For each field in the data object in samples, all values will be averaged.
If non-numeric values are included, the following strategies will be followed:
- All fields which contain a single numeric value in any included sample will be averaged and the non-numeric or null values will be ignored.
- All fields which contain a list will be consolidated into a single, flat list.
- All fields which contain only non-numeric or null values will be consolidated into a single, flat list.
datapointDuration. In this example, the scheduled consolidation
is at 10 minutes from the creation date. If historical datapoints are included in the report creation, the latest
datapoint's endDate plus the datapointDuration will be used as the scheduled time. If this date was in the past,
the next scheduled consolidation will occur at the appropriate interval from the last endDate.
5.2.4 Retrieving Report Data
To retrieve the consolidated datapoints, simply perform a GET request on the report once again. Alternatively, the GET for a report's datapoints may be used.GET /rest/reports/cpu-util
{
"consolidationFunction": "average",
"datapointDuration": 600,
"datapoints": [
{
"firstSampleDate": null,
"lastSampleDate": null,
"data": null,
"startDate": "2012-01-01 11:49:00 UTC",
"endDate": "2012-01-01 11:59:00 UTC"
},
{
"firstSampleDate": "2012-01-01 12:00:00 UTC",
"lastSampleDate": "2012-01-01 12:04:00 UTC",
"data": {
"minutes1": 0.65,
"minutes15": 0.25,
"minutes5": 0.6
},
"startDate": "2012-01-01 11:59:00 UTC",
"endDate": "2012-01-01 12:09:00 UTC"
}
],
"description": "An example report for cpu utilization",
"id": "aef6f6a3a0bz7bf6449537c9d",
"keepSamples": false,
"minimumSampleSize": 1,
"name": "cpu-util",
"reportSize": 288,
"version": 0
}null.
Only samples lying within the datapoint's duration, or from the startDate to the endDate, are included in the
consolidation. Therefore the first datapoint, which covered the 10 minute period just before the samples' recorded
timestamps, contained no data. The second, which covers the 10 minute period matching that of the samples, contains
the averaged sample data. This data could be used to display consolidated report data in a custom interface.
5.2.5 Possible Configurations
Configuration options may be changed to affect the process of report generation. These are documented in the API for the Report object and the Sample object.6 MWS Plugins (Beta)
This section describes MWS Plugins, their use, and their creation in Moab Web Services.MWS Plugins are currently in beta. Interfaces may change significantly in future releases.
6.1 Plugin Overview
This section provides an overview of the plugin layer in web services. The following areas will be covered:- An introduction to the concept of MWS plugins
- How to configure Moab Workload Manager to interact with MWS plugins
- A description of the plugin lifecycle
- How plugins are driven by events
- How to expose web services from a plugin
- How plugin utility services may be used
- How data report collisions between plugins are consolidated
- How calls from MWM are routed to MWS plugins
6.1.1 Introduction
Moab Web Services plugins provide a highly extensible interface to interact with Moab, MWS, and external resources. Plugins can perform some of the same functions as Moab Resource Managers (RMs), while also providing many other features not available to RMs. This section will discuss the main features of plugins, some basic terminology, and how MWS plugins can interact with Moab.Features
Plugins can- be created, modified, and deleted without restarting Moab Workload Manager or MWS.
- be defined in Groovy and uploaded to MWS without restarting.
- have individual data storage space and configuration.
- access MWS configuration and RESTful web services.
- log to a standard location configured in MWS.
- be polled at a regular interval (configured on a per-plugin basis).
- report current state data to Moab Workload Manager through the Resource Manager interface (see MWM Resource Manager Integration for more information).
- be informed of important system events.
- be individually stopped, started, paused, and resumed.
- expose secured and unsecured custom web services for external use.
- be manipulated via a full RESTful API (see Resources for more information).
- be manipulated via a full user interface in a web browser.
Terminology
There are two distinct terms in the plugin layer: plugin types and plugins (also called plugin instances).Plugin Types
Plugin Types can be considered plugin templates with built-in logic. In object-oriented programming languages, this relates to the concept of a class. They possess certain abilities, or methods, that can be called by Moab Web Services to query or update information about certain resources. They also can define methods which will be exposed to external clients as web services. They do not contain any configuration or current data, but they are often tied to a type of component, such as components that communicate with Moab's WIKI Protocol or those that are built on a certain product.They can define several types of methods:- Instance methods that return information about the current plugin, such as
getState. While these are defined in the plugin type, the plugin type itself does not have a state. - The poll event method that is called at a configured interval.
- Lifecycle event methods of plugins created from the plugin type, such as
beforeStartandafterStart. - RM event methods that are called by Moab when certain events occur.
- Web service methods that expose custom functionality as public web services.
Plugins (Instances)
Plugins (also called plugin instances) are created from plugin types. They contain current data or configuration and use the plugin type methods to interact with resources.Interactions with MWM as a Resource Manager
The plugin layer in MWS is integrated with Moab Workload Manager via the Native Resource Manager (RM) interface. When utilizing plugins, MWS is configured as a RM in Moab as explained in the next section. Events from Moab are pushed through the RM interface to MWS which is then pushed to each plugin in turn. The relationship between Moab Web Services, Moab, and plugins is shown in the following image: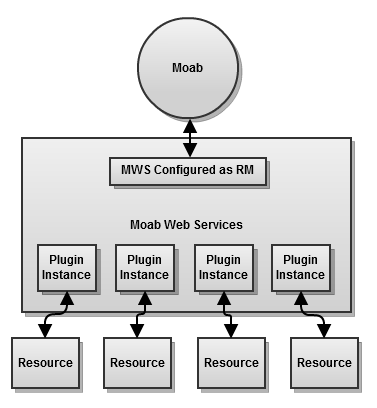 See Consolidating Data and Reporting State Data for more
information.
See Consolidating Data and Reporting State Data for more
information.
6.1.2 Lifecycle States
During the course of a plugin's use, the state of the plugin may change many times. Plugins have four possible states:Stopped, Started, Paused, and Errored.
The flow of a plugin through the states is shown in the following image: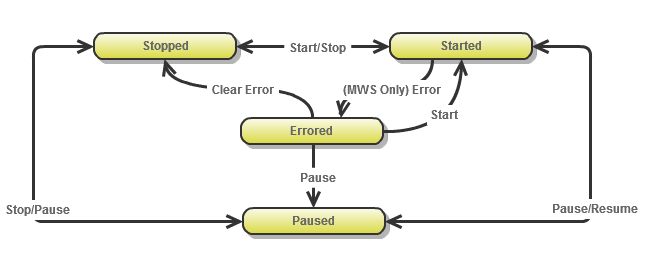 To see descriptions of each state, see the
PluginState API.Events that occur during lifecycle state changes may be found in the
Events section.
To see descriptions of each state, see the
PluginState API.Events that occur during lifecycle state changes may be found in the
Events section.
6.1.3 Events
Plugins use an event based model in that methods are called on the plugin when certain criteria are met or situations arise. Events currently exist for polling, lifecycle state changes, and RM events from Moab. See Handling Events for more information.6.1.4 Custom Web Services
Although the events interface typically serves most cases, there are some instances where an event is not supported that is desired. This is especially true when an external resource is the source of the event. To address these issues, plugins can expose custom web services to external resources. These web services may be named freely and do anything they wish within the plugin framework.For example, suppose a resource needs to notify a plugin that provisioning of a virtual machine has been completed. Instead of having the plugin poll the resource to verify that the provisioning was finished, the plugin could expose a custom web service to handle notification from the resource itself.Sample custom web service
def vmProvisionFinished(Map params) {
// Handle event
return [messages:["Event successfully processed"]]
}6.1.5 Utility Services
Several features of plugins are only available by utilizing bundled services. These include:- Accessing the individual datastore.
- Reporting state data to Moab through the Resource Manager interface.
- Manipulating other plugins and controlling their lifecycle.
- Accessing REST resources from Moab Web Services.
6.1.6 Data Consolidation
At times, plugins can report differing or even contradictory data for nodes, virtual machines, and jobs. This is called a data "collision". The act of resolving these collisions is called "Consolidation". Plugins also have the concept of "precedence", where the plugins with the lowest precedence value are considered more authoritative than the greater precedence values plugins. For example, a plugin with a precedence value of 1 has a higher precedence and is considered more authoritative than a plugin with a precedence value of 5. If no precedence is provided when creating plugins, the plugin is automatically assigned to the lowest precedence, or 1 greater than the highest precedence value. The precedence value may not be less than 1.When data from one plugin "collides" with another, the data from the highest precedence plugin will be considered the authoritative source for information. If multiple sets of data (reports) are provided by the same plugin, the latest set of data will take precedence. Additionally, MWS supports the concept of treating node and virtual machine data with state information optimistically, pessimistically, or neither. This is configured using theplugins.stateConsolidationPolicy configuration property in the MWS configuration file.
If this property is set to optimistic and any plugin reports the state for a node or VM as "Up", the consolidated
state will be "Up". Inversely, if the property is set to pessimistic and any plugin reports the state as "Down",
the consolidated state will be "Down". If it is set to null (neither), consolidation will occur for the state
field just as with any other field, with higher precedence and later reports being considered authoritative.Node, virtual machine, and job unique identifiers (IDs) are all converted to lower-case before consolidation, so the node "NODE1" is equivalent to "node1".
When MWS is upgraded to a version that supports plugin precedence from an older version, existing plugins will not have the precedence field set. The administrator should assign precedence to each plugin manually through the REST API or through the user interface to ensure that the consolidation will occur as expected. By default, data from a plugin without a precedence defaults to a precedence of 1, or the highest precedence.
Consolidation Examples
Suppose two plugins exist,pluginA and pluginB. Plugin A has a precedence of 1, and plugin B
has a precedence of 2, meaning that plugin A is more authoritative. These plugins both report
data for a node with an ID of node1. However, each reports a different node power state. Plugin A
reports the power as ON, while plugin B reports the power as OFF. The data collision that occurs
due to these two contradictory reports is resolved by the precedence of the plugins. Since plugin A has
a higher precedence (lower number), it is considered authoritative and the node will be reported as ON.Now suppose that the plugins also report differing node state for node1. In this case, the node state
would depend on the plugins.stateConsolidationPolicy property. The different combinations of report values
compared to the state consolidation policy and the final reported state are shown in the table below.| Plugin A Node State | Plugin B Node State | State Consolidation Policy | Consolidated Node State |
|---|---|---|---|
| ON | OFF | null (neither) | ON |
| OFF | ON | null (neither) | OFF |
| ON | OFF | optimistic | ON |
| OFF | ON | optimistic | ON |
| ON | OFF | pessimistic | OFF |
| OFF | ON | pessimistic | OFF |
6.1.7 Routing
Because Moab Web Services is configured as a Resource Manager (RM) in Moab Workload Manager, events are sometimes triggered by Moab through the RM interface. These actions could be migrating a virtual machine, starting a job, submitting a job, modifying a node, and so forth. The decisions regarding which plugins are affected and notified is termed routing .Currently all plugins receive all commands from Moab. This means that each plugin will receive the command to start a job if sent from Moab, even if that plugin does not handle the job. This means that plugins must ensure they handle actions or commands only for resources which they report or handle.6.2 Plugin Developer's Guide
Plugin types comprise the methods by which Moab may communicate with resource managers or other external components. They define all operations that can be performed for a "type" or "class" of plugins, hence the name "plugin type".Several plugin types are provided with Moab Web Services (see Plugin Types in the Quick Reference), but it is easy to create additional plugin types and add their functionality to web services. This involves using Groovy, which is based on the Java programming language. This section describes the general guidelines and specifics of implementing new plugin types.API Classes and Interfaces
There are several packages and classes available to assist in creating plugin types. These can all be found in the API documentation under the com.adaptc.mws.plugins package.6.2.1 Requirements
This section discusses the requirements to create a basic functional plugin. Thecom.adaptc.mws.plugins package
contains the abstract class AbstractPlugin
that should form the basis of any new plugin type. However, this class need not be extended to
create a functional plugin type. Only two requirements must be fulfilled for this:
- The class name must end in
Plugin. - There must exist
idfield getter and setter methods:
*public String getId();*public void setId(String id);
id field may be stored in whichever way desired as long as the getter and setter are available as shown above,
but will most likely be implemented as follows:class BasicPlugin {
String id
}String id will be expanded by the Groovy compiler to the full getter and setter method
definitions given above. In other words, no explicit method definitions are actually needed.
Note that the BasicPlugin shown above is able to be uploaded as a plugin type to MWS, but does not actually do
anything.It must also be noted that the AbstractPlugin class already implements an id field. Therefore, a plugin type
that extends this class does not need to define the field as shown in the following example.import com.adaptc.mws.plugins.AbstractPluginclass BasicPlugin extends AbstractPlugin { // No ID field is needed since it exists in AbstractPlugin }
6.2.2 Dynamic Methods
Several methods are dynamically inserted onto each plugin. These methods do not need to be included in the plugin class, and will be overwritten if included. Additionally, a logger is inserted into each plugin as discussed in the next section. The inserted methods are shown below (full definitions can be found in AbstractPlugin and AbstractPluginInfo):public void start() throws PluginStartException;(Equivalent to thestartmethod in the Plugin Control Service)public void stop() throws PluginStopException;(Equivalent to thestopmethod in the Plugin Control Service)public Log getLog();(Discussed in Logging)public ConfigObject getAppConfig();(Discussed in Configuration)public String message(Map parameters);(Discussed in i18n Messaging)public String getPluginType();public PluginState getState();public Integer getPollInterval();public Boolean getAutoStart();public Map<String, Object> getConfig();(See Configuration)
6.2.3 Logging
Logging in plugin types uses the Apache Commons Logging and log4j libraries. Each plugin is injected with a method calledgetLog
which can be used to access the configured logger. It returns an instance of
org.apache.commons.logging.Log.
Examples of using the logger are shown below.The logger may used to register messages to the MWS log at several levels (in order of severity):
- trace
- debug
- info
- warn
- error
- fatal
public void poll() { getLog().debug("getLog() is equivalent to just using 'log' in Groovy") log.debug("This is a debug message and is used for debugging purposes only") log.info("This is a informational message") log.warn("This is a warning") log.error("This is an error message") }
Logger Name
Each logger in the MWS logging configuration has a name. In the case of plugins, it is composed of the full class name, including the package, prepended by "plugins.". For example, a plugin class of "example.LoggingPlugin" will have access to a logger configured as "plugins.example.LoggingPlugin".Logging Configuration
The logging configuration is done through the MWS configuration file. See the MWS Configuration page for more information on configuring loggers. A good configuration for developing plugin types may be to add "plugins" at the debug level. Be sure to set the log level threshold down for the desired appender.log4j = {
…
// Appender configuration
... debug "plugins"
}6.2.4 i18n Messaging
Plugins, translators, and custom components all have access to i18n messages. Utilizing messages requires the two following steps:- Including a file (or multiple files) that ends in "messages.properties" in the plugin JAR file.
- Using the
messagemethod on a plugin type, translator, or custom component.
Including Messages in Plugin JAR File
Messages are defined using property files. These may be named anything as long as they end with "messages.properties" and must be placed at the root or top level of the plugin JAR file. If they are present, they will be loaded automatically. Multiple property files may be used within a single plugin JAR file.Each property file consists of an arbitrary amount of lines that define a message property (also called a code) with letters, numbers, and periods, associated with a human-readable message that can span multiple lines, have quotes, or contain arguments. These are demonstrated in the following example.first.message.code=This is the first message
second.message=This message can span multiple lines, \\
and will not show the linebreaks when retrieved
message.with.arguments=This message has arguments: first - {0}, second - {1}, third - {2}, etc.
message.with.quotes=This message uses single quotes around ''this phrase''.Message1Plugin and
Message2Plugin. The first suggestion is to namespace the messages for each plugin by the property definition,
such as the following:message1Plugin.first.message=This is a message for Message1Plugin message2Plugin.first.message=This is a message for Message2Plugin
It is important that no two message codes are identical within a single plugin JAR file, even if they are defined in separate property files. If this is done, a conflict will exist with the messages and behavior is undefined.
Using the Message Method
Each plugin, translator, and custom component is injected with a method namedmessage. This method takes a Map
as its parameter, which can contain one or several of the following properties:| Parameter | Type | Description |
|---|---|---|
| code | String | The message property definition (everything before the equals sign in the property file for a single message), i.e. "first.message.code". |
| args | List<Object> | A list of arguments to insert into the message. |
| default | String | A default message to be used when the message code cannot be resolved. |
| error | org.springframework.context.MessageSourceResolvable | An object that represents a hierarchy of message codes. This is typically used to display errors. |
code and args, as these combined provide great flexibility in generating messages.
If a message cannot be resolved, or in other words the message definition does not exist, the code will simply be
returned as the resolved message. Below are several examples of messages resolved using the property files given
above. While these are contained in the polling method, the message may be used anywhere within a plugin type.package exampleimport com.adaptc.mws.plugins.AbstractPluginclass MessagingPlugin extends AbstractPlugin { def poll() { assert message(code:"first.message.code")=="This is the first message" assert message(code:"message.with.arguments", args:[ "1st", 2, true ])=="This message has arguments: first - 1st, second - 2, third - true, etc." assert message(code:"message.with.quotes")=="This message uses single quotes around 'this phrase'." assert message(code:"invalid.message.code")=="invalid.message.code" } }
6.2.5 Configuration
Plugin types can access two different kinds of configuration: an individual plugin's configuration, and the global MWS application configuration.Individual Plugin Configuration
The individual plugin configuration is separate for each instance of a plugin. This may be used to store current configuration information such as access information for linked resources. It should not be used to store cached information or non-configuration related data. The Individual Datastore should be used instead for these cases.It is accessed by using thegetConfig method discussed in Dynamic Methods.public void poll() {
def configFromMethod = getConfig()
// OR an even simpler method…
def configFromMethod = config
}configure method, verify that it matches
predetermined criteria, and utilize it perform initial setup of the plugin (e.g. initialize libraries needed to
communicate with external resources). For example, to verify that the configuration contains the keys "username" and
"password", the following code may be used.public void configure() throws InvalidPluginConfigurationException { def myConfig = config // This checks to make sure the key exists in the configuration Map and that the value is not empty or null if (!myConfig.containsKey("username") || !myConfig.username) throw new InvalidPluginConfigurationException("The username configuration parameter must be provided") if (!myConfig.containsKey("password") || !myConfig.password) throw new InvalidPluginConfigurationException("The password configuration parameter must be provided") }
Access MWS Configuration
The MWS application configuration can also be accessed in plugin types. This configuration is global for the entire application and can be modified by the administrator as shown in the MWS Configuration section.It is accessed by using thegetAppConfig method discussed in Dynamic Methods. This is
demonstrated below.public void poll() {
// Retrieve the current MWS_HOME location
def mwsHome = appConfig.mws.home.location
// OR an even simpler method…
def mwsHome = getAppConfig().mws.home.location
}mws-config.groovy
plugins.custom.property = "This is my custom property"CustomAppPropertyPlugin
public void poll() { assert appConfig.plugins.custom.property=="This is my custom property" }
6.2.6 Configuration Constraints
Plugin types can optionally define validation constraints for the polling interval and plugin configuration. These parameters are then checked against the defined constraints during the creation of a new plugin. If the validation fails, meaning the configuration provided does not pass the constraints defined by the plugin type, the plugin will fail to be created with error messages based on the parameters and constraints defined.Defining Constraints
To define constraints for a plugin type and therefore for all plugins created using it, use the following syntax:import com.adaptc.mws.plugins.*class ConstrainedPlugin extends AbstractPlugin { static constraints = { // Set plugin's default polling interval pollInterval defaultValue:60 // The "myParam" configuration parameter is automatically required and cannot be blank myParam blank:false // The "myEnum" configuration parameter is not required and must set to one of the values in the list myEnum required:false, inList:["val1", "val2", "val3] // Insert additional constraints here… } }
| Constraint | Default Value | Type | Example Value | Default Message Code | Message Suffix | Description |
|---|---|---|---|---|---|---|
| blank | - | Boolean | false | default.blank.message | blank | If false, the parameter (if present) cannot be a blank string. |
| creditCard | - | Boolean | true | default.invalid.creditCard.message | creditCard.invalid | If true, uses org.apache.commons.validator.CreditCardValidator to determine if the parameter (if present) is a valid credit card number. |
| defaultValue | - | Object | 60 | - | - | If the parameter is not present, it will be set to this default value. Does not return any error messages. |
| - | Boolean | true | default.invalid.email.message | email.invalid | If true, the parameter (if present) must be a valid email address. | |
| inList | - | List | ["first", "second"] | default.not.inlist.message | not.inList | The parameter (if present) must be set to one of the values specified. |
| matches | - | String | "[a-z][A-Z]+" | default.doesnt.match.message | matches.invalid | The parameter (if present) must match the specified regular expression. |
| max | - | Integer | 10 | default.invalid.max.size.message | max.exceeded | The parameter (if present) must not be greater than the defined value. |
| *maxSize | - | Integer | 10 | default.invalid.max.size.message | maxSize.exceeded | The parameter's (if present) size must not be greater than the defined value. |
| min | - | Integer | 1 | default.invalid.min.size.message | min.notmet | The parameter (if present) must not be less than the defined value. |
| *minSize | - | Integer | 1 | default.invalid.min.message | minSize.notmet | The parameter's (if present) size must not be less than the defined value. |
| notEqual | - | Object | "Invalid Value" | default.not.equal.message | notEqual | The parameter (if present) must not be set to the defined value. |
| nullable | true | Boolean | false | default.null.message | nullable | If true, the parameter (if present) must be non-null value. See "required" for how to enforce the parameter to be present. |
| password | - | Boolean | true | - | - | If true, the parameter (if present) is hidden from the user both on input and display when managing plugin configuration. It is not, however, hidden in the REST API. Does not return any error messages. |
| range | - | Range | 10..20 | default.invalid.range.message | range.toosmall/range.toobig | Uses a groovy range to validate that the value is within a specified range. |
| required | true | Boolean | false | default.required.message | required | If true, the parameter must be present and non-null for the plugin to be created successfully. Implies the "nullable:false" constraint. |
| scale | - | Integer | 2 | - | - | Only valid for Double parameters. Rounds the parameter (if present) to the specified number of digits. Does not return any error messages. |
| *size | - | Range | 1..10 | default.invalid.size.message | size.toosmall/size.toobig | Uses a groovy range to restrict the size of a collection, string, or a number. |
| *type | - | Class | Integer.class | typeMismatch | typeMismatch | See the "Type Inferencing" section below. |
| url | - | Boolean | true | default.invalid.url.message | url.invalid | If true, uses org.apache.commons.validator.UrlValidator to determine if the parameter (if present) is a valid URL. Does not support exec or file scheme URLs. |
| scriptableUrl | - | Boolean | true | default.invalid.scriptable.url.message | scriptableUrl.invalid | Identical to the "url" validator, but adds support for exec and file scheme URLs. |
| validator | - | Closure | See below | default.invalid.validator.message | validator.error | See the "Custom Validator" section below. |
- The user interface (see Plugin Management) does not support parameters whose type is a subclass of Collection (a List for example). Such parameters are therefore not recommended.
- The polling interval constraints must always apply to Integer types. If this specification is violated, the plugin type cannot be added or updated.
Messaging
When defined constraints are violated for a plugin, error messages are retrieved based on the configuration parameters and the applied constraints using i18n Messaging codes. First, the most specific error message will be attempted to be resolved from a message code generated from the plugin type name, the configuration parameter, and the constraint. This code takes the format of "pluginTypeName.parameterName.suffix" where the plugin type's name has a lowercase first letter and the suffix is shown in the table above. If this message code is not defined, the default message code (as shown in the table above) will be used.For example, if the "url" constraint validation failed for the "ExamplePlugin" plugin type's "endpoint" configuration parameter, the following message codes would be resolved in order:- examplePlugin.endpoint.url.invalid
- default.invalid.url.message
Plugin types that have two or more uppercase letters at the start of the name will not be converted to have a lowercase first letter for error message codes. i.e. for the example just given using "VCenterPlugin" instead of "ExamplePlugin", the following message codes would be resolved in order:
- VCenterPlugin.endpoint.url.invalid
- default.invalid.url.message
Default Messages
Default messages may be contained in anymessages.properties file included in the plugin JAR file as explained
in i18n Messaging. Arguments for each constraint vary, but they always include these
argument indices:
- {0}: The configuration parameter name (i.e. endpoint)
- {1}: The plugin type class name (i.e. my.package.ExamplePlugin)
- {2}: The value of the configuration parameter
default.doesnt.match.message=The ''{0}'' configuration parameter value ({2}) does not match the required pattern ''{3}'' default.invalid.url.message=The ''{0}'' configuration parameter value ({2}) is not a valid URL default.invalid.scriptable.url.message=The ''{0}'' configuration parameter value ({2}) is not a valid scriptable URL default.invalid.creditCard.message=The ''{0}'' configuration parameter value ({2}) is not a valid credit card number default.invalid.email.message=The ''{0}'' configuration parameter value ({2}) is not a valid e-mail address default.invalid.range.message=The ''{0}'' configuration parameter value ({2}) does not fall within the valid range from {3} to {4} default.invalid.size.message=The ''{0}'' configuration parameter value ({2}) does not fall within the valid size range from {3} to {4} default.invalid.max.message=The ''{0}'' configuration parameter value ({2}) is greater than the maximum value of {3} default.invalid.min.message=The ''{0}'' configuration parameter value ({2}) is less than the minimum value of {3} default.invalid.max.size.message=The ''{0}'' configuration parameter value ({2}) exceeds the maximum size of {3} default.invalid.min.size.message=The ''{0}'' configuration parameter value ({2}) is less than the minimum size of {3} default.invalid.validator.message=The ''{0}'' configuration parameter value ({2}) does not pass custom validation default.not.inlist.message=The ''{0}'' configuration parameter value ({2}) is not contained within the list [{3}] default.blank.message=The ''{0}'' configuration parameter cannot be blank default.not.equal.message=The ''{0}'' configuration parameter value ({2}) cannot be equal to ''{3}'' default.null.message=The ''{0}'' configuration parameter cannot be null default.required.message=The ''{0}'' configuration parameter is required and cannot be null typeMismatch=The ''{0}'' configuration parameter value ({2}) does not match the required type ''{3}''
Labels and Help Messages
Message codes may also be provided for configuration parameters to aid the admin user with human readable property labels and help messages. Similar to the validation error message codes, labels and help message codes may be defined using the "pluginTypeName.parameterName.label" and "pluginTypeName.parameterName.help" message codes. These values are used only in Plugin Type Management and are not exposed through the REST API.Type Inferencing and Conversion
Due to the dynamic nature of configuration parameters, the expected type or class of values for each parameter are inferred from constraints. The following rules govern how type is inferred, in priority order:- If the "type" constraint is applied to a parameter, the constraint value will be used as the expected type.
- If the "inList" or "range" constraints are applied to a parameter, the class of the first element in the constraint value array is used as the expected type.
- If the "minSize" or "maxSize" constraints are applied to a parameter,
java.lang.Collectionis used as the expected type. - If the "max", "min", or "notEqual" constraints are applied to a parameter, the class of the constraint value is used as the expected type.
- If none of the above apply,
java.lang.Stringis used as the expected type.
Only the String, Date, Double, Integer, and Boolean classes are supported for the "type" constraint. If Float or Long is desired, use Double and Integer respectively as the type.If the configuration parameter values can be converted to the expected types, this will occur automatically. Otherwise, the "type" constraint is violated and the applicable error messages will be generated.
Custom Validator
In cases where the built-in constraints prove inadequate for validation, custom validators may be used. The "validator" constraint expects a Groovy Closure parameter which has one or (optionally) two arguments: the value of the configuration parameter and the plugin object. With these parameters, complex validation logic may be defined. Additionally, custom message codes and arguments may be defined by validator constraints and these will be used in generating error messages when validation fails.For example, suppose that the parameter "user" cannot be set to the same value as parameter "creator". Additionally, the "creator" parameter must not be equal to either "bob" or "joe". The existing constraints are inadequate to fulfill this use case, but the following code using validators would perform exactly as expected:import com.adaptc.mws.plugins.*class ConstrainedPlugin extends AbstractPlugin { static constraints = { user validator:{ val, obj -> if (val==obj.config.creator) return "invalid.equal.to.creator" } creator validator:{ val -> if ("val"=="joe") return ["invalid.equal", "joe"] if (val=="bob") return ["invalid.equal", "bob"] } } }
Message Codes
constrainedPlugin.user.invalid.equal.to.creator=The user configuration parameter value ({2}) must not be equal to the creator parameter.
constrainedPlugin.creator.invalid.equal=The creator configuration parameter must not be equal to {3}.Output Error Messages
For user = "jill", creator = "jill" "The user configuration parameter value (jill) must not be equal to the creator parameter."For user = "jill", creator = "bob" "The creator configuration parameter must not be equal to bob."For user = "jill", creator = "joe" "The creator configuration parameter must not be equal to joe."
- Nothing (
null) ortrueif the validation succeeded without errors. falseif a validation error occurred (in this case the default validator message suffix would be used).- A string which will be used as the message code suffix in the "pluginTypeName.propertyName.suffix" format.
- A list with the first element being the message code suffix, and all other elements being arguments for the message indexed starting at 3 (as shown in the example above).
appConfig property available which contains the application
configuration as discussed in the Configuration section. Additionally, services may
be retrieved as explained in the next section.Retrieving Services
At times it may be necessary to use Bundled Services in custom validators. A method namedgetService which takes a single string parameter of the name of the service (as used during injection) is
provided to be used in these cases. For example, if a plugin needs a valid server certificate file, the
SSL Service may be used as follows:import com.adaptc.mws.plugins.*class ConstrainedPlugin extends AbstractPlugin { static constraints = { certificateFile validator:{ val -> ISslService sslService = getService("sslService") try { sslService.getSocketFactory(val) } catch(Exception e) { // Certificate file is invalid, return an error return ["invalid", e.message] } } } }
The getService method does not work with translators, custom components,
RM services, or the datastore service.
6.2.7 Individual Datastore
Each plugin has access to an individual, persistent datastore which may be used for a variety of reasons. The datastore is not designed to store Moab data such as nodes, jobs, or virtual machines, but custom, arbitrary data pertinent only to the individual plugin. This may include storing objects in a persistent cache, state information for currently running processes, or any other arbitrary data. The individual datastore has the following properties:- Data is persisted to the Mongo database and will be available even if the plugin or MWS is restarted.
- The data must be stored in groups of data called collections. These correspond directly to MongoDB collections.
- Each plugin may have an arbitrary number of collections.
- Collections are guaranteed not to collide if there are identically named collections between two plugin types or even two plugin instances.
- Each collection contains multiple objects or entries. These correspond directly to MongoDB documents.
- The values of entries may be any object which can be serialized to MongoDB: simple types (int or Integer), Maps, and Lists.
- A collection is automatically created whenever an entry is added to it, it does not need to be specifically initialized.
Simple key/value storage is not currently provided with the datastore. It may easily be done, however, by storing data in the format of {name:"key", value:"value"} and then retrieving this entry later by querying on name equals "key".
Example
The example below demonstrates two web services. The first adds multiple entries containing various types of data to an arbitrarily named collection. The second retrieves the data and returns it to the user.package exampleimport com.adaptc.mws.plugins.*class DatastorePlugin extends AbstractPlugin { IPluginDatastoreService pluginDatastoreService def storeData(Map params) { def collectionName = params.collectionName def data = [[boolVal:true], [stringVal:"String"], [intVal:1], [nullVal:null]] if (pluginDatastoreService.addData(collectionName, data)) log.info("Data successfully added") else log.info("There was an error adding the data") return [success:true] } def retrieveData(Map params) { def collectionName = params.collectionName return pluginDatastoreService.getCollection(collectionName) } }
6.2.8 Exposing Web Services
Any number of methods may be exposed as public, custom web services by satisfying several criteria:- The method must declare that it returns
Objectordef. - The method must define a single argument of type
Map. - The method must actually return a
ListorMap. - The method must not be declared as private or protected; only public or unscoped methods will be recognized as web services.
Parameters and Request Body
The Map argument will contain all parameters passed into the web service by the client. See Accessing Plugin Web Services for additional details.Parameters may be passed into the web service call as normal URL parameters such as?param=value¶m2=value2, as
key-value pairs in the POST body of a request, or as JSON in the body.For the first two cases, the parameters will be available on the Map argument passed into the web service
call as key value pairs matching those of the request. Note that in these cases all keys and values will be
interpreted as strings. However, the parameters object has several helper methods to convert from Strings to simple
types, such as booleans, integers, doubles, floats, and lists. If the value is not a valid simple type, null is
returned.GET <webServiceUrl>?key=value&key2=true&key3=5&list=1&list=2def serviceMethod(Map params) { assert params.key=="value" assert params.key2=="true" assert params.bool('key2')==true assert params.key3=="5" assert params.int('key3')==5 assert params.list('list')==[1, 2] // Null is returned if the conversion is invalid assert params.int('key')==null }
body in the Map argument. In this scenario, the types of the values are preserved by the JSON format.POST <webServiceUrl> with JSON body of
{"key":"value","key2":true,"key3":5}def serviceMethod(Map params) {
assert params.body.key=="value"
assert params.body.key2==true
assert params.body.key3==5
}Unsecured Web Services
There are times when it is desirable to create a plugin with a publicly available web service that does not require a valid Application Account in order to access it. In these cases, the Unsecured annotation may be used on the plugin web service method. No authentication will be performed on Unsecured web services. An example of using the annotation is given below.Sample unsecured custom web service
@Unsecured
def retrievePublicData(Map params) {
return [data:["data item 1", "data item 2"]]
}Be cautious in using this annotation as it may potentially present a security risk if sensitive data is returned from the web service.
Returning Errors
In order to signify an error occurred or invalid data was provided, the WebServiceException class may be thrown from any custom web service. This exception contains constructors and fields for a list of messages and a HTTP response code. For example, suppose that the user provided inadequate information. The web service could use the following code to notify the user and prompt them to take action with custom messages.def service(Map params) {
// Handle invalid input
if (!params.int('a'))
throw new WebServiceException("Invalid parameter 'a' specified, please specify an integer!", 400)
// Use params.a correctly …
}{
"messages":[
"Invalid parameter 'a' specified, please specify an integer!"
]
}{
"messages":[
"A problem occurred while processing the request",
"Message provided in the exception constructor"
]
}Accessing the HTTP Request Method
The HTTP method used for the request is available from the Map parameters argument. The key used to access it is stored as a static field in PluginConstants calledWEB_SERVICES_METHOD.
The value is a string which can be GET, POST, PUT, or DELETE. The following example demonstrates how this
could be used with the WebServiceException to create a REST API with a plugin.def serviceMethod(Map params) {
// Check to make sure that this request used the HTTP GET method
// Throw a 405 error (method not supported) if not
if (params[PluginConstants.WEB_SERVICES_METHOD]!="GET")
throw new WebServiceException("Method is not supported", 405)
}6.2.9 Reporting State Data
As long as Moab Workload Manager is configured with MWS as a Resource Manager (RM), plugins may report state information on nodes, virtual machines, and jobs to MWM. This is done through Reports that are generated by the plugin and passed to the bundled RM services (Node RM Service, Virtual Machine RM Service, and Job RM Service). Each report is for a specific type of object: node, virtual machine, or job. Each contains current state information on the specific attributes of the type it is for.Generating Reports
To generate a report, simply create a new instance of a report depending on the type of object to be reported:| Object Type | Report Type |
|---|---|
| Node | NodeReport |
| Virtual Machine | VirtualMachineReport |
| Job | JobReport |
public void poll() { NodeReport node = new NodeReport("node1") node.timestamp = new Date() node.image = "centos-5.4-stateless" … // Set other properties and persist the report }
Special Cases in Field Values
All complex types, such as Lists, Maps, and objects (not including Enumerated values such as NodeReportState and JobReportState) have default values set for them and are not required to be instantiated before use. For example, themetrics
property of a node report may be modified as follows:public void poll() { NodeReport node = new NodeReport("node1") // The following assignments are equivalent in their functionality node.features.add("FEAT1") node.features << "FEAT2" // The following assignments are equivalent in their functionality node.metrics.METRIC1 = 4d node.metrics["METRIC2"] = 125.5 … // Set other properties and persist the report }
resources and requirements (jobs only) properties, assignments may be made easily without checking
for previously existing values or null objects. For example, resources may be added to the resources property
simply by accessing it as a Map:public void poll() { NodeReport node = new NodeReport("node1") node.resources.RES1.total = 10 node.resources.RES1.available = 3 node.resources["RES2"].total = 10 node.resources["RES2"].available = 10 … // Set other properties and persist the report }
requirements property has some additional handling to allow it to be accessed as a single
JobReportRequirement object, such as in the following example:public void poll() { JobReport job = new JobReport("job.1") job.nodeCountMinimum = 4 job.processorCountMinimum = 2 job.requiredNodeFeatures << "FEAT1" job.preferredNodeFeatures << "FEAT2" … // Set other properties and persist the report }
Although multiple requirements may be added to the requirements list to provide consistency with the MWS
Job resource, only the first requirement object's properties will be reported to MWM through
the RM interface.
Managing Images for Nodes
In order to have Moab Workload Manager recognize a node as a virtual machine hypervisor, it must have a valid associated Image. In particular, theimage property on a node report must set to a valid
image name. The image's hypervisorType and virtualizedImages properties are then used to report
the correct hypervisor type and supported virtual machine images to MWM.If the image is invalid, it will be ignored and the node will not be recognized as a hypervisor. If the image
is valid, but no hypervisorType value is present, the extensions.xcat.hvType field value will be used. If that is
also not present, the configuration parameter for default hypervisor type (See Configuration)
will be used instead.Persisting a Report
After a report has been generated and all desired fields have been updated, the report must be sent to one of the three bundled RM services for persisting. If this is not done, the report will be discarded and will not be considered when reporting state information to MWM. The RM services are shown below according to the object type that they handle:| Object Type | RM Service |
|---|---|
| Node | Node RM Service |
| Virtual Machine | Virtual Machine RM Service |
| Job | Job RM Service |
save and update. The difference between these is that the save method first
removes all previous reports from the plugin calling the method, and then persists the new reports, thereby only
persisting the latest reports, while the update method does not remove any reports before persisting the new
reports. Typically, the save method will be used while a plugin is being polled, while the update method will
be used in incremental event based reporting. An example of using the save method is shown below.INodeRMService nodeRMServicepublic void poll() { NodeReport node = new NodeReport("node1") // Change the state node.state = NodeReportState.BUSY // Persist nodeRMService.save([node]) }
6.2.10 Controlling Lifecycle
At times a plugin developer may wish to modify the current state of a plugin or even create plugins programatically. This may be done with the Plugin Control Service. Operations exist on the service to:- create plugin instances dynamically with specific configuration.
- retrieve plugin instances by ID or based on configuration properties.
- start or stop plugin instances.
- verify plugin instance configuration.
Creating Plugins
Several methods are provided to allow on-the-fly creation of new plugins. Generally, they allow a plugin with a specific ID and plugin type (as a string or as a Groovy Class) to be created with optional configuration properties. These properties should match the fields in the Plugin API.If any configuration properties are omitted, the defaults will be used as described in the Setting Default Plugin Configuration section. A boolean value is also returned indicating whether the creation succeeded or not.Note that thecreatePlugin methods will initialize the plugin for retrieval or usage and attempt to start the
plugin if the autoStart property is true.Retrieving Plugins
Plugins may be retrieved by using an ID, querying by plugin type, or even querying based on configuration parameters. Several methods are provided to perform these functions as shown on the Plugin Control Service page.Starting and Stopping Plugins
Plugins may also be started or stopped on demand. These two methods are exposed directly asstart and stop
on the plugin control service. Although each method does not return any data, exceptions are thrown if errors
are encountered.Verifying Plugin Configuration
Finally, the plugin control service may be used to verify plugin configuration at any point instead of just when the plugin is started or modified. This may be useful to attempt to modify plugin configuration directly through thesetConfig dynamic method and then verify that the new configuration is valid for the plugin.
Exceptions are thrown if the plugin or the configuration is invalid.Examples
If an error state is detected it may be necessary to stop the current plugin instance until corrective action can be taken. This may be done using the following code:package exampleimport com.adaptc.mws.plugins.*class ErrorPlugin { IPluginControlService pluginControlService public void poll() { // Error is detected, stop plugin instance! try { log.warn("An error was detected, trying to stop the plugin ${id}") pluginControlService.stop(id) log.warn("The plugin was successfully stopped") } catch(PluginStopException e) { log.error("Plugin instance ${id} could not be stopped", e) } } }
6.2.11 Accessing MWS REST Resources
Often a plugin type may need to access existing MWS REST Resources in order to extend or complement default MWS functionality. This may be done with the Moab Rest Service, which allows a plugin type developer to utilize the existing Resources documentation to perform these tasks.All accesses to resources require a HTTP method to use (such as GET, POST, PUT, or DELETE) and a relative URL (such as /rest/jobs). Although it mimics the REST resource interface, no actual requests are made and no data is transmitted through the network.Authentication
All resources are available to the Moab REST Service, and no authentication or Application Accounts are needed.Caution must be used when developing plugin types, as there are no restrictions to what may be done with the Moab REST Service. This is especially true when not utilizing hooks as discussed below.
Hooks
If Pre and Post-Processing Hooks are utilized in MWS, the plugin type developer may choose whether or not they are executed when performing a "request" through the Moab REST service. This is done through thehooks
option as documented on the Moab Rest Service page.Verifying API Version Support
The Moab REST Service provides a method for easily determining which API versions are supported by the current version of MWS. This method includes checks to make sure that the API version will work as expected, including verifying any configuration or external services are running.moabRestService.isAPIVersionSupported(1) moabRestService.isAPIVersionSupported(2)
URL Parameters
URL parameters, such asquery, sort, proxy-user, and others should be not be appended directly to the URL.
Instead, these may be specified with the params option:// Query images that are hypervisors moabRestService.get("/rest/images", params:[query:'{"hypervisor":true}']) // Sort images by osType moabRestService.get("/rest/images", params:[sort:'{"osType":1}'])
Examples
This code retrieves a list of all nodes, and is equivalent to the Get All Nodes task.package exampleimport com.adaptc.mws.plugins.* import net.sf.json.*class RestPlugin { IMoabRestService moabRestService public void poll() { def result = moabRestService.get("/rest/nodes") // OR with the hook enabled… def result = moabRestService.get("/rest/nodes", hooks:true) assert result instanceof MoabRestResponse assert nodes instanceof List log.debug("Nodes list:") nodes.each { JSON node -> log.debug(node.id) } } }
/rest/jobs/job.1?proxy-user=adaptive.package exampleimport com.adaptc.mws.plugins.* import net.sf.json.*class RestPlugin { IMoabRestService moabRestService public void poll() { def jobId = "job.1" def result = moabRestService.put("/rest/jobs/"+jobId, hooks:true, params:['proxy-user':'adaptive']) { [flags:["RESTARTABLE"]] } assert result.isSuccess() } }
6.2.12 Handling Events
Plugin types may handle specific events by containing methods defined by the conventions below. All events are optional.The Polling Event
To maintain current information, each plugin is polled at a specified time interval. The following method definition is required to utilize the polling event.void poll() { … }poll method on the target plugin is called. This method may perform
any function desired and should typically make calls to the Node RM Service, the
Virtual Machine RM Service, and the Job RM Service services to report the
current state of nodes and virtual machines. For example, the poll method in the Native
plugin type is implemented as follows:This is an extremely simplified version of what is actually implemented in the Native plugin type.
INodeRMService nodeRMService;
IVirtualMachineRMService virtualMachineRMService;public void poll() {
nodeRMService.save(getNodes());
virtualMachineRMService.save(getVirtualMachines());
}getNodes and getVirtualMachines to retrieve
node and virtual machine reports. These reports are then sent to the appropriate RM service. See
Reporting State Data for more information on the RM services, but the
objective of this example is to demonstrate one possible use of the poll event handler. Other plugin types, on the
other hand, may use the poll event to update internal data from pertinent resources or make calls to external APIs.Lifecycle Events
Events are also triggered for certain lifecycle state changes. The following method definitions are required to receive lifecycle events.public void configure() throws InvalidPluginConfigurationException { … } public void beforeStart() { … } public void afterStart() { … } public void beforeStop() { … } public void afterStop() { … }
| State Change | Event | Description |
|---|---|---|
| configure | Configure | Triggered before beforeStart and after the plugin has been configured. May be used to verify configuration and perform any setup needed any time configuration is loaded or modified. |
| beforeStart | Start | Triggered just before starting a plugin. |
| afterStart | Start | Triggered just after a plugin has been started. |
| beforeStop | Stop | Triggered just before stopping a plugin. |
| afterStop | Stop | Triggered just after stopping a plugin. |
RM Events
When MWS is configured as a Moab Resource Manager (see MWM Resource Manager Integration and more specifically Configuring MWM), RM events are sent from Moab to each plugin according to the Routing specification. The following method definitions are required to receive these events.public boolean jobCancel(List<String> jobs) { … } public boolean jobModify(List<String> jobs, Map<String, String> properties) { … } public boolean jobRequeue(List<String> jobs) { … } public boolean jobResume(List<String> jobs) { … } public boolean jobStart(String jobId, String taskList, String username) { … } public boolean jobStart(String jobId, String taskList, String username, Map<String, String> properties) { … } public boolean jobSubmit(Map<String, String> properties) { … } public boolean jobSuspend(List<String> jobs) { … } public boolean nodeModify(List<String> nodes, Map<String, String> properties) { … } public boolean nodePower(List<String> nodes, NodeReportPower state) { … } public boolean resourceCreate(String type, String id, Map<String, String> attributes) { … } public boolean systemModify(Map<String, String> properties) { … } public List<String> systemQuery(List<String> attributes) { … } public boolean virtualMachineMigrate(String vmId, String hypervisorId, String operationId) { … }
6.2.13 Handling Exceptions
Thecom.adaptc.mws.plugins package contains several exceptions that may be used and in some cases, should be caught.
All exceptions end with "Exception", as in PluginStartException.There are several specific cases where Exceptions should or can be used:
- The
reloadmethod on the Plugin Control Service can throw the InvalidPluginConfigurationException to signify that the configuration contains errors. - Various methods on the Plugin Control Service throw plugin exceptions which must be caught to diagnose errors when creating plugin types.
- Any exception (including the Exception class) can be thrown from a custom web service to display a 500 Internal Server Error to the client requesting the service with the given error message.
6.2.14 Managing SSL Connections
At times it is desirable to load and use self-signed certificates, certificates generated from a single trusted certificate authority (CA), or even simple server certificates. It may also be necessary to use client certificates to communicate with external resources. To ease this process, the SSL Service may be utilized. This service provides methods to load client and server certificates from the filesystem. Methods are also present to aid in creating connections which automatically trust all server certificates and connections.Several points should be noted when using the SSL Service:- Certificate files may be in the PEM file format and do not need to be in the DER format (as is typical of Java security).
- Each method returns an instance of SSLSocketFactory, which may then be used to create simple sockets or, in combination with another client library of choice, create a connection.
- If the client certificate password is non-null, it will be used to decrypt the protected client certificate.
- This service is not needed when performing SSL communications with trusted certificates, such as those for HTTPS enabled websites that do not have a self-signed certificate.
- If the file name of the certificate file (client or server) is relative (no leading '/' character), it will be loaded from the
mws.certificates.locationConfiguration parameter. - The default value of
mws.certificates.locationisMWS_HOME/etc/ssl.crt. - Both the client certificate alias and password may be
null. In this case, the client certificate must not be encrypted and the client certificate's default alias (the first subject CN) will be used. - The lenient socket factory and hostname verifier automatically trust all server certificates. Because of this, they present a large security hole. Only use these methods in development or in fully trusted environments.
Example
To create a socket to a server that requires a client certificate, the following code may be used.package exampleimport com.adaptc.mws.plugins.*class SSLConnectionPlugin extends AbstractPlugin { ISslService sslService public void poll() { // This certificate is not encrypted and will be the only certificate presented to the // connecting end of the socket. // This file will be loaded from MWS_HOME + mws.certificates.location + my-cert.pem. String clientCert = "my-cert.pem" def socketFactory = sslService.getSocketFactory(clientCert, null, null) def socket = socketFactory.createSocket("hostname.com", 443) // Write and read from the socket as desired… } }
package exampleimport com.adaptc.mws.plugins.*class SSLConnectionPlugin extends AbstractPlugin { ISslService sslService public void poll() { // This certificate represents either the server public certificate or the CA's certificate. // Since the path is absolute it will not be loaded from the MWS_HOME directory. String serverCert = "/etc/ssl/certs/server-cert.pem" def socketFactory = sslService.getSocketFactory(serverCert) // Open connection to URL HttpsURLConnection conn = "https://hostname.com:443/test".toURL().openConnection() conn.setSSLSocketFactory(socketFactory) // Retrieve page content and do with as desired… def pageContent = conn.getInputStream().text } }
6.2.15 Utilizing Services or Custom "Helper" Classes
There are three general types of services available for use in plugins:- Bundled services such as the Moab Rest Service.
- Custom built translators loaded by convention of their name.
- Other custom built helper classes registered with Annotations.
6.2.15.1 Bundled Services
Bundled services are utility classes that are included and injected by default onto all plugin types. It is not required to use any of these services, but they enable several core features of plugin types as discussed in the Utility Services section.More information may be found on each bundled service in the Quick Reference section under "Plugin Services". See especially the "Usage" page under "Plugin Services" to understand generally how they are to be used.6.2.15.2 Using Translators
Often a plugin type class file becomes so complex that it is desirable to split some of its logic into separate utility service classes. The most typical use case for this is to split out the logic for "translating" from a specific resource API to a format of data that the plugin type can natively understand and utilize. For this reason, there is a convention defined to easily add these helper classes called "Translators".Simply end any class name with "Translator", and it will be automatically injected just as bundled services onto plugin types, other translators, or even custom registered components. The injection occurs only if a field exists on the class matching the name of the translator with the first letter lower-cased. For example, a translator class called "MyTranslator" would be injected on plugin types, other translators, and custom components that define a field called "myTranslator" asdef myTranslator or
MyTranslator myTranslator.Do not use two upper-case letters to start the class name of a Translator. Doing this may cause injection to work improperly. i.e. use RmTranslator instead of RMTranslator as the class name.
Be careful not to declare translator and custom component injection such that a cyclic dependency is created.
Logging in Translators
All translators automatically have a "getLog" method injected on them which can be used to access the configured logger. It returns an instance of org.apache.commons.logging.Log.package exampleclass ExampleTranslator { public void myMethod() { // log will be translated to getLog() by the groovy compiler log.info("Starting my method") } }
Example
Suppose that a translator needs to be created to handle a connection to access an external REST resource. The translator could be defined as follows:package exampleclass ExampleTranslator { public int getExternalNumber() { def number = … // Make call to external resource return number } }
package exampleclass ExamplePlugin { def exampleTranslator // OR … //ExampleTranslator exampleTranslator public void poll() { // Use the translator log.info("The current number is "+exampleTranslator.getExternalNumber()) } }
package exampleclass AnotherTranslator { def exampleTranslator public int modifyNumber(int number) { return number + exampleTranslator.getExternalNumber() } }
6.2.15.3 Registering Custom Components
There are cases where the concept of a "Translator" does not fit the desired use of a utility class. In these cases, it is possible to register any arbitrary class as a component to be injected just as a translator would be. This is done using the Spring Framework's annotationorg.springframework.stereotype.Component. When this annotation
is used, the class is automatically registered to be injected just as translators onto plugin types and translators.All annotations are available in the dependencies declared by the plugins-commons artifact.
Do not use two upper-case letters to start the class name of a custom component. Doing this may cause injection to work improperly. i.e. use RmUtility instead of RMUtility as the class name.
Changing Scope
By default, when a custom component is injected, only a single instance is created for all classes which inject it. This is referred to as the 'singleton' scope. Another scope that is available is 'prototype', which creates a new instance every time it is injected. This is useful when the class contains state data or fields that are modified by multiple methods. To change the scope, use theorg.springframework.context.annotation.Scope on the class with a
single String parameter specifying 'singleton' or 'prototype'.Injecting Translators or Components
The need may arise to inject translators or other custom components onto custom components. This is done using theorg.springframework.beans.factory.annotation.Autowired or javax.annotation.Resource annotations. The
Autowired annotation is used to inject class instances by the type (i.e. MyTranslator myTranslator) while
the Resource annotation is used to inject class instances by the name (i.e. def myTranslator). Add the desired
annotation to the field that needs to be injected.Note that using theAutowiredannotation does injection by type which differs from translator and plugin type injection. These are done by name just as theResourceannotation allows. Due to this fact, a type of "def" cannot be used when doing injection onto custom components using theAutowiredannotation. See the example below.Injection of custom components onto translators and plugin types are still done by name, only fields injected using theAutowiredannotation are affected.
Be careful not to declare translator and custom component injection such that a cyclic dependency is created.
Logging in Custom Components
Unlike plugins and translators, custom components do not automatically have a "getLog" method injected on them. In order to log with custom components, you must use the Apache Commons Logging classes to retrieve a new log. ThePluginConstants class contains the value of the logger prefix that is used for all plugins and translators. The
following is an example of how to retrieve and use a logger correctly in a custom component.package exampleimport com.adaptc.mws.plugins.PluginConstants import org.apache.commons.logging.Log import org.apache.commons.logging.LogFactory import org.springframework.stereotype.Component@Component class ExampleComponent { private static final Log log = LogFactory.getLog(PluginConstants.LOGGER_PREFIX+this.name) public void myMethod() { log.info("Starting my method") } }
Example
Suppose that a custom utility class is needed to perform complex logic. A custom component could be defined as follows (notice the optional use of theScope annotation):package exampleimport org.springframework.stereotype.Component import org.springframework.context.annotation.Scope@Component @Scope("prototype") class ComplexLogicHandler { def handleLogic() { … // Perform complex logic and return } }
package exampleclass CustomPlugin { def complexLogicHandler public void poll() { complexLogicHandler.handleLogic() } }
Autowired annotation:package exampleimport org.springframework.stereotype.Component import org.springframework.beans.factory.annotation.Autowired@Component class AnotherHandler { // Note that this is injected by type, so 'def' may not be used @Autowired ComplexLogicHandler complexLogicHandler def wrapLogic() { complexLogicHandler.handleLogic() } }
Resource annotation:package exampleimport org.springframework.stereotype.Component import javax.annotation.Resource@Component class AnotherHandler { // Note that this is injected by name based solely on the name defined in // the annotation. The name of the field itself does not affect the injection. @Resource(name="complexLogicHandler") def complexLogicHandler def wrapLogic() { complexLogicHandler.handleLogic() } }
6.2.16 Packaging Plugins
Plugin types may be packaged in two different ways to upload to MWS:- A simple Groovy file containing a single plugin type definition.
- A JAR file containing one or more plugin types, translators, and custom components.
6.2.16.1 Plugin Projects and Metadata
Each plugin type has information attached to it, called metadata, which describes the origin and purpose of the plugin type. Additionally, a JAR file may also contain a project file which defines default metadata attributes for all plugin types in the JAR. Initial plugins, or plugins that will be created on loading of the JAR file if they do not exist, are also able to be defined on a project file. In all cases, metadata declared on a plugin type will override the metadata defined on the project file.To define a project file, simply add a class to JAR file that ends in "Project". This file will attempted to be loaded as the project file. Every field on a project file, and even the file itself, is optional. All available fields are shown in the example below.class SampleProject {
// Plugin information
String title = "Sample"
String description = "Sample plugin types"
String author = "Our Company."
String website = "http://example.com"
String email = "[email protected]" // Versioning properties
String version = "0.1"
String mwsVersion = "7.1 > *"
String commonsVersion = "0.9 > *"
String license = "APACHE" // Documentation properties
String issueManagementLink = "http://example.com/ticket-system/sample-plugins"
String documentationLink = "http://example.com/docs/sample-plugins"
String scmLink = "http://example.com/git/sample-plugins" // Plugins that are to be created with these properties only when they do NOT exist
// This does not override any existing plugin instance configuration
def initialPlugins = {
/*
// Multiple instances of plugins may be defined here.
// In this case, 'sample' is the id of the plugin
sample {
pluginType = "Sample"
// All properties except for "pluginType" are optional
pollInterval = 30
autoStart = true
// Although it is possible to set plugin precedence, it is not recommended since this precedence
// may already be taken and plugin creation will fail in this case
precedence = 5
config {
configParam = "value"
}
}
}
// Another plugin with an ID of 'sample2'
sample2 {
…
*/
}
}initialPlugins, mwsVersion, and commonsVersion may be overwritten by the
plugin type class itself by using static properties. A simple example is shown below.package exampleclass SamplePlugin { // Properties may be typed, untyped, final, or otherwise, // but they MUST be static static version = "0.2" static title = "Sample plugin" static description = "This sample plugin is used to demonstrate metadata information" static author = "Separate Division" … // Rest of the plugin type definition }
MWS and Commons Versions
ThemwsVersion and commonsVersion fields are used to restrict the versions of MWS and plugin framework
with which the plugin project may be used. Each field is of the format FIRST_VERSION > LAST_VERSION,
where FIRST_VERSION is the first supported MWS or plugin framework version (inclusive), and LAST_VERSION is the
last supported MWS or plugin framework version (inclusive). Each version must take the format of #.# or #.#.#, as in
7.1, or 7.1.2. An asterisk (*) is used to denote any version, and may be used for the first or the last version.Although support for restricting both the MWS and commons versions are provided, it is recommended to use the
commons version restriction always and the MWS version restriction where necessary. Restrictions on the commons
version prevent plugin loading errors while restrictions on the MWS version prevent runtime errors such as missing
support for certain MWS API versions.Typically the mwsVersion and commonsVersion fields are set as shown above, with the first version set to a
specific number, and the last version set to any (an asterisk). This is the recommended approach for setting both
fields. It is not recommended to use any version (asterisk) for the first version. Some examples of mwsVersion
and commonsVersion values are shown below with explanations of how they behave.String mwsVersion = "7.1 > *" // Any MWS version 7.1.0 and greater is supported (including 7.2, etc) String mwsVersion = "7.1.3 > *" // Any MWS version 7.1.3 and greater is supported (including 7.2, etc) String mwsVersion = "7.1 > 7.1.3" // Any MWS version between 7.1.0 and 7.1.3 is supported String mwsVersion = "* > *" // Any MWS version is supported (not recommended!) String mwsVersion = "* > 7.2" // Any MWS version up to 7.2 is supported (not recommended!)String commonsVersion = "0.9 > *" // Any framework version 0.9.0 and greater is supported (including 1.0, etc) String commonsVersion = "0.9.3 > *" // Any framework version 0.9.3 and greater is supported (including 1.0, etc) String commonsVersion = "0.9 > 0.9.3" // Any framework version between 0.9.0 and 0.9.3 is supported String commonsVersion = "* > *" // Any framework version is supported (not recommended!) String commonsVersion = "* > 1.0" // Any framework version up to 1.0 is supported (not recommended!)
mwsVersion or commonsVersion fields are formatted incorrectly, the plugin project will fail to load.
If a plugin project is uploaded to MWS and the version check fails, the project will fail to load with an error
message about the mwsVersion or commonsVersion.ThemwsVersionandcommonsVersionfields cannot be overridden by a single plugin type, but can be set only at the plugin project level. This prevents mixing of MWS and commons version requirements within a single project.
Initial Plugins
The initial plugins closure provides the flexibility to insert plugin instances when the JAR is loaded. This occurs at two points: when the plugin JAR is first uploaded to MWS, and when MWS is restarted. As shown in the example above, the ID, pluginType, and other properties may be configured for multiple plugins.The nature of Groovy closures means that programmatic definition of initial plugins is possible. This may even be based on the MWS application configuration. Two properties are automatically available in the initialPlugins closure:appConfig- Contains the MWS application configuration. Any configuration parameter is available for access as documented on the Configuration page.suite- Contains the currently configured suite that MWS is running in. This is equivalent to themws.suiteconfiguration parameter, and is an instance of Suite.
Native Plugin Case Study
The Native JAR file utilizes many of the features discussed above. In the root of the JAR file, a compiled class called NativeProject exists which defines all of the metadata fields, includinginitialPlugins. Trying to create an
initial plugin presents two distinct problems:
- The plugin should be initialized only if the suite is CLOUD.
- The plugin type configuration must contain an entry referencing the configured
mws.home.locationparameter, or the configured MWS_HOME location.
initialPlugins closure is defined as follows:import com.adaptc.mws.plugins.Suiteclass NativeProject { … // Metadata fields def initialPlugins = { // Initialize the cloud-native plugin only if the suite is CLOUD if (suite==Suite.CLOUD) { 'cloud-native' { pluginType = "Native" pollInterval = 30 config { // Use the appConfig property to retrieve the current MWS_HOME location getCluster = "file://${appConfig.mws.home.location}/etc/nodes.txt" } } } } }
6.2.16.2 Managing External Dependencies
External dependencies (e.g. JAR files) may be included and referenced in JAR files. Certain rules must also be followed in order to have the dependencies loaded from the JAR file correctly:- The plugin type must bundle all external dependency JARs in the root of the plugin type JAR file.
- An entry must be included in the
MANIFEST.MFfile that references each of these bundled JAR files as a space separated list:
Class-Path: dependency1.jar dependency2.jar dependency3.jar6.2.17 Example Plugin Types
Several plugin types are provided by Adaptive Computing for use in Moab Web Services. Examples of these include the Native and vCenter plugin types.Please see the Plugin Types item in the Quick Reference menu for all bundled plugin types.A sample plugin type in Groovy would resemble the following:
package sampleimport com.adaptc.mws.plugins.*class SamplePlugin extends AbstractPlugin { static author = "Adaptive Computing" static description = "A simple plugin in groovy" static version = "0.1" INodeRMService nodeRMService public void configure() throws InvalidPluginConfigurationException { def myConfig = config // "config" is equivalent to getConfig() in groovy def errors = [] if (!myConfig.arbitraryKey) errors << "Missing arbitraryKey!" if (errors) throw new InvalidPluginConfigurationException(errors) } public void poll() { NodeReport node = new NodeReport("node1") node.resources.RES1.total = 5 node.resources.RES1.available = 5 node.state = NodeReportState.IDLE nodeRMService.save([node]) } // Access at /rest/plugins/<id>/services/example-service public def exampleService(Map params) { return [success:true] } }
6.3 MWM Resource Manager Integration
Moab Workload Manager possesses the concept of Resource Managers (RMs). While plugins can be related to RMs, they often provide greater functionality and serve more purposes than a typical RM. MWS must be represented in MWM as a RM to enable certain plugin features such as state reporting and handling RM events. This section describes the process of configuring MWM and additional details of its queries to MWS.6.3.1 Configuring MWM
Moab Workload Manager must be configured to use MWS as a resource manager. The following lines must be in the/opt/moab/etc/moab.cfg file or one of its included files:RMCFG[mws] TYPE=NATIVE RMCFG[mws] FLAGS=UserSpaceIsSeparate RMCFG[mws] CLUSTERQUERYURL=exec://$TOOLSDIR/mws/cluster.query.mws.pl RMCFG[mws] WORKLOADQUERYURL=exec://$TOOLSDIR/mws/workload.query.mws.pl RMCFG[mws] JOBCANCELURL=exec://$TOOLSDIR/mws/job.cancel.mws.pl RMCFG[mws] JOBMIGRATEURL=exec://$TOOLSDIR/mws/vm.migrate.mws.pl RMCFG[mws] JOBMODIFYURL=exec://$TOOLSDIR/mws/job.modify.mws.pl RMCFG[mws] JOBREQUEUEURL=exec://$TOOLSDIR/mws/job.requeue.mws.pl RMCFG[mws] JOBRESUMEURL=exec://$TOOLSDIR/mws/job.resume.mws.pl RMCFG[mws] JOBSTARTURL=exec://$TOOLSDIR/mws/job.start.mws.pl RMCFG[mws] JOBSUBMITURL=exec://$TOOLSDIR/mws/job.submit.mws.pl RMCFG[mws] JOBSUSPENDURL=exec://$TOOLSDIR/mws/job.suspend.mws.pl RMCFG[mws] NODEMODIFYURL=exec://$TOOLSDIR/mws/node.modify.mws.pl RMCFG[mws] NODEPOWERURL=exec://$TOOLSDIR/mws/node.power.mws.pl RMCFG[mws] RESOURCECREATEURL=exec://$TOOLSDIR/mws/resource.create.mws.pl RMCFG[mws] SYSTEMMODIFYURL=exec://$TOOLSDIR/mws/system.modify.mws.pl RMCFG[mws] SYSTEMQUERYURL=exec://$TOOLSDIR/mws/system.query.mws.pl
/opt/moab/etc/cloud.cfg. Here
are the default values:CONFIG[default] MWS_URL=http://localhost:8080/mws CONFIG[default] MWS_USERNAME=admin CONFIG[default] MWS_PASSWORD=adminpw
TheMWS_USERNAMEandMWS_PASSWORDmust match the values ofauth.defaultUser.usernameandauth.defaultUser.password, respectively, found in/opt/mws/etc/mws-config.groovy.
*.mws.pl scripts should be located in the tools/mws of the Moab home directory.
The Moab/WebServices.pm module must also be available to the scripts. All of these files
may be found in the tools/mws and lib/perl5 directories of the Moab tar file. They
are automatically installed if Moab is configured with the --with-mws flag or they can be
copied directly from there to the tools folder in your Moab home directory.To enable such actions as submitting jobs as different users, the
ENABLEPROXY=TRUE option must be present in the ADMINCFG configuration line and the
OSCREDLOOKUP option must be set to NEVER as follows:ADMINCFG[1] USERS=root ENABLEPROXY=TRUE OSCREDLOOKUP NEVER
6.3.2 RM Queries
During each iteration of Moab Workload Manager's cycle, it will query MWS through the RM interface to access current node, virtual machine, and job information. At this point, all reports are loaded from the database and consolidated into a single report of each object as explained in the Data Consolidation section.All unset, or null, values for properties on reports are ignored.In some cases it may be desired to query MWS directly for the current consolidated node, virtual machine, and job reports. This may be done using the following URLs which return data in the Wiki interface format (see the Native plugin type for more information). Note that the content type of these URLs is
plain/text,
not application/json.| query | Description |
|---|---|
| /rest/plugins/all/rm/cluster-query | Retrieves consolidated node and virtual machine reports from all plugins. All VMs will have a CONTAINERNODE attribute present. |
| /rest/plugins/<ID>/rm/cluster-query | Retrieves consolidated node and virtual machine reports for the specified plugin ID. All VMs will have a CONTAINERNODE attribute present. |
| /rest/plugins/all/rm/workload-query | Retrieves consolidated job reports from all plugins. |
| /rest/plugins/<ID>/rm/workload-query | Retrieves consolidated job reports for the specified plugin ID. |
Examples
The following example uses cURL to perform the query.$ curl -u admin:adminpw http://localhost:8080/mws/rest/plugins/all/rm/cluster-query
SC=0 RESPONSE=Success
n1.test STATE=Up;UPDATETIME=1344488025;CPROC=4;CMEMORY=8191;AMEMORY=7205;CPULOAD=0.0182;POWER=On
n2.test STATE=Up;UPDATETIME=1344488025;CPROC=4;CMEMORY=10239;AMEMORY=9227;CPULOAD=0.0233;POWER=On
n3.test STATE=Up;UPDATETIME=1344488025;CPROC=4;CMEMORY=10239;AMEMORY=9230;CPULOAD=0.019633333333333336;POWER=On
n4.test STATE=Up;UPDATETIME=1344488025;CPROC=4;CMEMORY=10239;AMEMORY=9230;CPULOAD=0.020033333333333334;POWER=On
management.test STATE=Up;UPDATETIME=1344488025;CPROC=24;CMEMORY=49150;AMEMORY=39339;CPULOAD=0.23799999999999996;POWER=On
ldapdns STATE=Up;CONTAINERNODE=management.test;UPDATETIME=1344488025;CPROC=1;CMEMORY=1024;AMEMORY=152;CPULOAD=0.0104;POWER=On6.4 Plugin Type Management
Plugin types may be managed and accessed with Moab Web Services dynamically, even while running. Operations are provided to upload (add or update) plugin types and to list or show current plugin types. The available fields that are displayed with plugin types are given in the PluginType API. For more information on how these fields are set, see the Plugin Projects and Metadata section.
Plugin Type JAR or groovy files should never be manually copied into the MWS_HOME/plugins directory.
They must be managed using the methods shown in this section or through the REST API.
6.4.1 Listing Plugin Types
To list all plugin types, browse to the MWS home page (https://servername/mws for example). Log in as the admin user,
then click Plugins and then Plugin Types.
6.4.2 Displaying Plugin Types
To show information about a plugin type, go to the Plugin Type List page and click the desired plugin type.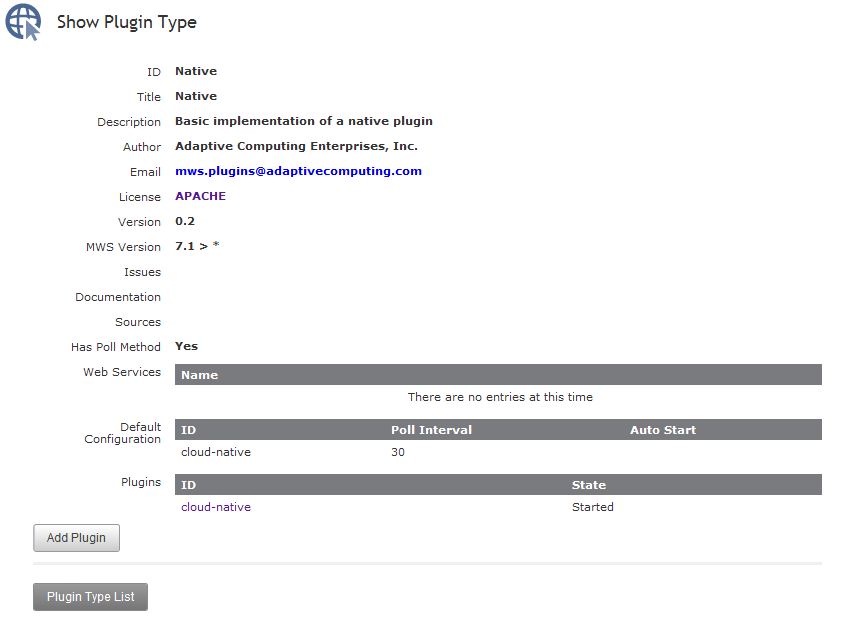
6.4.3 Add or Update Plugin Types
Plugin types can be uploaded into Moab Web Services using a Groovy file, a Java Archive (JAR) file, or pasted Groovy code. To access the plugin type upload page, navigate to the Plugin Type List page and click Add or Update Plugin Type. The default interface of this page enables the uploading of a single Groovy class file or a JAR file.When a plugin type is updated, by default all corresponding plugins created from the plugin type will be recreated. If this behavior is not desired, clear the "Do you want to reload all plugins to use this new version?" checkbox before uploading the plugin type.Single Class File
Groovy files containing a single plugin type may be uploaded at the /mws/admin/plugin-types/create URL.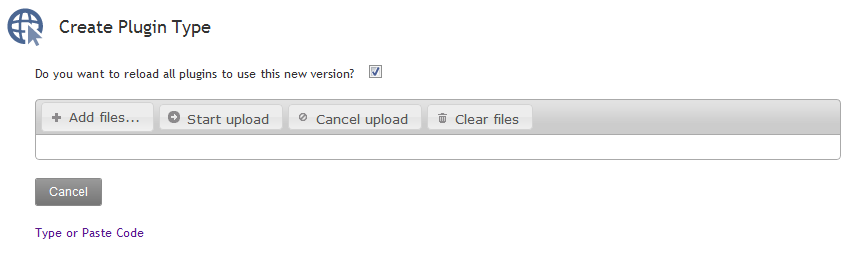 Simply click Add files..., select the
 .groovy class file, and click the Start upload button. If the plugin
type was successfully uploaded and initialized, the size of the file uploaded will be displayed along with the
name of the plugin loaded.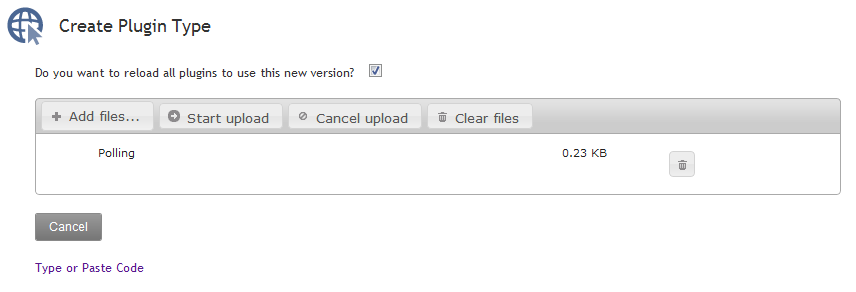 If the upload failed or an error occurred during initialization of the plugin, an error message will be displayed.
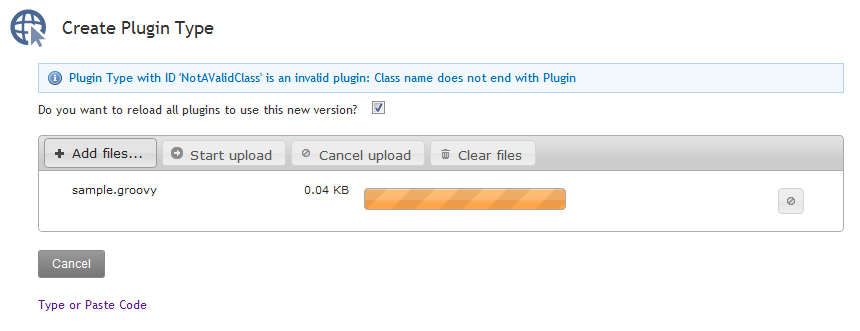
JAR File
A JAR file as described in the Packaging Plugins section containing one or more plugins may also be uploaded using the same process as the Groovy file.Click Add files..., select the.jar file, and click the Start upload button. If the upload failed or an
error occurred during initialization of the plugin(s), an error message will be displayed.The JAR upload process differs from the single file in that if successful, the name of the JAR file itself is
displayed instead of the plugin name(s).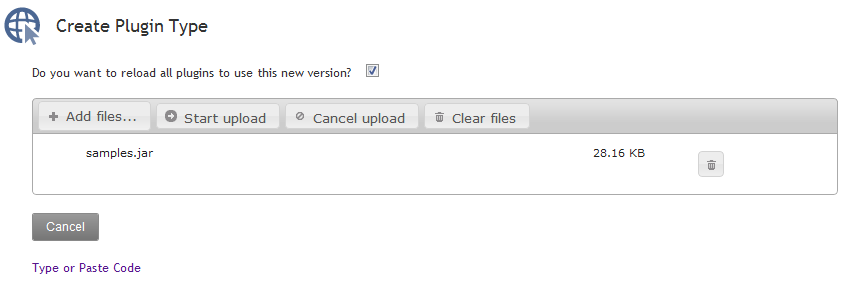
Code
To paste or type code directly into MWS and have it be loaded as a single class file, click Type or Paste Code and type or paste the code into the presented text box.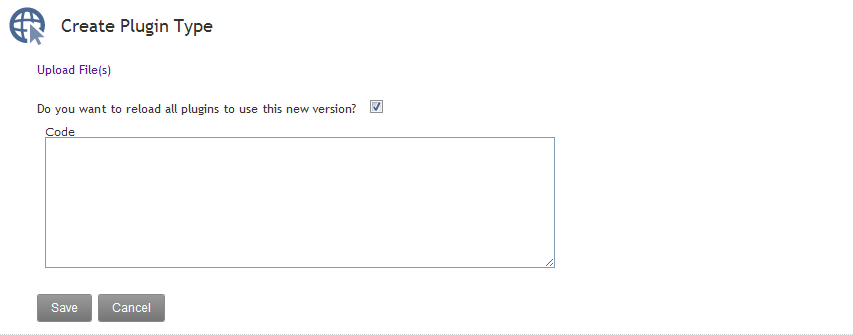
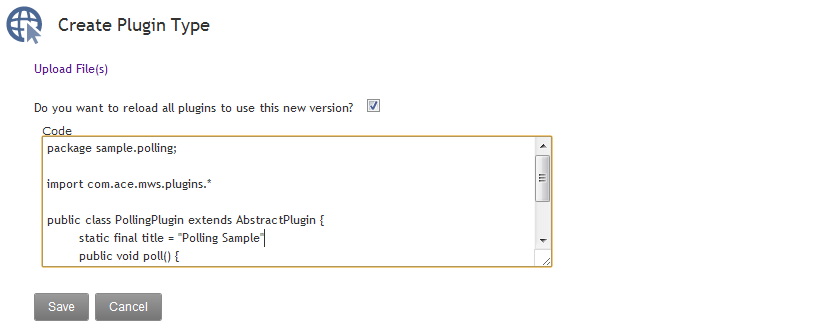 When the code is in the box, click Create. If the upload succeeded and the code was able to be compiled as Groovy,
the browser will be redirected to the Show Plugin Type page. If the upload failed or an error occurred during
compilation or initialization of the plugin, an error message will be displayed.
When the code is in the box, click Create. If the upload succeeded and the code was able to be compiled as Groovy,
the browser will be redirected to the Show Plugin Type page. If the upload failed or an error occurred during
compilation or initialization of the plugin, an error message will be displayed.The MWS log file file may need to be referred to for additional details and error messages in the case of a failure.
6.5 Plugin Management
Plugins may be managed and accessed with Moab Web Services dynamically, even while running. This includes plugin instance and lifecycle management. Additionally, default configuration values may be set for new plugins. In order to access custom web services, the REST API must be utilized as described in the Accessing Plugin Web Services section. The available fields that are displayed with plugins are given in the PluginInstance API.6.5.1 Listing Plugins
To list all plugins, browse to the MWS home page (https://servername/mws for example). Log in as the admin user,
then click Plugins and then Plugins.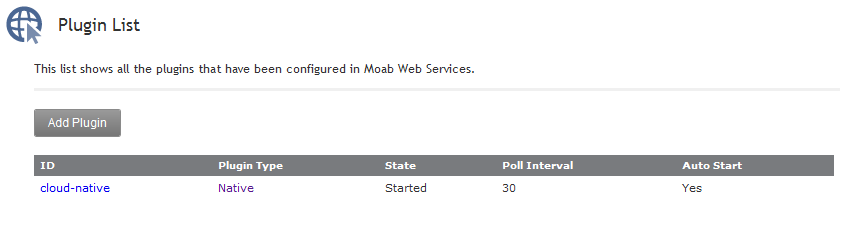
6.5.2 Creating a Plugin
To create a plugin, go to the Plugin List page and click Add Plugin. First, a Plugin Type must be selected to continue to actually create the plugin. The page is automatically built to support the
plugin type's constraints. The ID field will be automatically filled in with a suggested
value, and the Poll Interval field will be displayed only if the plugin type has a
The page is automatically built to support the
plugin type's constraints. The ID field will be automatically filled in with a suggested
value, and the Poll Interval field will be displayed only if the plugin type has a poll method. The required
configuration fields are displayed by default, and optional fields may be selected and added to the configuration
from the drop down at the top of the configuration section. See the PluginInstance API
for more information on the fields.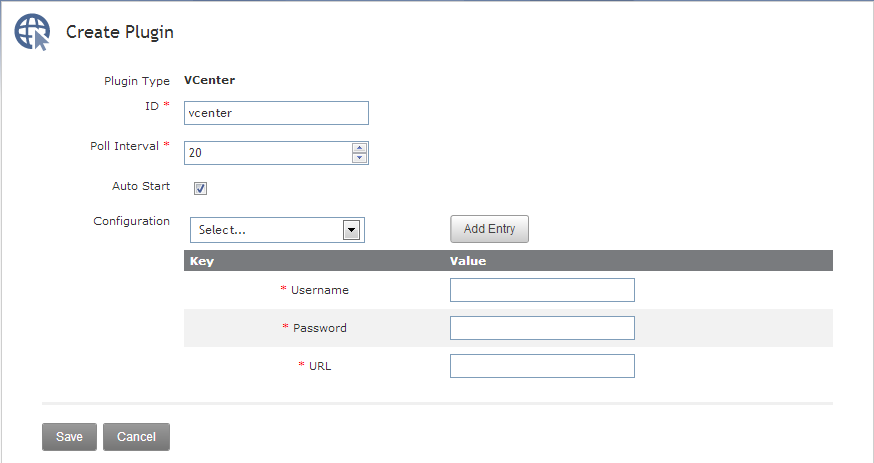
6.5.3 Displaying a Plugin
To show information about a plugin, go to the Plugin List page and click the desired plugin ID.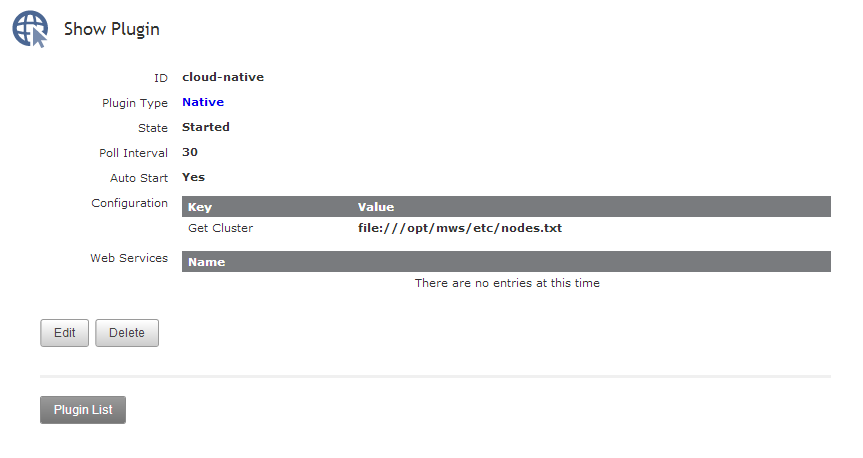
6.5.4 Modifying a Plugin
To modify a plugin, go to the Plugin List page, click the desired plugin ID, and then click Edit. See the PluginInstance API for more information on available fields.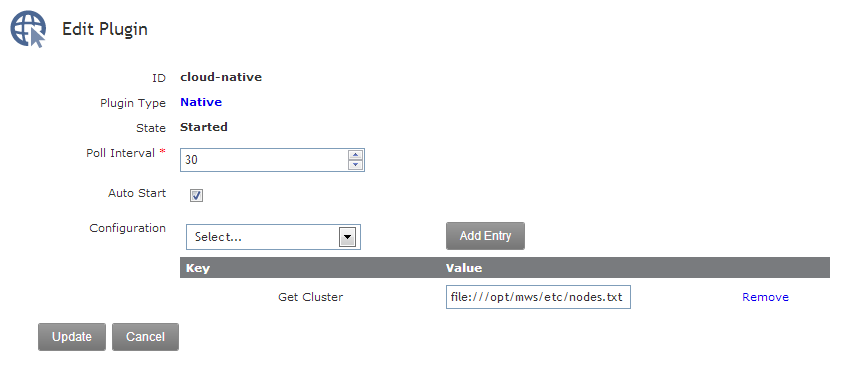
6.5.5 Deleting a Plugin
To delete a plugin, go to the Plugin List page, click the desired plugin ID, and then click Delete. A confirmation message is shown. If the OK button is clicked, the plugin is deleted from the system and cannot be recovered, including all configuration.6.5.6 Monitoring and Lifecycle Controls
To monitor and control the lifecycle of plugins, browse to the MWS home page (https://servername/mws for example).
Log in as the admin user, then click Plugins and then Plugin Monitoring. This page displays the current state
of all plugins as well as their polling status.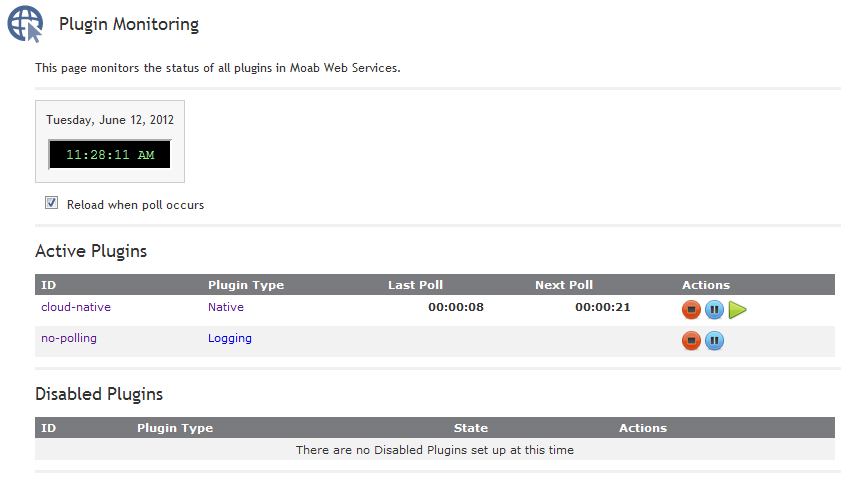
If plugins are created from plugin types which do not have a poll method, their lifecycle controls will
be limited. Any information below which mentions polling does not apply to the 'no-polling' plugin shown
in the screenshots.
Active Plugins
Active plugins are those which are in the Started or Paused states. These are available to receive events such as polling. If paused, a plugin will not receive events but is not actually stopped, therefore no stop events are triggered.The following images demonstrate the status of plugins in the active states. Started plugins which can include the relative time of the last poll as well as the time of the next poll in
a countdown format. Action buttons are available to stop or pause the plugin as well as trigger an immediate
poll event.
Started plugins which can include the relative time of the last poll as well as the time of the next poll in
a countdown format. Action buttons are available to stop or pause the plugin as well as trigger an immediate
poll event. Paused plugins which can include only the last polling time. Action buttons are available to stop or resume
the plugin, as well as trigger an immediate poll event.
Paused plugins which can include only the last polling time. Action buttons are available to stop or resume
the plugin, as well as trigger an immediate poll event.Disabled Plugins
Disabled plugins are those which are in the Stopped or Errored states. These plugins do not receive events such as polling. If errored, a plugin may either be stopped, which represents a "clearing" of the error, or started normally. However, if no action is taken on an errored plugin, it likely will not start due to the fact that most plugins are put into the errored state during startup of the plugin.The following images demonstrate the representation of plugins in the disabled states. Stopped plugins. A single action button is available to attempt to start the plugin.
 An errored plugin. As mentioned previously, action buttons are available to stop the plugin or clear the
error as well as attempt to start the plugin. If the start fails, an error message will be displayed.
An errored plugin. As mentioned previously, action buttons are available to stop the plugin or clear the
error as well as attempt to start the plugin. If the start fails, an error message will be displayed.
6.5.7 Setting Default Plugin Configuration
Configuration of default values for plugin configuration parameters involves setting fields in the MWS configuration file. These values are used if no values are provided when creating a new plugin. Additionally, the default values will be displayed to the user on the Create Plugin page.The parameters to configure are documented on the MWS Configuration page and comprise most values starting withplugins.